


This browser is too old to run Achievable.

Update it, or open this page in a current version of Chrome, Safari, Firefox or Edge. On an iPhone or iPad, update iOS: every browser there runs on the version of Safari that comes with it.

Achievable logoAchievable logo
NPTE-PTA
Sign in
Sign up
Purchase
Textbook
Practice exams
Support
How it works
Resources
Exam catalog
Mountain with a flag at the peak
Textbook
Introduction
1. Cardiovascular system
2. Pulmonary system
3. Neuromuscular system
4. Pediatrics
5. Musculoskeletal system
5.1 Anatomy of musculoskeletal system
5.2 Anatomical terminology and exercise training principles
5.3 Joint mechanics and phases of healing
5.4 Upper extremity anatomy
5.5 Special tests of upper extremity
5.6 Comparing clinical presentation and interventions for upper extremity
5.7 Lower extremity anatomy
5.8 Special tests of lower extremity
5.9 Comparing clinical presentation and interventions for lower extremity
5.10 Spine and pelvis anatomy
5.11 Special tests of the spine, pelvis, and temporomandibular joint
5.12 Comparing clinical presentation and interventions for the spine, pelvis, and temporomandibular joint
5.13 Other musculoskeletal conditions
5.14 Gait
5.15 Prosthetics
5.16 Orthotics
5.17 Medications, imaging, and fractures
5.18 Surgical protocols
6. Other systems
7. Non-systems
Wrapping up
Achievable logoAchievable logo
5.3 Joint mechanics and phases of healing
Achievable NPTE-PTA
5. Musculoskeletal system
Our NPTE-PTA course is now in "early access" - get 50% off for a limited time.

Joint mechanics and phases of healing

9 min read
Font
Discuss
Share
Feedback

Osteokinematics and arthrokinematics

Definitions
Osteokinematics
Movement between two bones (flexion/extension, IR/ER).
Arthrokinematics
Movement of joint surfaces, such as roll, glide, spin - such movements are used to improve the range of motion.
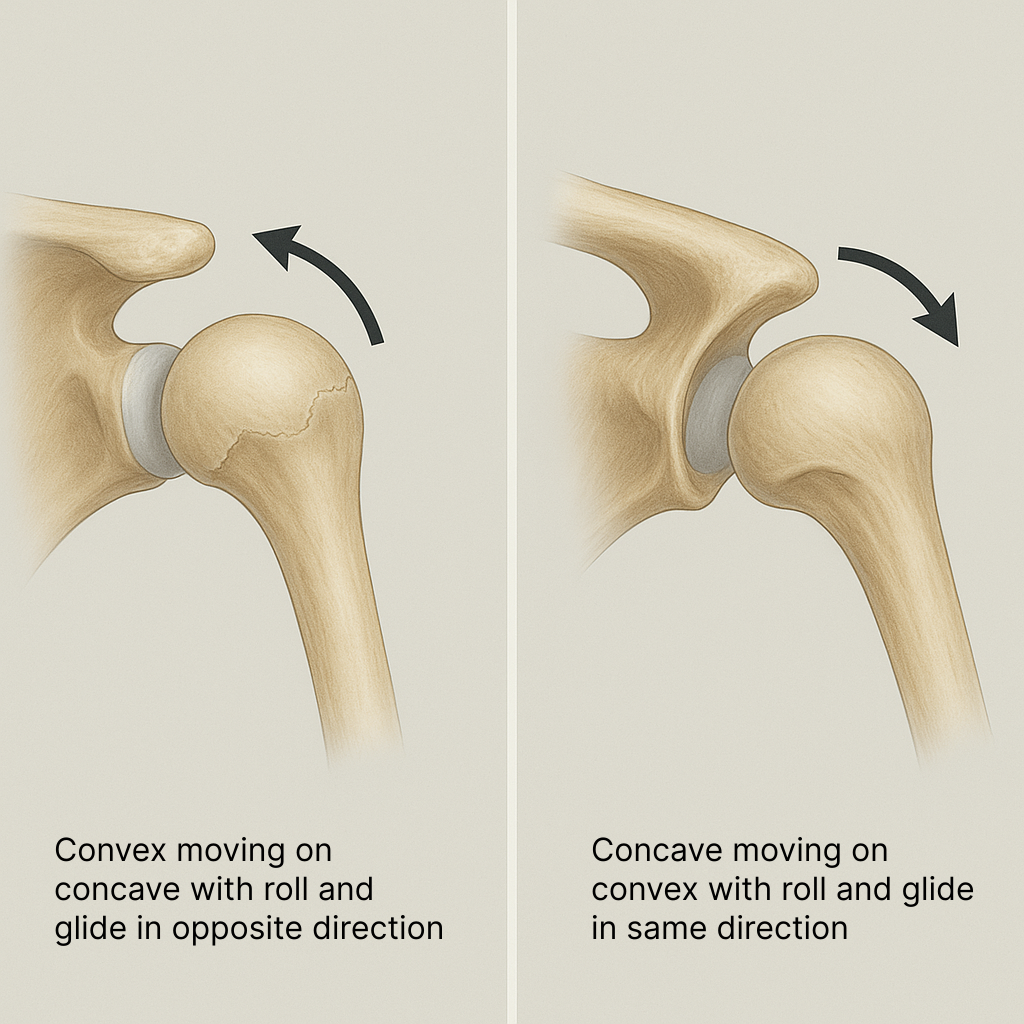
Rule of convex surface moving on a fixed concave surface
The convex surface glides in the direction opposite to the direction the bone shaft moves (roll and glide occur in opposite directions).
Rule of the concave surface moving on a fixed convex surface
The concave surface glides in the same direction the bone shaft moves (roll and glide occur in the same direction).
Convex/concave
Convex/concave
Achievable

Shoulder (convex on concave rule)

Example: Finding the glide direction for shoulder abduction

The humeral head is convex and the glenoid fossa is concave, so the convex-on-concave rule applies: the humeral head must glide opposite to the direction the humeral shaft moves.

During abduction, the shaft of the humerus moves superiorly. Applying the rule, the humeral head rolls superior and glides inferior - the opposite direction.

Answer: abduction = roll superior, glide inferior

  • Flexion: Roll anterior, slide posterior
  • Horizontal adduction: Roll anterior, slide posterior
  • Internal rotation: Roll anterior, slide posterior
  • Extension: Roll posterior, slide anterior
  • Horizontal abduction: Roll posterior, slide anterior
  • External rotation: Roll posterior, slide anterior

Elbow (concave on convex rule)

  • Flexion: Roll anterior, slide anterior
  • Extension: Roll posterior, slide posterior

Wrist (convex on concave rule)

  • Flexion: Roll anterior, slide posterior
  • Extension: Roll posterior, slide anterior
  • Radial deviation: Roll radial, slide ulnar
  • Ulnar deviation: Roll ulnar, slide radial

Hip (convex on concave rule)

  • Flexion: Roll anterior, slide posterior
  • Extension: Roll posterior, slide anterior
  • Adduction: Roll inferior, slide superior
  • Abduction: Roll superior, slide inferior
  • Internal rotation: Roll medial, slide posterior
  • External rotation: Roll lateral, slide anterior

Knee (concave on convex rule)

  • Flexion: Roll posterior, slide posterior
  • Extension: Roll anterior, slide anterior

Ankle (convex on concave rule)

  • Dorsiflexion: Roll anterior, slide posterior
  • Plantarflexion: Roll posterior, slide anterior
  • Supination/Inversion: Roll medial, slide lateral
  • Pronation/Eversion: Roll lateral, slide medial

Joint mobilization

Joint mobilization is a manual therapy technique that involves moving a joint passively to improve its range of motion and reduce pain. Mobilization is applied as a glide: the therapist moves the joint surface in the glide (slide) direction shown in bold above for the motion being restored - for example, an anterior glide of the humeral head to improve shoulder external rotation.

Indications for joint mobilization

  • Pain
  • Muscle spasm
  • Joint hypomobility
  • Functional limitation at joint ROM

Precautions for joint mobilization

  • Malignancy
  • Bone disease
  • Unhealed fracture
  • Excessive pain
  • Systemic connective tissue disease (e.g., rheumatoid arthritis)
  • Total joint replacement
  • Individuals on anticoagulants

Contraindications for mobilization

  • Joint hypermobility
    • Ehlers-Danlos syndrome is a group of inherited disorders, caused by gene variations that affect collagen, marked by extremely loose joints (joint hypermobility)
  • Joint effusion
  • Inflammation

Gentle grade I-II oscillations may still be used for pain relief even when grade III-IV stretching mobilization is contraindicated.

The grades of joint mobilization (Maitland approach)

  • Grade I - small amplitude movement at the beginning of the joint’s range of motion
    • Typically used in acute phases for pain management
  • Grade II - large amplitude movement within the joint’s range, not reaching the limit
    • Typically used, like Grade I, to manage pain
  • Grade III - large amplitude movement reaching the limit of the joint’s range
    • Typically used in sub-acute phases for return of range of motion
  • Grade IV - small amplitude movement at the end of the joint’s range
    • Used to increase tissue extensibility, reduce stiffness, and improve range of motion

Joint positions

Joint position or mechanics are ways to define the joint’s level of stability. An open position (also called loose-packed position or resting position) refers to a joint position where the articulating surfaces have minimal contact, ligaments are relaxed, and the joint has the least stability. A closed position (also called a close-packed position) is when the joint surfaces are fully congruent, ligaments are maximally taut, and the joint is at its most stable position. The open positions are those in which joint mobilizations will occur.

Resting and closed positions

  • Sternoclavicular
    • Resting position: arm resting at the side
    • Closed position: arm maximally elevated
  • Acromioclavicular
    • Resting position: arm resting at the side
    • Closed position: arm abducted to 90 degrees
  • Glenohumeral
    • Resting position: 40-55 degrees abduction; 30 degrees of horizontal adduction
    • Closed position: maximum abduction and external rotation
  • Humeroulnar (elbow)
    • Resting position: 70 degrees flexion, 10 degrees supination
    • Closed position: full extension and supination
  • Humeroradial (elbow)
    • Resting position: full extension and supination
    • Closed position: 90 degrees flexion and 5 degrees supination
  • Proximal radioulnar (forearm)
    • Resting position: 70 degrees flexion and 35 degrees supination
    • Closed position: 5 degrees of supination
  • Distal radioulnar (forearm)
    • Resting position: 10 degrees of supination
    • Closed position: 5 degrees of supination
  • Radio/ulnarcarpal
    • Resting position: neutral with slight ulnar deviation
    • Closed position: full extension with radial deviation
  • Hip
    • Resting position: 30 degrees flexion, 30 degrees abduction, and slight lateral rotation
    • Closed position: full extension, abduction, and internal rotation
  • Knee
    • Resting position: 25-degree flexion
    • Closed position: full extension and external rotation
  • Talocrural (ankle/foot)
    • Resting position: mid inversion/eversion and 10 degrees plantar flexion
    • Closed position: full dorsiflexion
  • Subtalar (ankle/foot)
    • Resting position: midway between inversion and eversion
    • Closed position: full inversion
  • Midtarsal (ankle/foot)
    • Resting position: midway between inversion and eversion
    • Closed position: full supination
  • Tarsometatarsal (ankle/foot)
    • Resting position: midway between supination/pronation
    • Closed position: full supination

Capsular patterns

A capsular pattern is a predictable pattern of pain and limited motion seen in a synovial joint with a joint capsule when that capsule is tight or inflamed.

Below are capsular patterns of joints

  • Glenohumeral
    • External rotation, abduction, internal rotation
  • Sternoclavicular
    • Shoulder elevation
  • Acromioclavicular
    • Shoulder elevation
  • Humeroulnar
    • Flexion, extension
  • Humeroradial
    • Flexion, extension
  • Proximal radioulnar
    • Pronation, supination
  • Distal radioulnar
    • Pronation, supination
  • Wrist
    • Flexion, extension
  • Hip
    • Flexion, internal rotation, abduction
  • Knee
    • Flexion > extension
  • Talocrural (ankle)
    • Plantarflexion > dorsiflexion
  • Subtalar
    • Limited inversion (varus)
  • Tibiofibular (proximal and distal)
    • No true capsular pattern; pain when the joint is stressed

End feels of joints

End feel refers to the sensation a clinician feels at the limit of a joint’s passive range of motion, which helps determine whether the joint is moving normally or whether there’s an abnormality such as inflammation, ligament damage, or stiffness.

Below are the characteristics of normal end feels

  • Soft end feel:
    • Occurs when soft tissues, such as muscles, meet, often felt as a cushioned sensation (example: knee flexion)
  • Firm end feel:
    • A more defined resistance, usually due to the tension of ligaments or joint capsule at the end of range (example: wrist flexion)
  • Hard end feel (bony):
    • A sudden, abrupt stop to movement, typically caused by bone-on-bone contact (example: elbow extension)

Pathological end feels are those indicating there has been injury to the joint, tendon, or muscle.

Pathological end feels that may be present

  • Springy block
    • A rebounding sensation is often associated with internal joint derangements, like a torn meniscus
  • Empty end feel:
    • Significant pain experienced before reaching the end of the range of motion, usually indicating acute inflammation
  • Boggy or soft end feel
    • A “mushy” sensation due to joint effusion or edema, typically seen in acute injuries
  • Hard end feel (bony)
    • A bony block occurring earlier than the expected end of range (or at a joint that normally has a soft or firm end feel), typically from osteophytes in osteoarthritis
  • Muscle spasm end feel
    • Sudden, sharp resistance due to muscle guarding, causing pain and limiting movement

Phases of healing and types of musculoskeletal interventions

Tissue healing occurs in three phases: 1. Acute or inflammatory phase, 2. Subacute or proliferative phase, and 3. Chronic or maturation/remodeling phase.

The acute phase refers to the initial inflammatory stage following an injury, characterized by pain, swelling, and redness. The acute phase typically lasts for 3-7 days.

The subacute phase is the subsequent repair stage where new tissue begins to grow, and the body starts to rebuild damaged structures, usually occurring a few days after the initial injury and lasting several weeks.

The chronic or maturation/remodeling phase is a normal part of healing, not a sign that healing has stalled. It begins around week 3 and can continue for 12 months or more, as collagen matures and realigns along the lines of stress and tensile strength increases.

Chronic inflammation is different from the chronic healing phase. It’s a persistent inflammatory response that delays healing, for example from repeated microtrauma.

Interventions in each phase

PTA role: The supervising PT establishes and modifies the plan of care. As the PTA, you carry out the plan within each phase and report changes in the patient’s status back to the PT rather than independently re-evaluating or changing the intervention plan.

Stop or reduce the intervention and notify the PT if you see:

  • Pain lasting more than 24 hours after treatment
  • New or increased joint swelling or effusion
  • Increased warmth at the joint
  • Loss of range of motion compared to baseline

Acute phase

  • Pain management
  • Maitland mobilizations - grade I or II
  • Joint protection to prevent further injury
  • Edema management
  • Therapeutic exercise: PROM/AAROM and gentle muscle-setting (isometric) exercise in pain-free range; no resistance training yet
  • Stretching is contraindicated

Subacute phase

  • Avoid overuse pain, as resting pain should be at a minimum
  • Stretching is initiated to aid in restoring the full range of motion
  • Endurance training will begin
  • Resistance training will begin
  • Postural and biomechanical education

Chronic or remodeling phase

  • Recognize signs that the tissue has not progressed (persistent inflammation, pain at rest) and report them to the supervising PT, who adjusts the plan
  • Emphasize postural and biomechanical strengthening
  • Improve flexibility and joint alignment

Osteokinematics vs. arthrokinematics

  • Osteokinematics: bone-on-bone motion (flexion/extension, IR/ER)
  • Arthrokinematics: joint surface motion (roll, glide, spin) used to improve ROM
  • Convex-on-concave: glide opposite to bone shaft movement
  • Concave-on-convex: glide same direction as bone shaft movement
  • Joint-specific roll/glide directions follow these rules (e.g., shoulder = convex/concave; elbow & knee = concave/convex; wrist, hip, ankle = convex/concave)

Joint mobilization

  • Manual technique to passively move joints, improve ROM, reduce pain
  • Indications: pain, spasm, hypomobility, functional ROM limits
  • Precautions: malignancy, bone disease, unhealed fracture, connective tissue disease, joint replacement, anticoagulant use
  • Contraindications: hypermobility, effusion, inflammation (though grade I-II oscillations still okay for pain relief)
  • Maitland grades:
    • Grade I/II: small/large amplitude within range, not to limit — pain control (acute)
    • Grade III/IV: large/small amplitude to end range — restore ROM, reduce stiffness (sub-acute+)

Joint positions

  • Open/loose-packed position: minimal surface contact, lax ligaments, least stable — used for mobilizations
  • Closed/close-packed position: max congruency, taut ligaments, most stable
  • Key examples: glenohumeral resting = 40-55° abduction; closed = max abduction/ER; knee resting = 25° flexion, closed = full extension/ER; hip resting = 30° flexion/abduction/slight lateral rotation, closed = full extension/abduction/IR

Capsular patterns

  • Predictable pain/restriction pattern when joint capsule is tight/inflamed
  • Glenohumeral: ER, abduction, IR limited (in that order)
  • Hip: flexion, IR, abduction most limited
  • Knee: flexion > extension; ankle (talocrural): plantarflexion > dorsiflexion
  • Tibiofibular joints: no true capsular pattern, pain only with stress

End feels

  • Normal: soft (tissue approximation, e.g., knee flexion), firm (ligament/capsule tension, e.g., wrist flexion), hard/bony (bone-on-bone, e.g., elbow extension)
  • Pathological: springy block (meniscus tear), empty (pain before limit, acute inflammation), boggy (effusion/edema), early hard/bony block (osteophytes), muscle spasm (sharp guarding response)
  • Pathological end feels signal joint/tendon/muscle injury

Phases of healing & interventions

  • Acute/inflammatory (3-7 days): pain/edema management, grade I-II mobilizations, PROM/AAROM, gentle isometrics; no stretching or resistance yet
  • Subacute/proliferative (weeks): begin stretching, resistance and endurance training, postural/biomechanical education
  • Chronic/remodeling (from ~week 3, up to 12+ months): collagen matures/realigns; focus on postural/biomechanical strengthening and flexibility
  • Chronic inflammation ≠ normal remodeling — indicates delayed healing
  • PTA role: implement PT’s plan, monitor for warning signs (pain >24 hrs, increased swelling/warmth, ROM loss) and report back rather than independently adjusting treatment

Sign up for free to take 13 quiz questions on this topic

Previous
Next  | 5.4 Upper extremity anatomy
All rights reserved ©2016 - 2026 Achievable, Inc.

Joint mechanics and phases of healing

Osteokinematics and arthrokinematics

Definitions
Osteokinematics
Movement between two bones (flexion/extension, IR/ER).
Arthrokinematics
Movement of joint surfaces, such as roll, glide, spin - such movements are used to improve the range of motion.
Rule of convex surface moving on a fixed concave surface
The convex surface glides in the direction opposite to the direction the bone shaft moves (roll and glide occur in opposite directions).
Rule of the concave surface moving on a fixed convex surface
The concave surface glides in the same direction the bone shaft moves (roll and glide occur in the same direction).

Shoulder (convex on concave rule)

Example: Finding the glide direction for shoulder abduction

The humeral head is convex and the glenoid fossa is concave, so the convex-on-concave rule applies: the humeral head must glide opposite to the direction the humeral shaft moves.

During abduction, the shaft of the humerus moves superiorly. Applying the rule, the humeral head rolls superior and glides inferior - the opposite direction.

Answer: abduction = roll superior, glide inferior

  • Flexion: Roll anterior, slide posterior
  • Horizontal adduction: Roll anterior, slide posterior
  • Internal rotation: Roll anterior, slide posterior
  • Extension: Roll posterior, slide anterior
  • Horizontal abduction: Roll posterior, slide anterior
  • External rotation: Roll posterior, slide anterior

Elbow (concave on convex rule)

  • Flexion: Roll anterior, slide anterior
  • Extension: Roll posterior, slide posterior

Wrist (convex on concave rule)

  • Flexion: Roll anterior, slide posterior
  • Extension: Roll posterior, slide anterior
  • Radial deviation: Roll radial, slide ulnar
  • Ulnar deviation: Roll ulnar, slide radial

Hip (convex on concave rule)

  • Flexion: Roll anterior, slide posterior
  • Extension: Roll posterior, slide anterior
  • Adduction: Roll inferior, slide superior
  • Abduction: Roll superior, slide inferior
  • Internal rotation: Roll medial, slide posterior
  • External rotation: Roll lateral, slide anterior

Knee (concave on convex rule)

  • Flexion: Roll posterior, slide posterior
  • Extension: Roll anterior, slide anterior

Ankle (convex on concave rule)

  • Dorsiflexion: Roll anterior, slide posterior
  • Plantarflexion: Roll posterior, slide anterior
  • Supination/Inversion: Roll medial, slide lateral
  • Pronation/Eversion: Roll lateral, slide medial

Joint mobilization

Joint mobilization is a manual therapy technique that involves moving a joint passively to improve its range of motion and reduce pain. Mobilization is applied as a glide: the therapist moves the joint surface in the glide (slide) direction shown in bold above for the motion being restored - for example, an anterior glide of the humeral head to improve shoulder external rotation.

Indications for joint mobilization

  • Pain
  • Muscle spasm
  • Joint hypomobility
  • Functional limitation at joint ROM

Precautions for joint mobilization

  • Malignancy
  • Bone disease
  • Unhealed fracture
  • Excessive pain
  • Systemic connective tissue disease (e.g., rheumatoid arthritis)
  • Total joint replacement
  • Individuals on anticoagulants

Contraindications for mobilization

  • Joint hypermobility
    • Ehlers-Danlos syndrome is a group of inherited disorders, caused by gene variations that affect collagen, marked by extremely loose joints (joint hypermobility)
  • Joint effusion
  • Inflammation

Gentle grade I-II oscillations may still be used for pain relief even when grade III-IV stretching mobilization is contraindicated.

The grades of joint mobilization (Maitland approach)

  • Grade I - small amplitude movement at the beginning of the joint’s range of motion
    • Typically used in acute phases for pain management
  • Grade II - large amplitude movement within the joint’s range, not reaching the limit
    • Typically used, like Grade I, to manage pain
  • Grade III - large amplitude movement reaching the limit of the joint’s range
    • Typically used in sub-acute phases for return of range of motion
  • Grade IV - small amplitude movement at the end of the joint’s range
    • Used to increase tissue extensibility, reduce stiffness, and improve range of motion

Joint positions

Joint position or mechanics are ways to define the joint’s level of stability. An open position (also called loose-packed position or resting position) refers to a joint position where the articulating surfaces have minimal contact, ligaments are relaxed, and the joint has the least stability. A closed position (also called a close-packed position) is when the joint surfaces are fully congruent, ligaments are maximally taut, and the joint is at its most stable position. The open positions are those in which joint mobilizations will occur.

Resting and closed positions

  • Sternoclavicular
    • Resting position: arm resting at the side
    • Closed position: arm maximally elevated
  • Acromioclavicular
    • Resting position: arm resting at the side
    • Closed position: arm abducted to 90 degrees
  • Glenohumeral
    • Resting position: 40-55 degrees abduction; 30 degrees of horizontal adduction
    • Closed position: maximum abduction and external rotation
  • Humeroulnar (elbow)
    • Resting position: 70 degrees flexion, 10 degrees supination
    • Closed position: full extension and supination
  • Humeroradial (elbow)
    • Resting position: full extension and supination
    • Closed position: 90 degrees flexion and 5 degrees supination
  • Proximal radioulnar (forearm)
    • Resting position: 70 degrees flexion and 35 degrees supination
    • Closed position: 5 degrees of supination
  • Distal radioulnar (forearm)
    • Resting position: 10 degrees of supination
    • Closed position: 5 degrees of supination
  • Radio/ulnarcarpal
    • Resting position: neutral with slight ulnar deviation
    • Closed position: full extension with radial deviation
  • Hip
    • Resting position: 30 degrees flexion, 30 degrees abduction, and slight lateral rotation
    • Closed position: full extension, abduction, and internal rotation
  • Knee
    • Resting position: 25-degree flexion
    • Closed position: full extension and external rotation
  • Talocrural (ankle/foot)
    • Resting position: mid inversion/eversion and 10 degrees plantar flexion
    • Closed position: full dorsiflexion
  • Subtalar (ankle/foot)
    • Resting position: midway between inversion and eversion
    • Closed position: full inversion
  • Midtarsal (ankle/foot)
    • Resting position: midway between inversion and eversion
    • Closed position: full supination
  • Tarsometatarsal (ankle/foot)
    • Resting position: midway between supination/pronation
    • Closed position: full supination

Capsular patterns

A capsular pattern is a predictable pattern of pain and limited motion seen in a synovial joint with a joint capsule when that capsule is tight or inflamed.

Below are capsular patterns of joints

  • Glenohumeral
    • External rotation, abduction, internal rotation
  • Sternoclavicular
    • Shoulder elevation
  • Acromioclavicular
    • Shoulder elevation
  • Humeroulnar
    • Flexion, extension
  • Humeroradial
    • Flexion, extension
  • Proximal radioulnar
    • Pronation, supination
  • Distal radioulnar
    • Pronation, supination
  • Wrist
    • Flexion, extension
  • Hip
    • Flexion, internal rotation, abduction
  • Knee
    • Flexion > extension
  • Talocrural (ankle)
    • Plantarflexion > dorsiflexion
  • Subtalar
    • Limited inversion (varus)
  • Tibiofibular (proximal and distal)
    • No true capsular pattern; pain when the joint is stressed

End feels of joints

End feel refers to the sensation a clinician feels at the limit of a joint’s passive range of motion, which helps determine whether the joint is moving normally or whether there’s an abnormality such as inflammation, ligament damage, or stiffness.

Below are the characteristics of normal end feels

  • Soft end feel:
    • Occurs when soft tissues, such as muscles, meet, often felt as a cushioned sensation (example: knee flexion)
  • Firm end feel:
    • A more defined resistance, usually due to the tension of ligaments or joint capsule at the end of range (example: wrist flexion)
  • Hard end feel (bony):
    • A sudden, abrupt stop to movement, typically caused by bone-on-bone contact (example: elbow extension)

Pathological end feels are those indicating there has been injury to the joint, tendon, or muscle.

Pathological end feels that may be present

  • Springy block
    • A rebounding sensation is often associated with internal joint derangements, like a torn meniscus
  • Empty end feel:
    • Significant pain experienced before reaching the end of the range of motion, usually indicating acute inflammation
  • Boggy or soft end feel
    • A “mushy” sensation due to joint effusion or edema, typically seen in acute injuries
  • Hard end feel (bony)
    • A bony block occurring earlier than the expected end of range (or at a joint that normally has a soft or firm end feel), typically from osteophytes in osteoarthritis
  • Muscle spasm end feel
    • Sudden, sharp resistance due to muscle guarding, causing pain and limiting movement

Phases of healing and types of musculoskeletal interventions

Tissue healing occurs in three phases: 1. Acute or inflammatory phase, 2. Subacute or proliferative phase, and 3. Chronic or maturation/remodeling phase.

The acute phase refers to the initial inflammatory stage following an injury, characterized by pain, swelling, and redness. The acute phase typically lasts for 3-7 days.

The subacute phase is the subsequent repair stage where new tissue begins to grow, and the body starts to rebuild damaged structures, usually occurring a few days after the initial injury and lasting several weeks.

The chronic or maturation/remodeling phase is a normal part of healing, not a sign that healing has stalled. It begins around week 3 and can continue for 12 months or more, as collagen matures and realigns along the lines of stress and tensile strength increases.

Chronic inflammation is different from the chronic healing phase. It’s a persistent inflammatory response that delays healing, for example from repeated microtrauma.

Interventions in each phase

PTA role: The supervising PT establishes and modifies the plan of care. As the PTA, you carry out the plan within each phase and report changes in the patient’s status back to the PT rather than independently re-evaluating or changing the intervention plan.

Stop or reduce the intervention and notify the PT if you see:

  • Pain lasting more than 24 hours after treatment
  • New or increased joint swelling or effusion
  • Increased warmth at the joint
  • Loss of range of motion compared to baseline

Acute phase

  • Pain management
  • Maitland mobilizations - grade I or II
  • Joint protection to prevent further injury
  • Edema management
  • Therapeutic exercise: PROM/AAROM and gentle muscle-setting (isometric) exercise in pain-free range; no resistance training yet
  • Stretching is contraindicated

Subacute phase

  • Avoid overuse pain, as resting pain should be at a minimum
  • Stretching is initiated to aid in restoring the full range of motion
  • Endurance training will begin
  • Resistance training will begin
  • Postural and biomechanical education

Chronic or remodeling phase

  • Recognize signs that the tissue has not progressed (persistent inflammation, pain at rest) and report them to the supervising PT, who adjusts the plan
  • Emphasize postural and biomechanical strengthening
  • Improve flexibility and joint alignment
Key points

Osteokinematics vs. arthrokinematics

  • Osteokinematics: bone-on-bone motion (flexion/extension, IR/ER)
  • Arthrokinematics: joint surface motion (roll, glide, spin) used to improve ROM
  • Convex-on-concave: glide opposite to bone shaft movement
  • Concave-on-convex: glide same direction as bone shaft movement
  • Joint-specific roll/glide directions follow these rules (e.g., shoulder = convex/concave; elbow & knee = concave/convex; wrist, hip, ankle = convex/concave)

Joint mobilization

  • Manual technique to passively move joints, improve ROM, reduce pain
  • Indications: pain, spasm, hypomobility, functional ROM limits
  • Precautions: malignancy, bone disease, unhealed fracture, connective tissue disease, joint replacement, anticoagulant use
  • Contraindications: hypermobility, effusion, inflammation (though grade I-II oscillations still okay for pain relief)
  • Maitland grades:
    • Grade I/II: small/large amplitude within range, not to limit — pain control (acute)
    • Grade III/IV: large/small amplitude to end range — restore ROM, reduce stiffness (sub-acute+)

Joint positions

  • Open/loose-packed position: minimal surface contact, lax ligaments, least stable — used for mobilizations
  • Closed/close-packed position: max congruency, taut ligaments, most stable
  • Key examples: glenohumeral resting = 40-55° abduction; closed = max abduction/ER; knee resting = 25° flexion, closed = full extension/ER; hip resting = 30° flexion/abduction/slight lateral rotation, closed = full extension/abduction/IR

Capsular patterns

  • Predictable pain/restriction pattern when joint capsule is tight/inflamed
  • Glenohumeral: ER, abduction, IR limited (in that order)
  • Hip: flexion, IR, abduction most limited
  • Knee: flexion > extension; ankle (talocrural): plantarflexion > dorsiflexion
  • Tibiofibular joints: no true capsular pattern, pain only with stress

End feels

  • Normal: soft (tissue approximation, e.g., knee flexion), firm (ligament/capsule tension, e.g., wrist flexion), hard/bony (bone-on-bone, e.g., elbow extension)
  • Pathological: springy block (meniscus tear), empty (pain before limit, acute inflammation), boggy (effusion/edema), early hard/bony block (osteophytes), muscle spasm (sharp guarding response)
  • Pathological end feels signal joint/tendon/muscle injury

Phases of healing & interventions

  • Acute/inflammatory (3-7 days): pain/edema management, grade I-II mobilizations, PROM/AAROM, gentle isometrics; no stretching or resistance yet
  • Subacute/proliferative (weeks): begin stretching, resistance and endurance training, postural/biomechanical education
  • Chronic/remodeling (from ~week 3, up to 12+ months): collagen matures/realigns; focus on postural/biomechanical strengthening and flexibility
  • Chronic inflammation ≠ normal remodeling — indicates delayed healing
  • PTA role: implement PT’s plan, monitor for warning signs (pain >24 hrs, increased swelling/warmth, ROM loss) and report back rather than independently adjusting treatment

More from Musculoskeletal system

  • Anatomy of musculoskeletal system
  • Anatomical terminology and exercise training principles
  • Upper extremity anatomy
  • Lower extremity anatomy
  • Spine and pelvis anatomy