


Achievable logoAchievable logo
NCLEX
Sign in
Sign up
Purchase
Textbook
Practice exams
Support
How it works
Exam catalog
Mountain with a flag at the peak
Textbook
Introduction
1. Safe and effective care environment
2. Health promotion and maintenance
3. Psychosocial Integrity
4. Physiological Integrity
4.1 Basic care and comfort
4.1.1 Assistive devices and mobility aids
4.1.2 Comfort measures
4.1.3 Nutrition and hydration support
4.1.4 Elimination support
4.1.5 Rest, sleep, and pain management
4.1.6 Non-pharmacological therapies
4.2 Pharmacological and parenteral therapies
4.3 Reduction of risk potential
4.4 Physiological adaptation
Wrapping up
Achievable logoAchievable logo
4.1.1 Assistive devices and mobility aids
Achievable NCLEX
4. Physiological Integrity
4.1. Basic care and comfort
Our NCLEX course is currently in development and is a work-in-progress.

Assistive devices and mobility aids

6 min read
Font
Discuss
Share
Feedback

Introduction

After illness, injury, or surgery, many clients, especially older adults, must regain independence in small steps. Assistive devices and mobility aids bridge the gap between dependence and autonomy, making daily activities safer and restoring confidence.

On the NCLEX, you’re expected to recognize common devices, understand their safe use, and educate clients on adapting to them post-hospitalization.

NGN insight:
Mobility aids promote safety, independence, and healing. Improper use can increase fall risk. Nurses play a key role in teaching proper use and monitoring for complications.

Learning objectives

By the end of this section, you should be able to:

  • Identify commonly used assistive devices in older adult and post-operative populations
  • Understand appropriate nursing interventions to support safe device use
  • Educate clients and caregivers on proper positioning, transfer technique, and home safety
  • Recognize warning signs of misuse or complications
  • Apply this knowledge to client-centered scenarios and NCLEX-style questions

Common assistive devices

The following devices are the most frequently encountered in clinical care for clients with limited mobility, particularly after surgery, during rehabilitation, or in geriatric settings.

Walkers

Walkers provide broad-based support and are ideal for clients with poor balance or weakness in both legs. They require sufficient upper body strength and cognitive awareness.

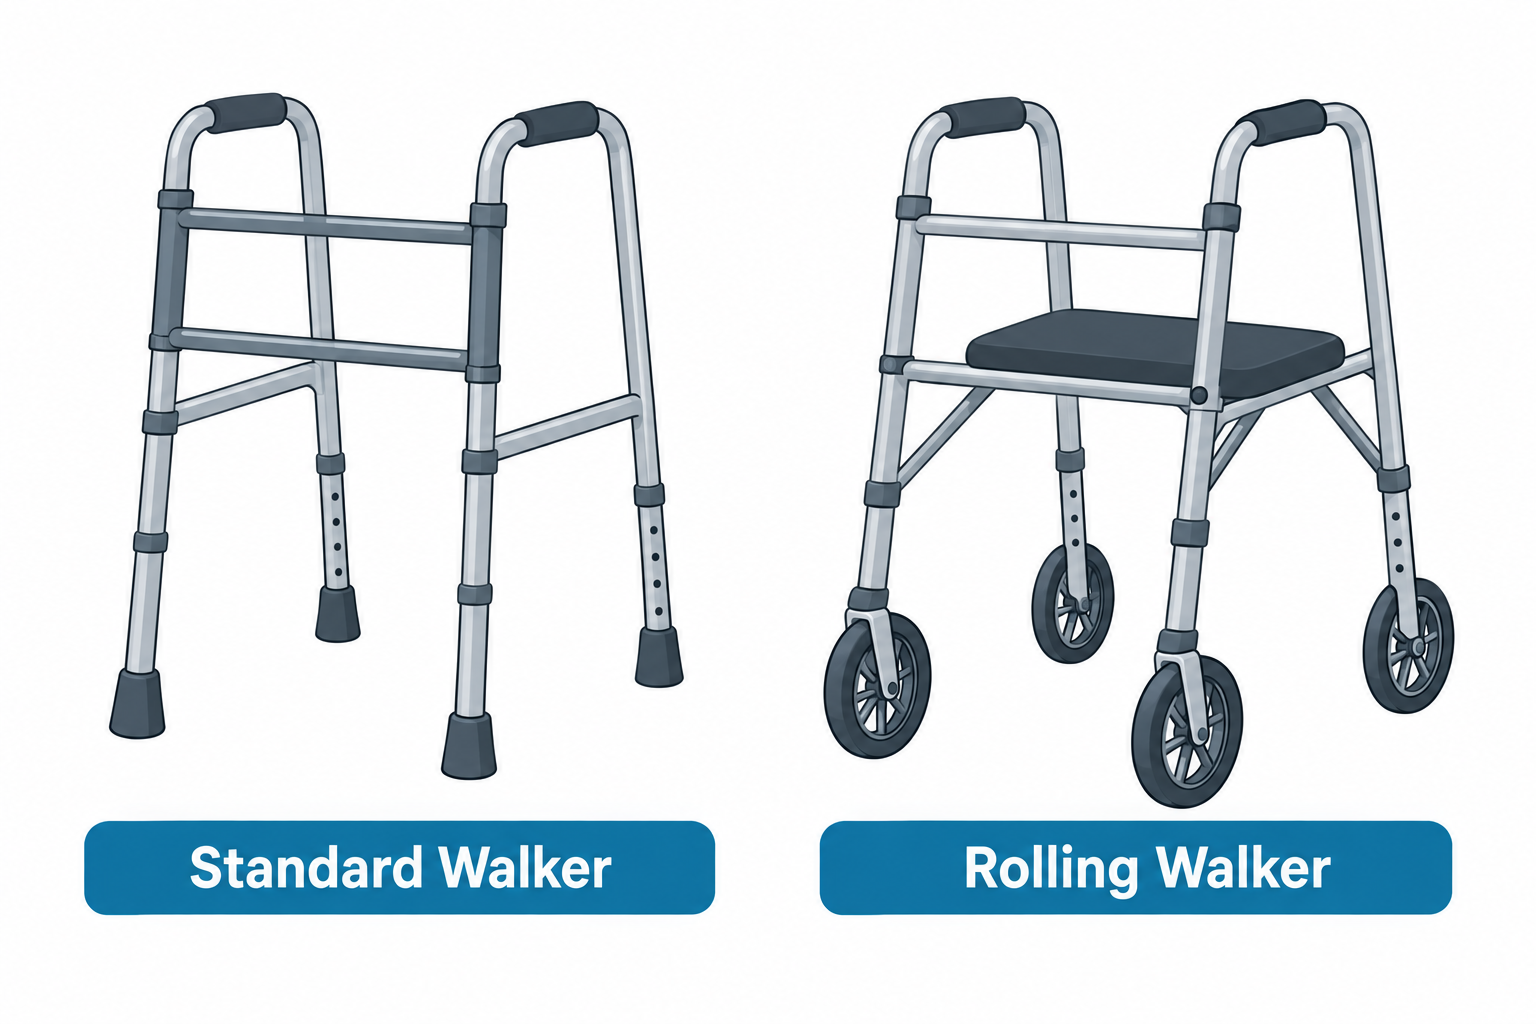
  • Standard walker (no wheels): Best for stable environments or when maximum support is needed.
  • Rolling walker (two or four wheels): Easier to maneuver for clients with better balance; often includes a seat for rest.

Walker safety and teaching:

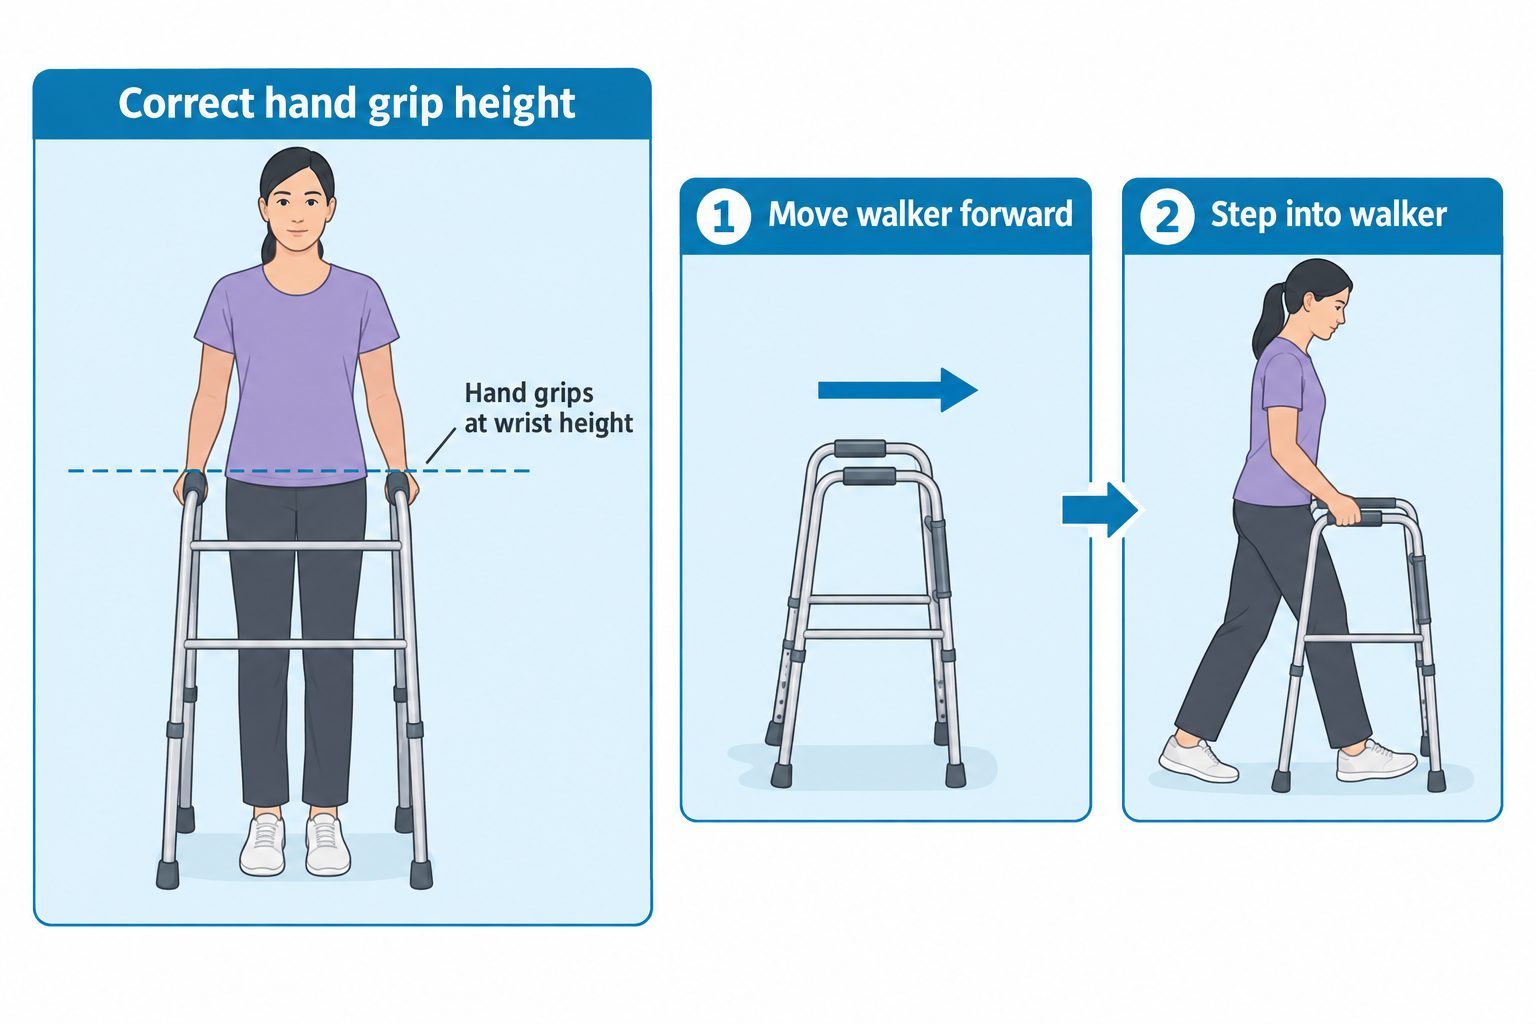
  • Adjust the walker so hand grips are at wrist level when arms are at the sides.
  • Instruct clients to move the walker forward first, then step into it. Do not pull the walker toward the body while walking.
  • Ensure rubber tips (or wheels) are intact and roll freely.
  • Avoid using walkers on stairs or escalators.
alt_text
(Labeled) ilustrations of [Standard walker and rolling walker] ////////
alt_text
Step by step illustration of [Correct Walker Height and Walking Sequence]///////

Canes

Canes offer unilateral support and are commonly used for minor balance issues or weakness on one side.

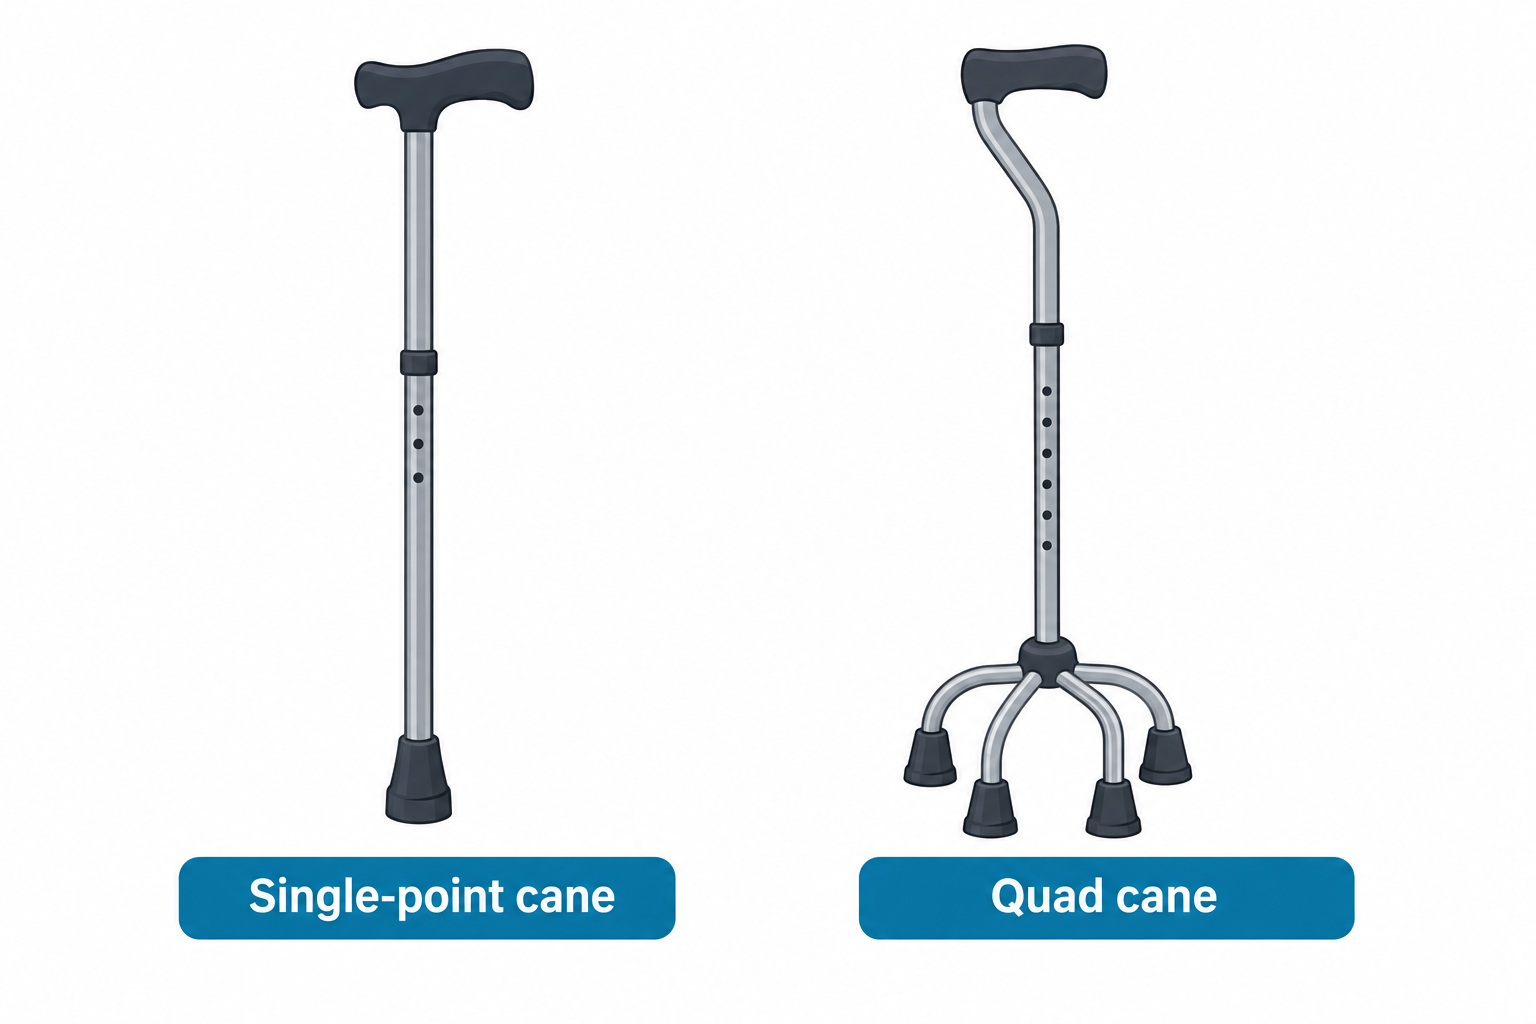
  • Single-point cane: For mild balance support.
  • Quad cane: Offers more stability due to its broader base.

Cane teaching:

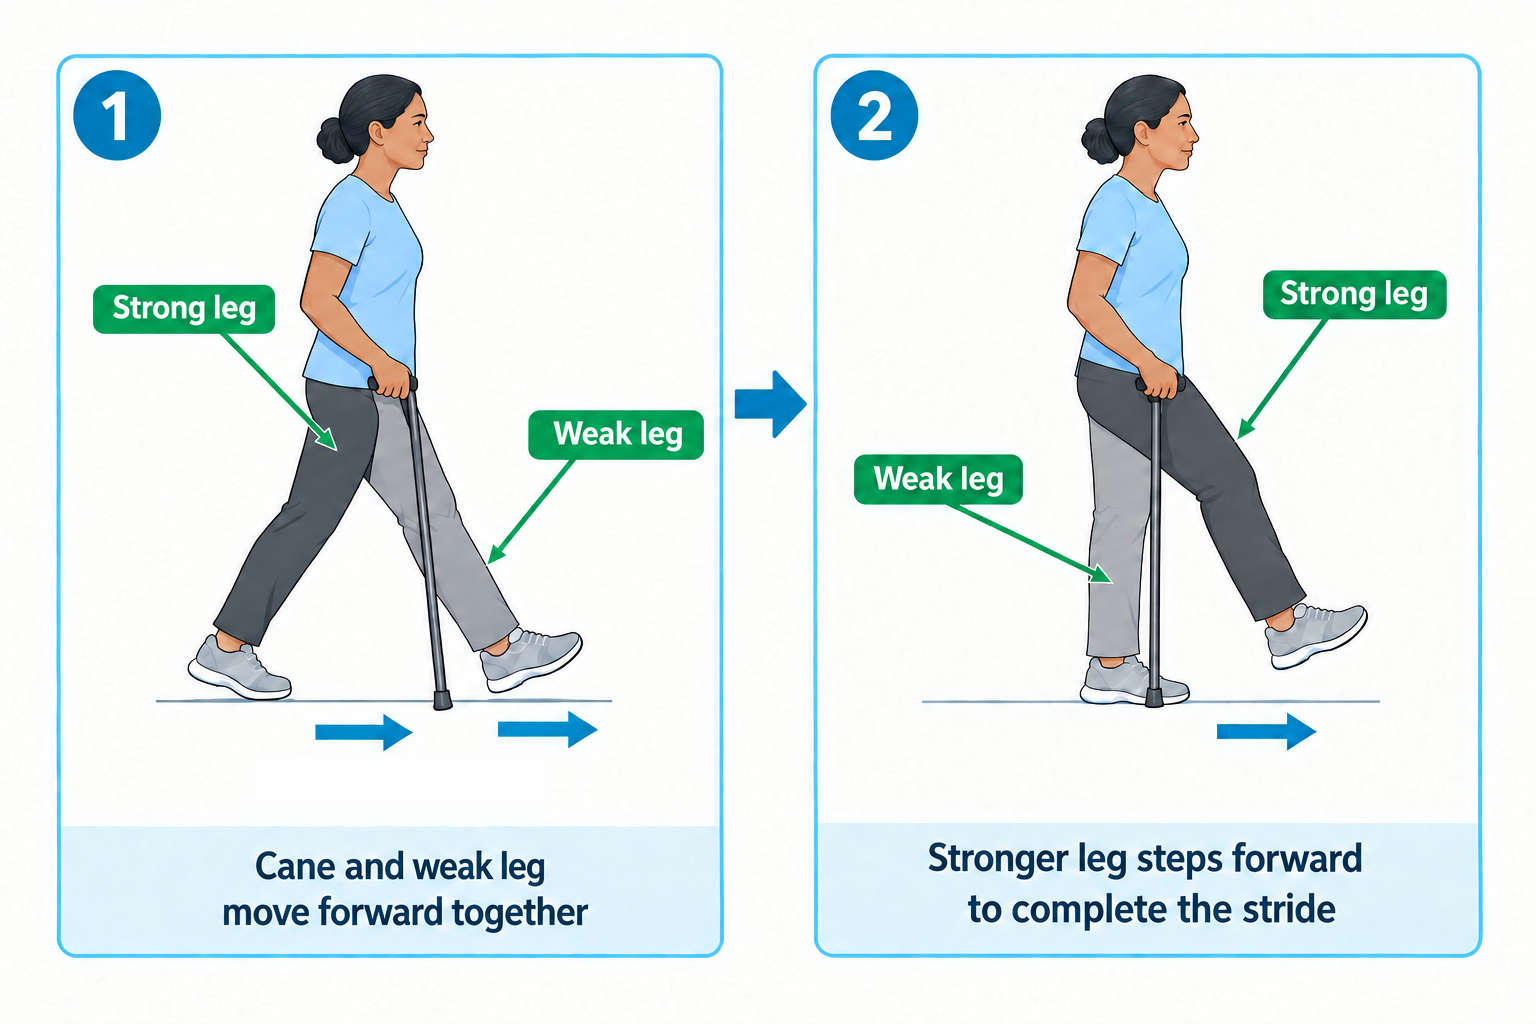
  • Hold the cane on the strong side of the body.
  • Move the cane and the weaker leg forward together, followed by the stronger leg.
  • Adjust height so the elbow flexes about 15–30 degrees when the hand rests on the grip.
alt_text
(Labeled) images of [Single point cane and Quad cane]/////////
alt_text
Sequential illustration of [Proper Cane Use]/////////

Crutches

Crutches are used for non-weight-bearing or partial-weight-bearing ambulation.

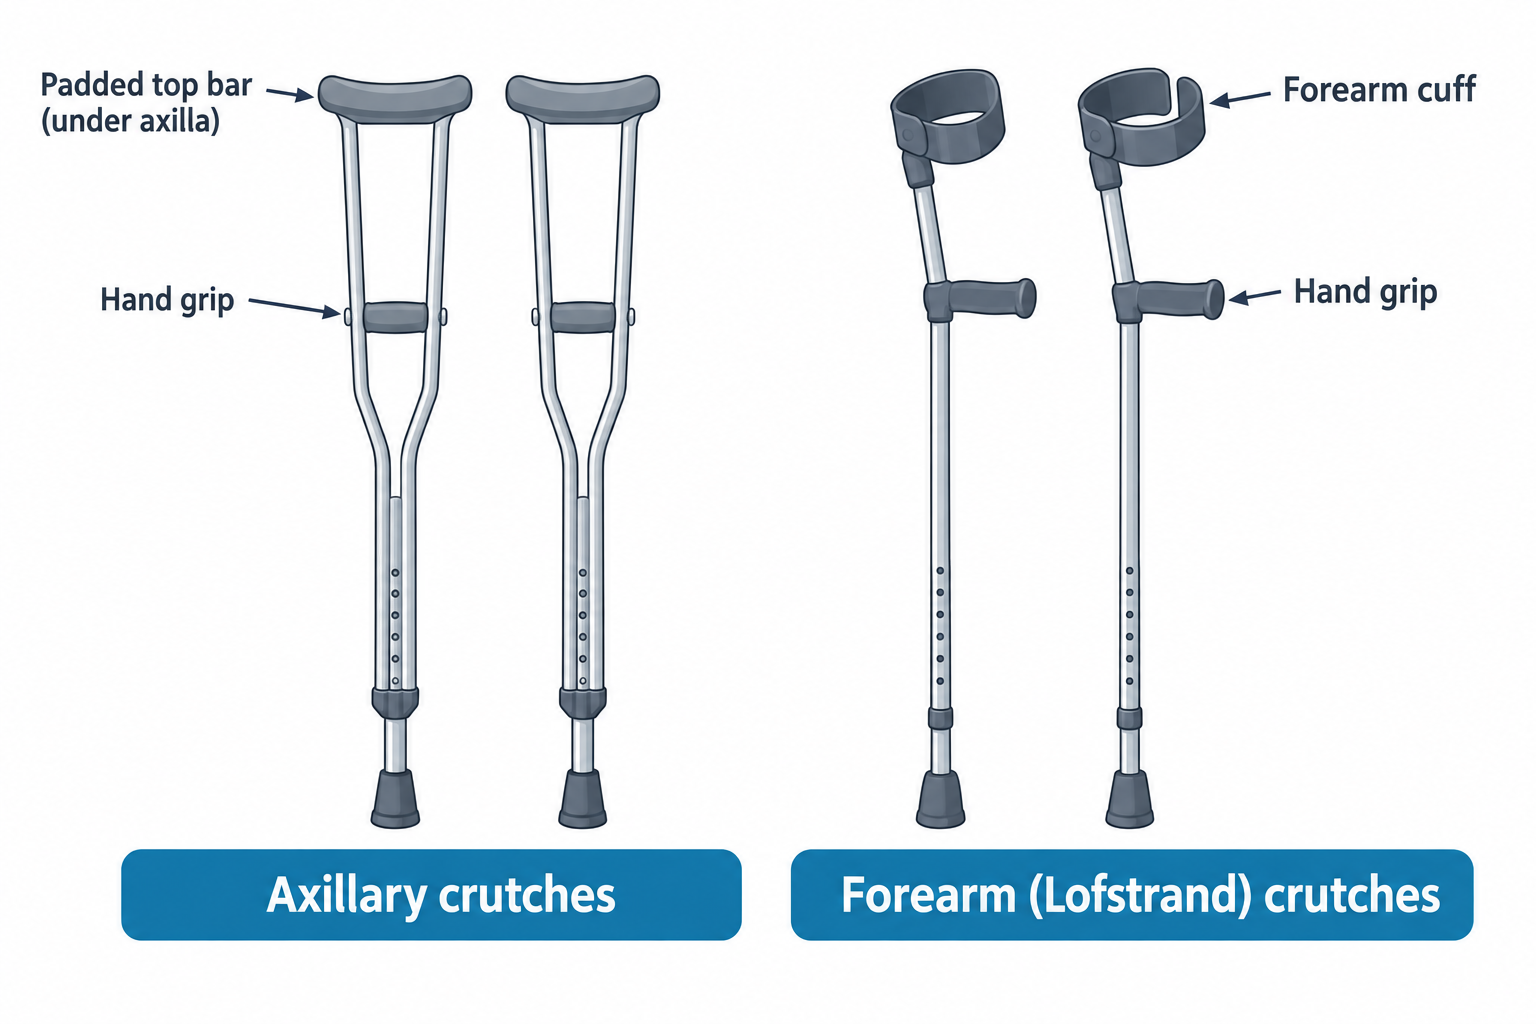
  • Axillary crutches: Common for short-term use.
  • Forearm crutches (Lofstrand): Used more for long-term conditions.

Crutch teaching:

  • Ensure 2–3 finger widths between the crutch pad and axilla to prevent nerve damage.
  • Weight should rest on hands, not underarms.
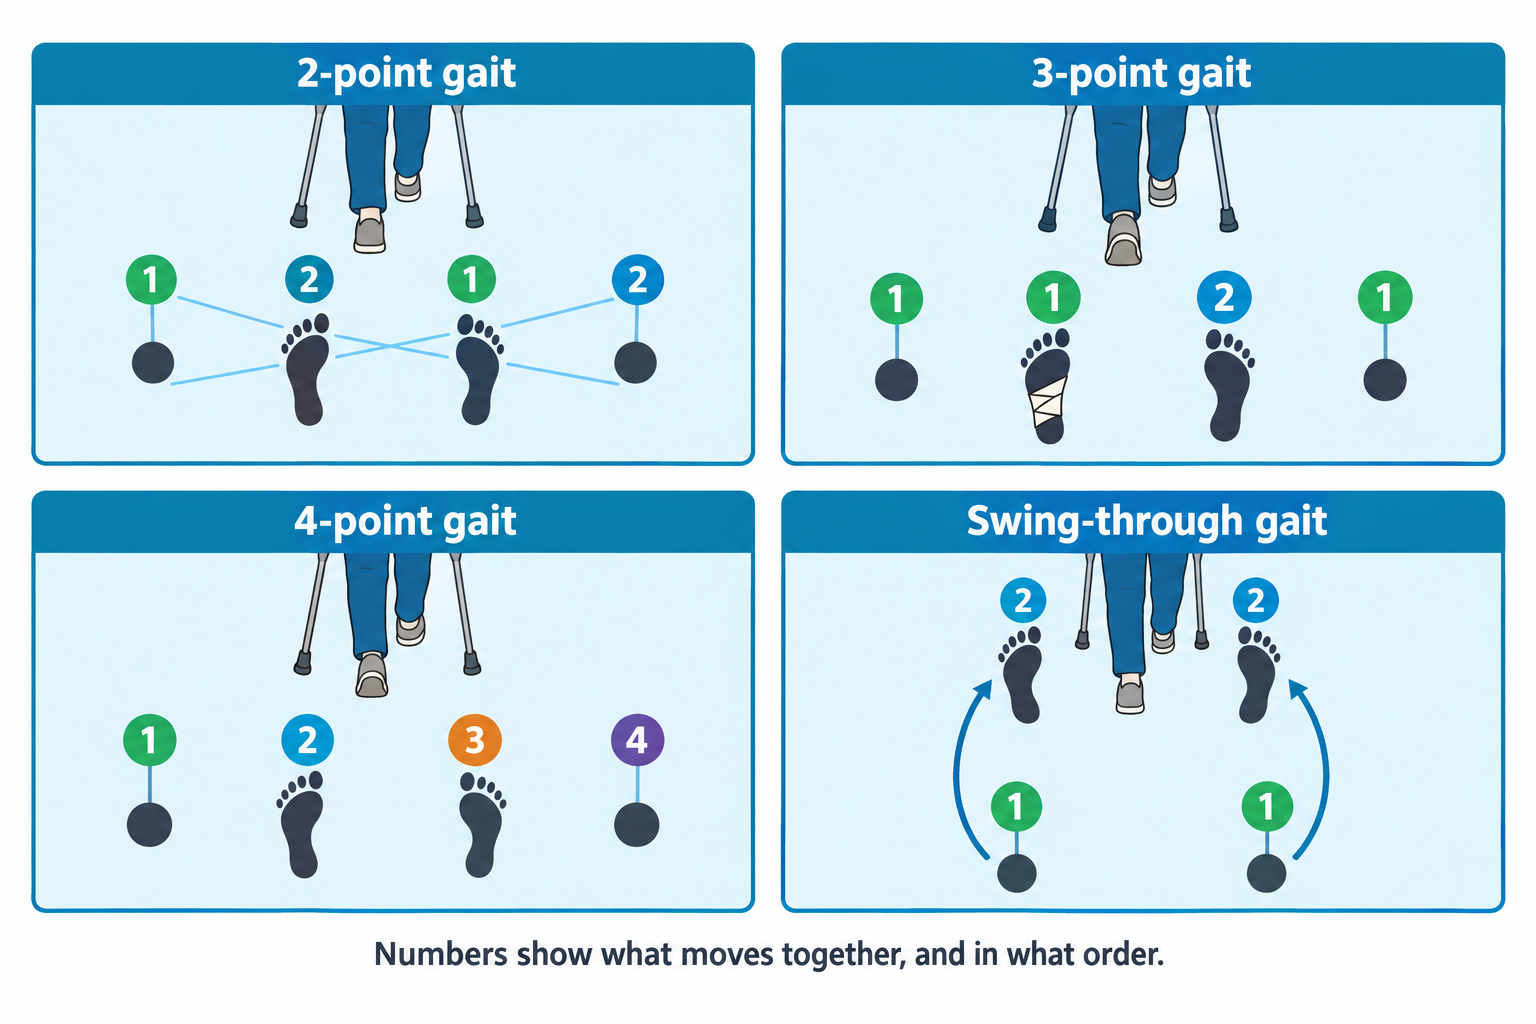
  • Teach gait patterns: 2-point, 3-point, 4-point, and swing-through, based on weight-bearing status.
alt_text
(Labeled) images of: [Axillary crutches and Forearm (Lofstrand) crutches]/////////
Definitions
2-point gait
One crutch and opposite foot move together, then other side.
3-point gait
Both crutches and the affected/non-weight-bearing leg move forward together, followed by the unaffected leg.
4-point gait
Each crutch and leg move separately; very stable.
Swing-through gait
Both crutches forward, then both legs swing past the crutches (for experienced users).
alt_text
[Crutch gait patterns]: Movement diagram of crutch gait patterns; 2-point, 3-point, 4-point, and swing-through/////////

Wheelchairs

Used for clients who are unable to walk or need full-body support.

Key considerations:

  • Lock wheels before transfers.
  • Remove or swing away footrests during transfers.
  • When assisting a client on a ramp, move forward when going up and backward when going down to improve stability.

Transfer aids

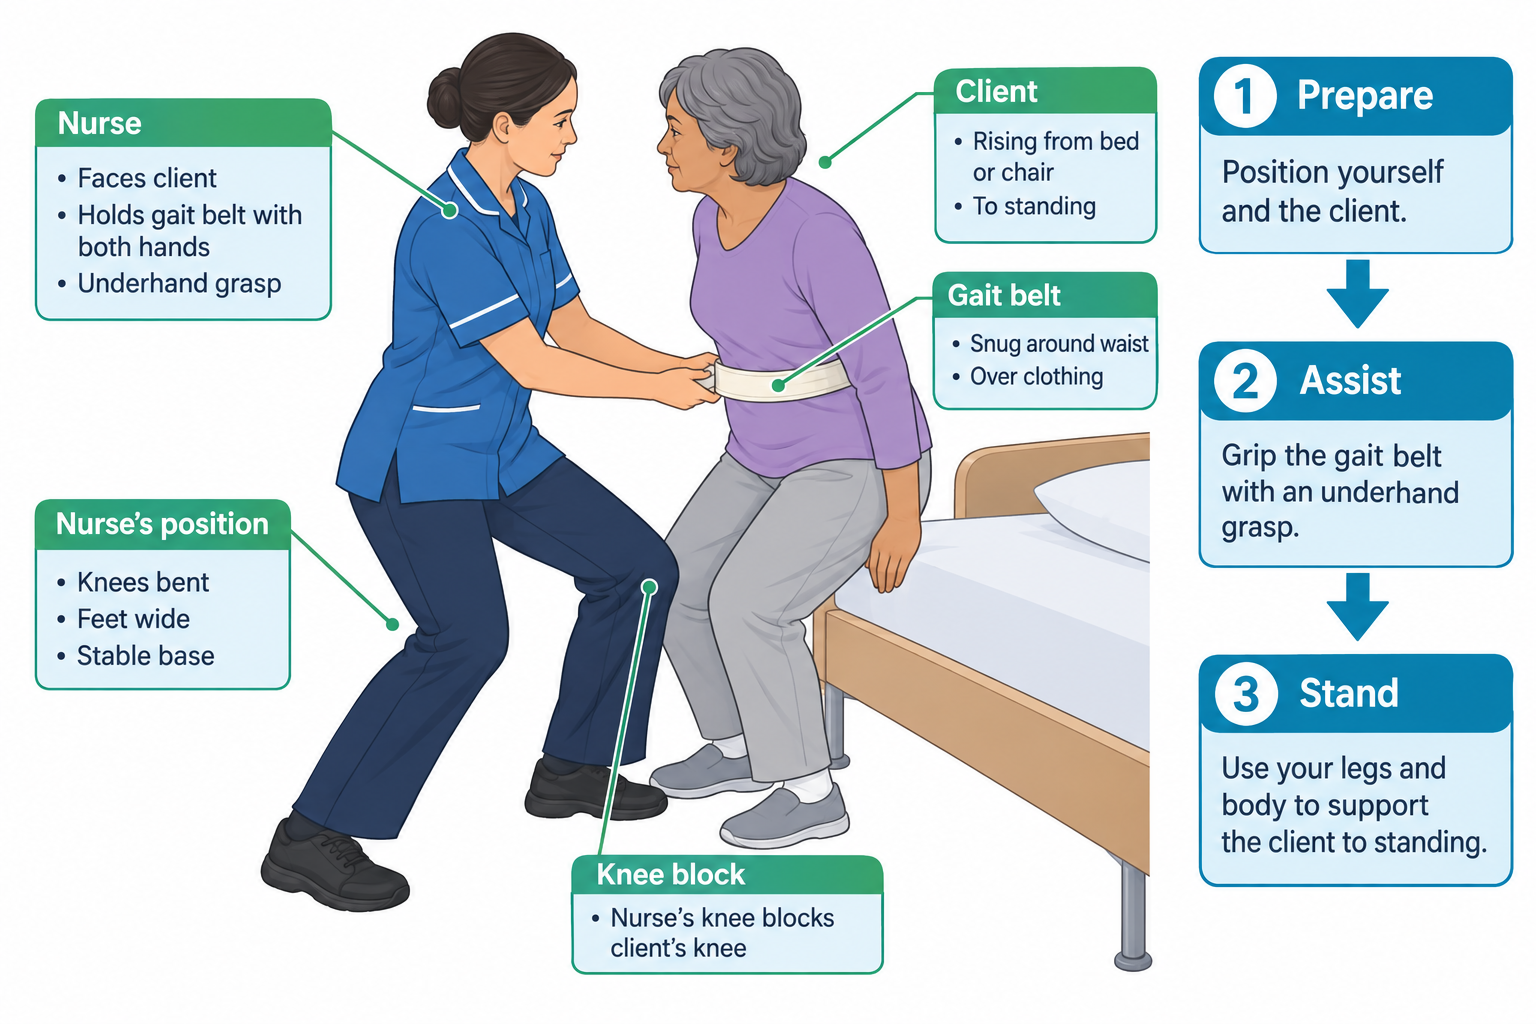
  • Transfer belt (gait belt): Placed around the client’s waist to aid in transfers or walking support.
  • Sliding board: Used for seated transfers between surfaces.
  • Pivot disc: Helps with controlled pivot transfers when client can bear some weight.
alt_text
[Safe Assisted Transfer Using a Gait Belt]: Illustrations of safe pivot transfer and use of gait belt/////////

Mechanical lifts

For clients who are non-weight-bearing or require full assistance.

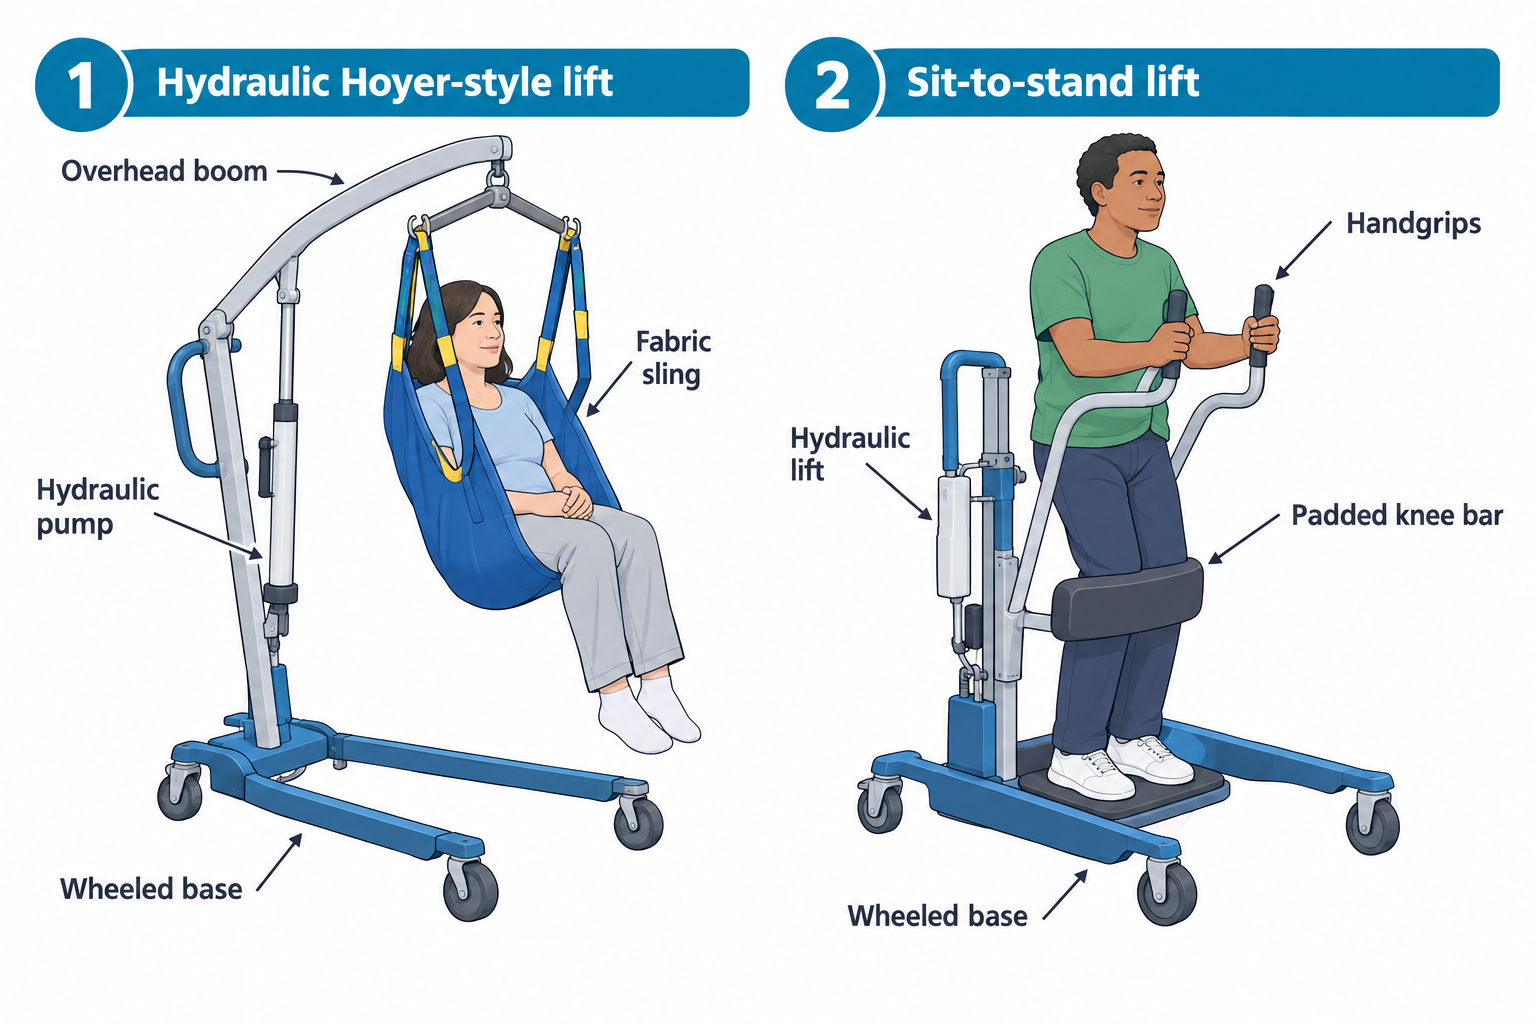
  • Hydraulic (Hoyer) lifts: Used with fabric slings for full transfers.
  • Sit-to-stand lifts: For clients who can partially bear weight and follow instructions.
alt_text
Side by side comparison of [Common Mechanical Lifts]/////////

Safety rules:

  • Use the number of trained caregivers recommended by the manufacturer’s instructions and facility policy.
  • Ensure the sling is properly secured and weight-appropriate.
  • Follow manufacturer instructions and facility policy for safe lift use.

Less commonly tested assistive devices

These may appear in specialty care settings but are less commonly emphasized on NCLEX.

  • Prosthetic limbs
  • Orthotic braces (e.g., ankle-foot orthosis)
  • Adaptive utensils and feeding devices
  • Reachers or grabbers
  • Hearing amplifiers

You should recognize these by name, but detailed mechanics are beyond the core focus.

Clinical vignette: Mr. Thompson, 82, underwent a right hip replacement. On day 2 post-op, you observe him attempting to stand with the help of a rolling walker. His daughter is holding his arm for support. He is hunched forward, and the walker is adjusted to mid-upper arm height.

Nursing response: Educate Mr. Thompson to stand tall and adjust the walker so the hand grips are at wrist level. Coach the daughter to use a gait belt rather than arm pulling. Reinforce walker use only on flat surfaces and instruct against pulling it while rising from a chair.

Rationale: Improper use of a mobility aid can result in falls, delayed healing, or dislocation of a new hip joint.

Client education

  • Always wear nonslip shoes when using mobility aids.
  • Encourage clear pathways at home: no rugs, cords, or clutter.
  • Use nightlights to reduce nocturnal falls.
  • Practice sit-to-stand movements before full ambulation.
  • Remind clients never to use furniture or unstable items as support.

Nursing interventions

  • Assess each client’s muscle strength, coordination, balance, cognition, and sensory function.
  • Collaborate with physical and occupational therapy for device fitting and gait training.
  • Monitor for skin breakdown or pressure from braces, belts, or devices.
  • Evaluate fall risk regularly and reassess after any new impairment.

Common pitfalls on the NCLEX

  • Teaching clients to hold cane on the weak side (incorrect).
  • Forgetting to assess cognitive ability before giving a walker.
  • Allowing crutches to press into the axilla.
  • Leaving wheelchair footplates engaged during transfer.
  • Failing to follow manufacturer instructions and facility policy for mechanical lift transfers.
  • Always match the device to the client’s physical and cognitive ability.
  • Walkers = most stable but not for stairs.
  • Crutches = require upper body strength and gait training.
  • Canes go on the strong side, move with the weak leg.
  • Mechanical lifts require two trained staff and a weight-rated sling.

Sign up for free to take 5 quiz questions on this topic

Previous
Next  | 4.1.2 Comfort measures
All rights reserved ©2016 - 2026 Achievable, Inc.

Assistive devices and mobility aids

Introduction

After illness, injury, or surgery, many clients, especially older adults, must regain independence in small steps. Assistive devices and mobility aids bridge the gap between dependence and autonomy, making daily activities safer and restoring confidence.

On the NCLEX, you’re expected to recognize common devices, understand their safe use, and educate clients on adapting to them post-hospitalization.

NGN insight:
Mobility aids promote safety, independence, and healing. Improper use can increase fall risk. Nurses play a key role in teaching proper use and monitoring for complications.

Learning objectives

By the end of this section, you should be able to:

  • Identify commonly used assistive devices in older adult and post-operative populations
  • Understand appropriate nursing interventions to support safe device use
  • Educate clients and caregivers on proper positioning, transfer technique, and home safety
  • Recognize warning signs of misuse or complications
  • Apply this knowledge to client-centered scenarios and NCLEX-style questions

Common assistive devices

The following devices are the most frequently encountered in clinical care for clients with limited mobility, particularly after surgery, during rehabilitation, or in geriatric settings.

Walkers

Walkers provide broad-based support and are ideal for clients with poor balance or weakness in both legs. They require sufficient upper body strength and cognitive awareness.

  • Standard walker (no wheels): Best for stable environments or when maximum support is needed.
  • Rolling walker (two or four wheels): Easier to maneuver for clients with better balance; often includes a seat for rest.

Walker safety and teaching:

  • Adjust the walker so hand grips are at wrist level when arms are at the sides.
  • Instruct clients to move the walker forward first, then step into it. Do not pull the walker toward the body while walking.
  • Ensure rubber tips (or wheels) are intact and roll freely.
  • Avoid using walkers on stairs or escalators.
alt_text
(Labeled) ilustrations of [Standard walker and rolling walker] ////////
alt_text
Step by step illustration of [Correct Walker Height and Walking Sequence]///////

Canes

Canes offer unilateral support and are commonly used for minor balance issues or weakness on one side.

  • Single-point cane: For mild balance support.
  • Quad cane: Offers more stability due to its broader base.

Cane teaching:

  • Hold the cane on the strong side of the body.
  • Move the cane and the weaker leg forward together, followed by the stronger leg.
  • Adjust height so the elbow flexes about 15–30 degrees when the hand rests on the grip.
alt_text
(Labeled) images of [Single point cane and Quad cane]/////////
alt_text
Sequential illustration of [Proper Cane Use]/////////

Crutches

Crutches are used for non-weight-bearing or partial-weight-bearing ambulation.

  • Axillary crutches: Common for short-term use.
  • Forearm crutches (Lofstrand): Used more for long-term conditions.

Crutch teaching:

  • Ensure 2–3 finger widths between the crutch pad and axilla to prevent nerve damage.
  • Weight should rest on hands, not underarms.
  • Teach gait patterns: 2-point, 3-point, 4-point, and swing-through, based on weight-bearing status.
alt_text
(Labeled) images of: [Axillary crutches and Forearm (Lofstrand) crutches]/////////
Definitions
2-point gait
One crutch and opposite foot move together, then other side.
3-point gait
Both crutches and the affected/non-weight-bearing leg move forward together, followed by the unaffected leg.
4-point gait
Each crutch and leg move separately; very stable.
Swing-through gait
Both crutches forward, then both legs swing past the crutches (for experienced users).
alt_text
[Crutch gait patterns]: Movement diagram of crutch gait patterns; 2-point, 3-point, 4-point, and swing-through/////////

Wheelchairs

Used for clients who are unable to walk or need full-body support.

Key considerations:

  • Lock wheels before transfers.
  • Remove or swing away footrests during transfers.
  • When assisting a client on a ramp, move forward when going up and backward when going down to improve stability.

Transfer aids

  • Transfer belt (gait belt): Placed around the client’s waist to aid in transfers or walking support.
  • Sliding board: Used for seated transfers between surfaces.
  • Pivot disc: Helps with controlled pivot transfers when client can bear some weight.
alt_text
[Safe Assisted Transfer Using a Gait Belt]: Illustrations of safe pivot transfer and use of gait belt/////////

Mechanical lifts

For clients who are non-weight-bearing or require full assistance.

  • Hydraulic (Hoyer) lifts: Used with fabric slings for full transfers.
  • Sit-to-stand lifts: For clients who can partially bear weight and follow instructions.
alt_text
Side by side comparison of [Common Mechanical Lifts]/////////

Safety rules:

  • Use the number of trained caregivers recommended by the manufacturer’s instructions and facility policy.
  • Ensure the sling is properly secured and weight-appropriate.
  • Follow manufacturer instructions and facility policy for safe lift use.

Less commonly tested assistive devices

These may appear in specialty care settings but are less commonly emphasized on NCLEX.

  • Prosthetic limbs
  • Orthotic braces (e.g., ankle-foot orthosis)
  • Adaptive utensils and feeding devices
  • Reachers or grabbers
  • Hearing amplifiers

You should recognize these by name, but detailed mechanics are beyond the core focus.

Clinical vignette: Mr. Thompson, 82, underwent a right hip replacement. On day 2 post-op, you observe him attempting to stand with the help of a rolling walker. His daughter is holding his arm for support. He is hunched forward, and the walker is adjusted to mid-upper arm height.

Nursing response: Educate Mr. Thompson to stand tall and adjust the walker so the hand grips are at wrist level. Coach the daughter to use a gait belt rather than arm pulling. Reinforce walker use only on flat surfaces and instruct against pulling it while rising from a chair.

Rationale: Improper use of a mobility aid can result in falls, delayed healing, or dislocation of a new hip joint.

Client education

  • Always wear nonslip shoes when using mobility aids.
  • Encourage clear pathways at home: no rugs, cords, or clutter.
  • Use nightlights to reduce nocturnal falls.
  • Practice sit-to-stand movements before full ambulation.
  • Remind clients never to use furniture or unstable items as support.

Nursing interventions

  • Assess each client’s muscle strength, coordination, balance, cognition, and sensory function.
  • Collaborate with physical and occupational therapy for device fitting and gait training.
  • Monitor for skin breakdown or pressure from braces, belts, or devices.
  • Evaluate fall risk regularly and reassess after any new impairment.

Common pitfalls on the NCLEX

  • Teaching clients to hold cane on the weak side (incorrect).
  • Forgetting to assess cognitive ability before giving a walker.
  • Allowing crutches to press into the axilla.
  • Leaving wheelchair footplates engaged during transfer.
  • Failing to follow manufacturer instructions and facility policy for mechanical lift transfers.
Key points
  • Always match the device to the client’s physical and cognitive ability.
  • Walkers = most stable but not for stairs.
  • Crutches = require upper body strength and gait training.
  • Canes go on the strong side, move with the weak leg.
  • Mechanical lifts require two trained staff and a weight-rated sling.

More from Basic care and comfort

  • Comfort measures
  • Nutrition and hydration support
  • Elimination support
  • Rest, sleep, and pain management
  • Non-pharmacological therapies