


Achievable logoAchievable logo
CCMA
Sign in
Sign up
Purchase
Textbook
Practice exams
Support
How it works
Exam catalog
Mountain with a flag at the peak
Textbook
1. Medical assistant
2. Electronic records
3. Medical terminology and anatomy
4. The fundamentals of infection control
5. Introduction to vital signs
6. The patient interview and history
7. The physical examination
8. Appointment scheduling
9. Insurance billing
10. Diagnostic coding and the ICD-10-CM System
11. Procedural coding
12. Medical billing and reimbursement essentials
13. Assisting with medical specialties
14. Assisting with the musculoskeletal system
15. Assisting with the cardiovascular system
16. Assisting with the respiratory system
17. Assisting with the nervous system
18. Anatomy and physiology of the urinary system
19. Assisting in obstetrics and gynecology
20. Assisting in endocrinology
21. Assisting in ophthalmology & otolaryngology
22. Assisting in gastroenterology
23. Assisting in the immune & lymphatic systems
24. Assisting in pediatrics: the developmental stages and care
25. The medical assistant’s role in caring for the older patient
26. The role of the medical assistant in physical therapy examination and assessment
27. Preparing for minor surgery: room, solutions, and supplies
27.1 Assisting in surgery
27.2 Surgical instruments: cutting and grasping
27.3 Drapes and sutures
27.4 Autoclave loading/unloading, chemical sterilization, and professional responsibilities
27.5 Surgical asepsis, instrument care, and the utility room
27.6 The autoclave process: operation, wrapping, and quality assurance
27.7 Dressings, bandages, and professional conduct
27.8 Introduction to minor office surgery and technology
27.9 Specialized procedures and preoperative preparation
27.10 Sterile technique and intraoperative assistance
27.11 Completing surgery and postoperative care
28. Introduction to the clinical laboratory
29. Urinalysis
30. Blood collection
31. Analysis of blood
32. Electrocardiography and heart structure
33. The principles of pharmacology
34. Essential calculations and measurement systems
35. Solid, liquid, & solutions medication doses
36. Administering medications
37. Metabolism and core nutrient roles
38. Medical emergencies in the healthcare setting
Achievable logoAchievable logo
27.5 Surgical asepsis, instrument care, and the utility room
Achievable CCMA
27. Preparing for minor surgery: room, solutions, and supplies
Our CCMA course is currently in development and is a work-in-progress.

Surgical asepsis, instrument care, and the utility room

9 min read
Font
Discuss
Share
Feedback

Asepsis is the condition of being free of infection or infectious material. Medical asepsis is the reduction of microorganisms and the prevention of the transfer of microorganisms. This creates an environment that is clean but not sterile (i.e., free of microorganisms). The principles of medical asepsis are implemented to prevent reinfection of a patient and cross-infection of another patient or medical personnel. To prevent cross-contamination, potential microorganisms and pathogens must be isolated by following standard blood and body fluid precautions and by sanitizing, disinfecting, or sterilizing objects as soon as possible after they become contaminated.

Surgical asepsis is the complete destruction of microorganisms. This technique is mandatory for any procedure that invades the body’s skin or tissues, such as surgery. In surgical asepsis, everything that comes in contact with the surgical site must be sterile, including surgical gowns, drapes, instruments, and the gloved hands of the surgeon and surgical assistants. Any time the skin or a mucous membrane is punctured or pierced, as in venipunctures or injections, surgical aseptic techniques must be practiced. Urinary catheterizations, biopsies, and dressing changes on open wounds are performed using sterile technique. The next section discusses how to prepare instruments to be used in surgically aseptic procedures.

Care & handling of instruments

Because instruments are expensive, and the success of the procedure depends on their quality, the medical assistant must properly care for each instrument to maximize its life and ensure that every part is in safe working order.

Instruments that are not disposable are made of fine-grade stainless steel. The term stainless usually is taken too literally. Although stainless steel does resist rust and keeps a fine edge and tip longer, even the best stainless steel may develop water spots and stains. Proper hardness and flexibility are important. Inexpensive instruments that are chrome plated may be too brittle or too soft. In addition, mistreatment of chrome-plated instruments can cause tiny breaks in the finish that may become a source of contamination or may tear the provider’s gloves.

All instruments should be carefully examined when they are purchased. Scissors should be tested to see whether they shear the full length of the blades completely to the tip. If the scissors cut a piece of cloth cleanly and do not chew at any point, even at the tip, they are functioning correctly. Teeth and serrations should be checked to see whether they intermesh completely and whether the jaws are even on the sides and tip. Each instrument should be felt over its entire surface for any rough areas that may tear or snag the provider’s gloves or act as a future source of contamination. Box locks and hinges must work freely but should not be too loose. Thumb- and spring-handled instruments must have the correct tension and meet evenly at the tips. After inspection, instruments should be sanitized and checked again for possible faulty workmanship before sterilization.

Under no circumstances should instruments be bundled together or allowed to become entangled. Do not mix stainless steel instruments with others made of different metals, including chrome-plated instruments, because this may cause electrolysis and result in etching. If an instrument is accidentally dropped, it may be permanently damaged. If scissors are dropped with the blades partly open, there may be a nick at the point where the blades cross. Any damaged or malfunctioning instrument must be disposed of to prevent complications during a surgical procedure.

After a surgical procedure, contaminated instruments should be placed in a basin of disinfectant solution. Heavier instruments should be on the bottom of the basin and lighter, more delicate instruments on top. Always unlock each instrument before immersing it in the chemical decontaminant to permit sanitization of the entire surface area. Never allow blood or other substances to dry on an instrument because they will be difficult to remove. If immediate sanitization and disinfection are not possible, the instruments should be rinsed well and placed in a cold-water solution with a blood solvent and mild detergent. It is best to use a detergent with a neutral pH, is low sudsing, and can be rinsed off easily. The manufacturer’s recommendations for the correct dilution and time of immersion of the various sanitizing agents, disinfectants, and blood solvents must be strictly followed for the chemicals to be effective.

When the surgical procedure is completed, the receiving basin for instruments should be transferred from the surgical area to the disinfection and sterilization room. It is important to remove used instruments from the patient’s view as soon as possible. After sanitization is complete, instruments should be rinsed thoroughly and either washed by hand or washed mechanically using an ultrasonic device. Some delicate instruments, such as microsurgical and lensed instruments, should be washed by hand with a mild, low-sudsing, neutral-pH detergent solution and a soft brush.

All instruments should be cleaned while submerged to prevent the airborne spread of microorganisms. Throughout the sanitization process, the medical assistant should wear heavy utility gloves to prevent possible exposure to contaminants. Some clinical policies require the medical assistant to wear disposable gloves under utility gloves for added protection from contaminants. Instruments then should be rinsed, dried with a lint-free cloth, and inspected for proper functioning before they are packed for sterilization.

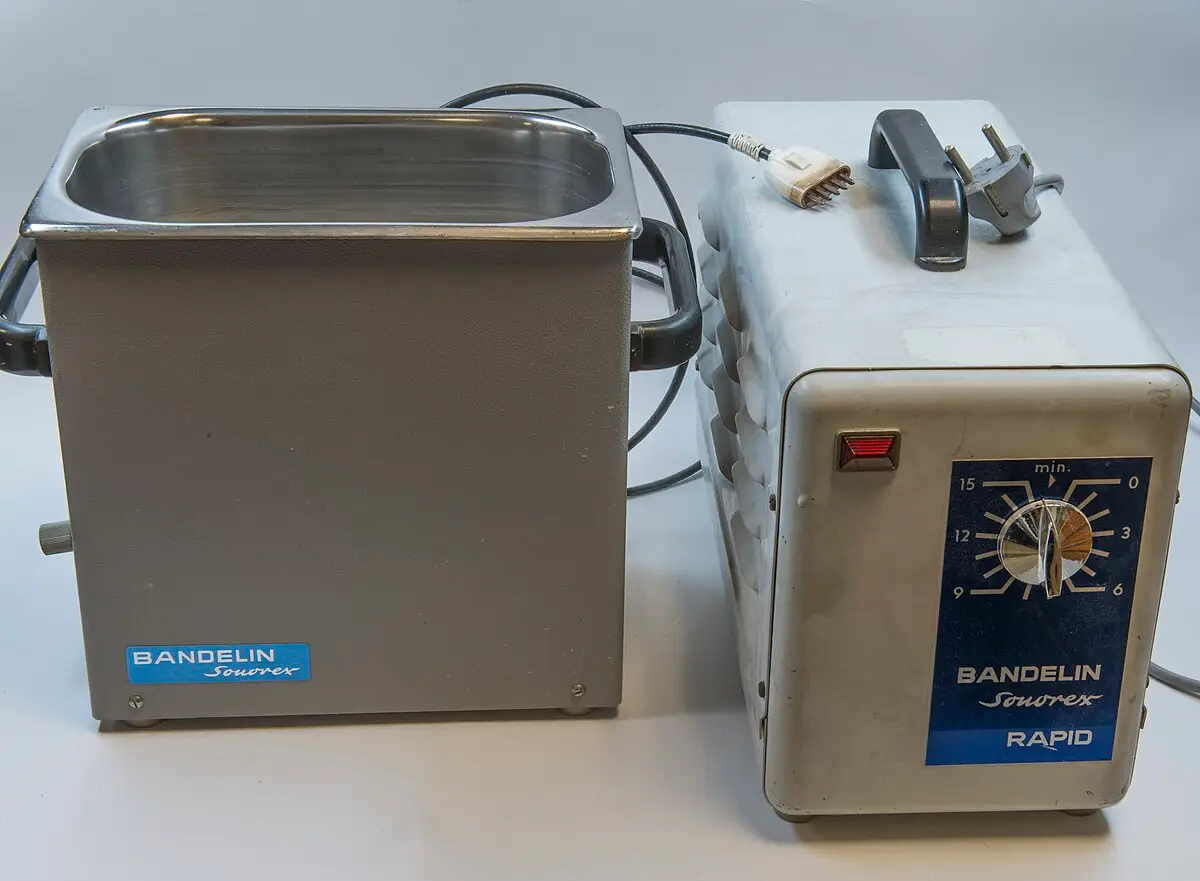
Mechanical washing, such as with an ultrasonic device, can be used for most instruments and is an especially good method for sanitizing sharp instruments to prevent injuries (FIGURE 9.28). In an ultrasonic cleaning unit, the instruments are immersed in a cleaning solution, and the device produces sound waves that clean contaminants from the instruments’ surfaces. Some units then rinse and dry the instruments, leaving them ready for the sterilization process. However, manufacturers’ guidelines should be followed for rubber and plastic materials.

After sanitization and inspection, the instruments are ready for the sterilization process. Commercially prepared, disposable packs are available for most minor surgical procedures. They save time and eliminate the need for sanitization, disinfection, and sterilization of reusable stainless-steel instruments, but they may also be too costly for individual practices.

Ultrasonic cleaner unit used for instrument decontamination
Ultrasonic cleaner unit
Wikimedia Commons
/
CC BY 3.0

Sterilization

Before an instrument or piece of equipment can be used in a surgical procedure, it must first be sanitized and then sterilized to remove all forms of microorganisms. It is essential that you understand the concepts of sanitization and disinfection before learning sterilization methods. Written sanitization, disinfection, and sterilization procedures should be in place for each workplace.

Utility room

An area should be set aside to ensure proper sterilization for surgical aseptic procedures. The area should be divided into two sections, one dirty and one clean. The dirty section is used for receiving contaminated instruments and other materials at the end of surgical procedures. This area should have a sink, receiving basins, proper sanitizing and disinfecting agents, brushes, utility gloves, autoclave wrapping paper or cloth, autoclave envelopes and tape, sterilizer indicators, and gloves. Designated biohazard waste containers are needed for gloves worn when handling contaminated items. Personal protective equipment (PPE) for sanitization, disinfection, and autoclave procedures includes the following:

  • Fluid-resistant gloves to prevent contact with contaminants
  • A laboratory coat or impervious gown, if needed, to protect against splashes
  • A face shield or goggles if a splash hazard exists
  • Heat-resistant autoclave gloves for unloading

The clean section of the utility room should be reserved for receiving the sterile items after they have been removed from the autoclave. Clear, clean plastic bags in which to store sterile packs may be kept in the clean area. Both areas should be spotless and well organized.

Instruments and other items used in ambulatory surgery, examination, or treatment must be carefully cleaned before proceeding with the steps of disinfection or sterilization. Sanitization is the cleansing process that removes organic material and reduces the number of microorganisms to a safe level. This cleansing process removes debris, such as blood and other body fluids, from instruments or equipment. Sanitization should be completed immediately after instruments are used. This should occur in a separate workroom or area or on the “dirty” side of the utility room to prevent cross-contamination of clean instruments and equipment. If it is not possible to sanitize instruments immediately after a procedure, they should be rinsed under cold water immediately and placed in a low-sudsing, rust-inhibiting, enzyme-containing detergent solution. Blood and debris must be removed so that later disinfection with chemicals or sterilization can penetrate all the instruments’ surfaces. Never allow blood or other substances to coagulate or dry on an instrument.

The medical assistant should always wear utility gloves while performing sanitization to prevent possible personal contamination with potentially infectious body fluids that may be present. When you are ready to sanitize instruments, drain the soaking solution and rinse each instrument in cold, running water.

Clean all sharp instruments at one time when you can concentrate on preventing injury to yourself. Open all hinges and scrub serrations and ratchets with a small scrub brush or toothbrush. Rinse the instruments in hot water, and then carefully check that they are in proper working order before they are disinfected or sterilized. Generally, these instruments are left out to air dry, but they may be hand dried with a microfiber towel to prevent spotting. Follow facility policy as to how instruments should be dried.

Disinfection is the process of killing pathogenic organisms or rendering them inactive. Many types of disinfecting agents are available, and they have varying degrees of effectiveness. It is important to follow the manufacturer’s guidelines on how to use each product properly and understand its advantages and disadvantages and possible sources of error. Disinfectants are used on equipment that cannot be sterilized (e.g., blood pressure cuffs and stethoscopes), on countertops and other physical surfaces in the healthcare facility, and for soaking instruments and equipment before sterilization. It is important to wear proper protective equipment when using disinfectants because they are generally strong enough to damage human tissue and will often leave burns if allowed prolonged contact with the skin.

Asepsis vs. Surgical Asepsis

  • Asepsis: free from infection; medical asepsis reduces microorganisms, prevents transfer
  • Surgical asepsis: complete destruction of microorganisms; mandatory for invasive procedures
  • Sterile technique required for any skin/mucous membrane puncture (e.g., injections, catheterizations)

Care & Handling of Instruments

  • Inspect instruments for defects, sharpness, and smooth surfaces before use
  • Do not bundle or mix metals; avoid dropping instruments to prevent damage
  • After use: place in disinfectant, unlock before immersion, clean promptly to prevent dried debris

Instrument Cleaning & Sanitization

  • Clean instruments submerged to prevent airborne contamination
  • Wear utility gloves (and possibly disposable gloves underneath) during cleaning
  • Use neutral pH, low-sudsing detergents; follow manufacturer’s dilution/time guidelines
  • Ultrasonic cleaning units: effective for sharp instruments, follow guidelines for plastics/rubber

Sterilization

  • Instruments must be sanitized before sterilization
  • Written procedures for sanitization, disinfection, and sterilization required
  • Commercial disposable packs available but may be costly

Utility Room Organization & PPE

  • Utility room divided into dirty (contaminated) and clean (sterile) sections
  • Dirty side: for receiving, cleaning, and disinfecting used instruments
  • Clean side: for storing sterile items
  • PPE: fluid-resistant gloves, lab coat/gown, face shield/goggles, heat-resistant gloves for autoclave

Sanitization & Disinfection Procedures

  • Sanitization: removes organic material, reduces microorganisms to safe level
  • Immediate cleaning after use; rinse in cold water, use enzyme detergent if delayed
  • Disinfection: kills or inactivates pathogens, used for items that can’t be sterilized
  • Always follow manufacturer’s instructions for disinfectants and wear proper PPE

Sign up for free to take 16 quiz questions on this topic

Previous
Next  | 27.6 The autoclave process: operation, wrapping, and quality assurance
All rights reserved ©2016 - 2026 Achievable, Inc.

Surgical asepsis, instrument care, and the utility room

Asepsis is the condition of being free of infection or infectious material. Medical asepsis is the reduction of microorganisms and the prevention of the transfer of microorganisms. This creates an environment that is clean but not sterile (i.e., free of microorganisms). The principles of medical asepsis are implemented to prevent reinfection of a patient and cross-infection of another patient or medical personnel. To prevent cross-contamination, potential microorganisms and pathogens must be isolated by following standard blood and body fluid precautions and by sanitizing, disinfecting, or sterilizing objects as soon as possible after they become contaminated.

Surgical asepsis is the complete destruction of microorganisms. This technique is mandatory for any procedure that invades the body’s skin or tissues, such as surgery. In surgical asepsis, everything that comes in contact with the surgical site must be sterile, including surgical gowns, drapes, instruments, and the gloved hands of the surgeon and surgical assistants. Any time the skin or a mucous membrane is punctured or pierced, as in venipunctures or injections, surgical aseptic techniques must be practiced. Urinary catheterizations, biopsies, and dressing changes on open wounds are performed using sterile technique. The next section discusses how to prepare instruments to be used in surgically aseptic procedures.

Care & handling of instruments

Because instruments are expensive, and the success of the procedure depends on their quality, the medical assistant must properly care for each instrument to maximize its life and ensure that every part is in safe working order.

Instruments that are not disposable are made of fine-grade stainless steel. The term stainless usually is taken too literally. Although stainless steel does resist rust and keeps a fine edge and tip longer, even the best stainless steel may develop water spots and stains. Proper hardness and flexibility are important. Inexpensive instruments that are chrome plated may be too brittle or too soft. In addition, mistreatment of chrome-plated instruments can cause tiny breaks in the finish that may become a source of contamination or may tear the provider’s gloves.

All instruments should be carefully examined when they are purchased. Scissors should be tested to see whether they shear the full length of the blades completely to the tip. If the scissors cut a piece of cloth cleanly and do not chew at any point, even at the tip, they are functioning correctly. Teeth and serrations should be checked to see whether they intermesh completely and whether the jaws are even on the sides and tip. Each instrument should be felt over its entire surface for any rough areas that may tear or snag the provider’s gloves or act as a future source of contamination. Box locks and hinges must work freely but should not be too loose. Thumb- and spring-handled instruments must have the correct tension and meet evenly at the tips. After inspection, instruments should be sanitized and checked again for possible faulty workmanship before sterilization.

Under no circumstances should instruments be bundled together or allowed to become entangled. Do not mix stainless steel instruments with others made of different metals, including chrome-plated instruments, because this may cause electrolysis and result in etching. If an instrument is accidentally dropped, it may be permanently damaged. If scissors are dropped with the blades partly open, there may be a nick at the point where the blades cross. Any damaged or malfunctioning instrument must be disposed of to prevent complications during a surgical procedure.

After a surgical procedure, contaminated instruments should be placed in a basin of disinfectant solution. Heavier instruments should be on the bottom of the basin and lighter, more delicate instruments on top. Always unlock each instrument before immersing it in the chemical decontaminant to permit sanitization of the entire surface area. Never allow blood or other substances to dry on an instrument because they will be difficult to remove. If immediate sanitization and disinfection are not possible, the instruments should be rinsed well and placed in a cold-water solution with a blood solvent and mild detergent. It is best to use a detergent with a neutral pH, is low sudsing, and can be rinsed off easily. The manufacturer’s recommendations for the correct dilution and time of immersion of the various sanitizing agents, disinfectants, and blood solvents must be strictly followed for the chemicals to be effective.

When the surgical procedure is completed, the receiving basin for instruments should be transferred from the surgical area to the disinfection and sterilization room. It is important to remove used instruments from the patient’s view as soon as possible. After sanitization is complete, instruments should be rinsed thoroughly and either washed by hand or washed mechanically using an ultrasonic device. Some delicate instruments, such as microsurgical and lensed instruments, should be washed by hand with a mild, low-sudsing, neutral-pH detergent solution and a soft brush.

All instruments should be cleaned while submerged to prevent the airborne spread of microorganisms. Throughout the sanitization process, the medical assistant should wear heavy utility gloves to prevent possible exposure to contaminants. Some clinical policies require the medical assistant to wear disposable gloves under utility gloves for added protection from contaminants. Instruments then should be rinsed, dried with a lint-free cloth, and inspected for proper functioning before they are packed for sterilization.

Mechanical washing, such as with an ultrasonic device, can be used for most instruments and is an especially good method for sanitizing sharp instruments to prevent injuries (FIGURE 9.28). In an ultrasonic cleaning unit, the instruments are immersed in a cleaning solution, and the device produces sound waves that clean contaminants from the instruments’ surfaces. Some units then rinse and dry the instruments, leaving them ready for the sterilization process. However, manufacturers’ guidelines should be followed for rubber and plastic materials.

After sanitization and inspection, the instruments are ready for the sterilization process. Commercially prepared, disposable packs are available for most minor surgical procedures. They save time and eliminate the need for sanitization, disinfection, and sterilization of reusable stainless-steel instruments, but they may also be too costly for individual practices.

Sterilization

Before an instrument or piece of equipment can be used in a surgical procedure, it must first be sanitized and then sterilized to remove all forms of microorganisms. It is essential that you understand the concepts of sanitization and disinfection before learning sterilization methods. Written sanitization, disinfection, and sterilization procedures should be in place for each workplace.

Utility room

An area should be set aside to ensure proper sterilization for surgical aseptic procedures. The area should be divided into two sections, one dirty and one clean. The dirty section is used for receiving contaminated instruments and other materials at the end of surgical procedures. This area should have a sink, receiving basins, proper sanitizing and disinfecting agents, brushes, utility gloves, autoclave wrapping paper or cloth, autoclave envelopes and tape, sterilizer indicators, and gloves. Designated biohazard waste containers are needed for gloves worn when handling contaminated items. Personal protective equipment (PPE) for sanitization, disinfection, and autoclave procedures includes the following:

  • Fluid-resistant gloves to prevent contact with contaminants
  • A laboratory coat or impervious gown, if needed, to protect against splashes
  • A face shield or goggles if a splash hazard exists
  • Heat-resistant autoclave gloves for unloading

The clean section of the utility room should be reserved for receiving the sterile items after they have been removed from the autoclave. Clear, clean plastic bags in which to store sterile packs may be kept in the clean area. Both areas should be spotless and well organized.

Instruments and other items used in ambulatory surgery, examination, or treatment must be carefully cleaned before proceeding with the steps of disinfection or sterilization. Sanitization is the cleansing process that removes organic material and reduces the number of microorganisms to a safe level. This cleansing process removes debris, such as blood and other body fluids, from instruments or equipment. Sanitization should be completed immediately after instruments are used. This should occur in a separate workroom or area or on the “dirty” side of the utility room to prevent cross-contamination of clean instruments and equipment. If it is not possible to sanitize instruments immediately after a procedure, they should be rinsed under cold water immediately and placed in a low-sudsing, rust-inhibiting, enzyme-containing detergent solution. Blood and debris must be removed so that later disinfection with chemicals or sterilization can penetrate all the instruments’ surfaces. Never allow blood or other substances to coagulate or dry on an instrument.

The medical assistant should always wear utility gloves while performing sanitization to prevent possible personal contamination with potentially infectious body fluids that may be present. When you are ready to sanitize instruments, drain the soaking solution and rinse each instrument in cold, running water.

Clean all sharp instruments at one time when you can concentrate on preventing injury to yourself. Open all hinges and scrub serrations and ratchets with a small scrub brush or toothbrush. Rinse the instruments in hot water, and then carefully check that they are in proper working order before they are disinfected or sterilized. Generally, these instruments are left out to air dry, but they may be hand dried with a microfiber towel to prevent spotting. Follow facility policy as to how instruments should be dried.

Disinfection is the process of killing pathogenic organisms or rendering them inactive. Many types of disinfecting agents are available, and they have varying degrees of effectiveness. It is important to follow the manufacturer’s guidelines on how to use each product properly and understand its advantages and disadvantages and possible sources of error. Disinfectants are used on equipment that cannot be sterilized (e.g., blood pressure cuffs and stethoscopes), on countertops and other physical surfaces in the healthcare facility, and for soaking instruments and equipment before sterilization. It is important to wear proper protective equipment when using disinfectants because they are generally strong enough to damage human tissue and will often leave burns if allowed prolonged contact with the skin.

Key points

Asepsis vs. Surgical Asepsis

  • Asepsis: free from infection; medical asepsis reduces microorganisms, prevents transfer
  • Surgical asepsis: complete destruction of microorganisms; mandatory for invasive procedures
  • Sterile technique required for any skin/mucous membrane puncture (e.g., injections, catheterizations)

Care & Handling of Instruments

  • Inspect instruments for defects, sharpness, and smooth surfaces before use
  • Do not bundle or mix metals; avoid dropping instruments to prevent damage
  • After use: place in disinfectant, unlock before immersion, clean promptly to prevent dried debris

Instrument Cleaning & Sanitization

  • Clean instruments submerged to prevent airborne contamination
  • Wear utility gloves (and possibly disposable gloves underneath) during cleaning
  • Use neutral pH, low-sudsing detergents; follow manufacturer’s dilution/time guidelines
  • Ultrasonic cleaning units: effective for sharp instruments, follow guidelines for plastics/rubber

Sterilization

  • Instruments must be sanitized before sterilization
  • Written procedures for sanitization, disinfection, and sterilization required
  • Commercial disposable packs available but may be costly

Utility Room Organization & PPE

  • Utility room divided into dirty (contaminated) and clean (sterile) sections
  • Dirty side: for receiving, cleaning, and disinfecting used instruments
  • Clean side: for storing sterile items
  • PPE: fluid-resistant gloves, lab coat/gown, face shield/goggles, heat-resistant gloves for autoclave

Sanitization & Disinfection Procedures

  • Sanitization: removes organic material, reduces microorganisms to safe level
  • Immediate cleaning after use; rinse in cold water, use enzyme detergent if delayed
  • Disinfection: kills or inactivates pathogens, used for items that can’t be sterilized
  • Always follow manufacturer’s instructions for disinfectants and wear proper PPE

More from Preparing for minor surgery: room, solutions, and supplies

  • Assisting in surgery
  • Surgical instruments: cutting and grasping
  • Drapes and sutures
  • Autoclave loading/unloading, chemical sterilization, and professional responsibilities
  • The autoclave process: operation, wrapping, and quality assurance