


Achievable logoAchievable logo
NCLEX
Sign in
Sign up
Purchase
Textbook
Practice exams
Support
How it works
Exam catalog
Mountain with a flag at the peak
Textbook
Introduction
1. Safe and effective care environment
1.1 Management of care
1.2 Safety and infection control
1.2.1 Standard precautions and transmission-based precautions
1.2.2 Surgical asepsis and sterile technique
1.2.3 Use of safety devices
1.2.4 Hazardous materials and emergency response
1.2.5 Incident reporting and error prevention
1.2.6 Safe handling of equipment and radiation precautions
1.2.7 Isolation and infection prevention
2. Health promotion and maintenance
3. Psychosocial Integrity
4. Physiological Integrity
Wrapping up
Achievable logoAchievable logo
1.2.3 Use of safety devices
Achievable NCLEX
1. Safe and effective care environment
1.2. Safety and infection control
Our NCLEX course is currently in development and is a work-in-progress.

Use of safety devices

6 min read
Font
Discuss
Share
Feedback

Introduction

Safety devices are meant to protect, not to punish. They are the guardrails of nursing practice, but if misused, they can cause harm as easily as they prevent it. Nurses must balance autonomy and dignity with the duty to shield clients from injury, using the least restrictive measure first, and reassessing often. The NCLEX will test your ability to choose, monitor, document, and discontinue these devices safely and ethically.

Learning objectives

By the end of this section, you should be able to:

  • Distinguish between least-restrictive restraint options and know when restraints are permissible
  • Implement fall prevention measures and assess equipment safety
  • Document, monitor, and evaluate safety device use according to standards

Restraints

There are two types of restraints: Physical restraints limit movement (mitts, belts, and vests), while chemical restraints use sedating medications (benzodiazepines and antipsychotics) to restrict behavior. Use the least restrictive method possible.

Indications & orders: Restraints are used only to prevent harm to self or others, when all alternatives fail. A provider order is required and time-limited: as short as 1 to 4 hours for violent/self-destructive behavior restraints (depending on age), renewable up to a maximum of 24 hours before a face-to-face physician reassessment is required. A PRN or standing restraint order is never permitted

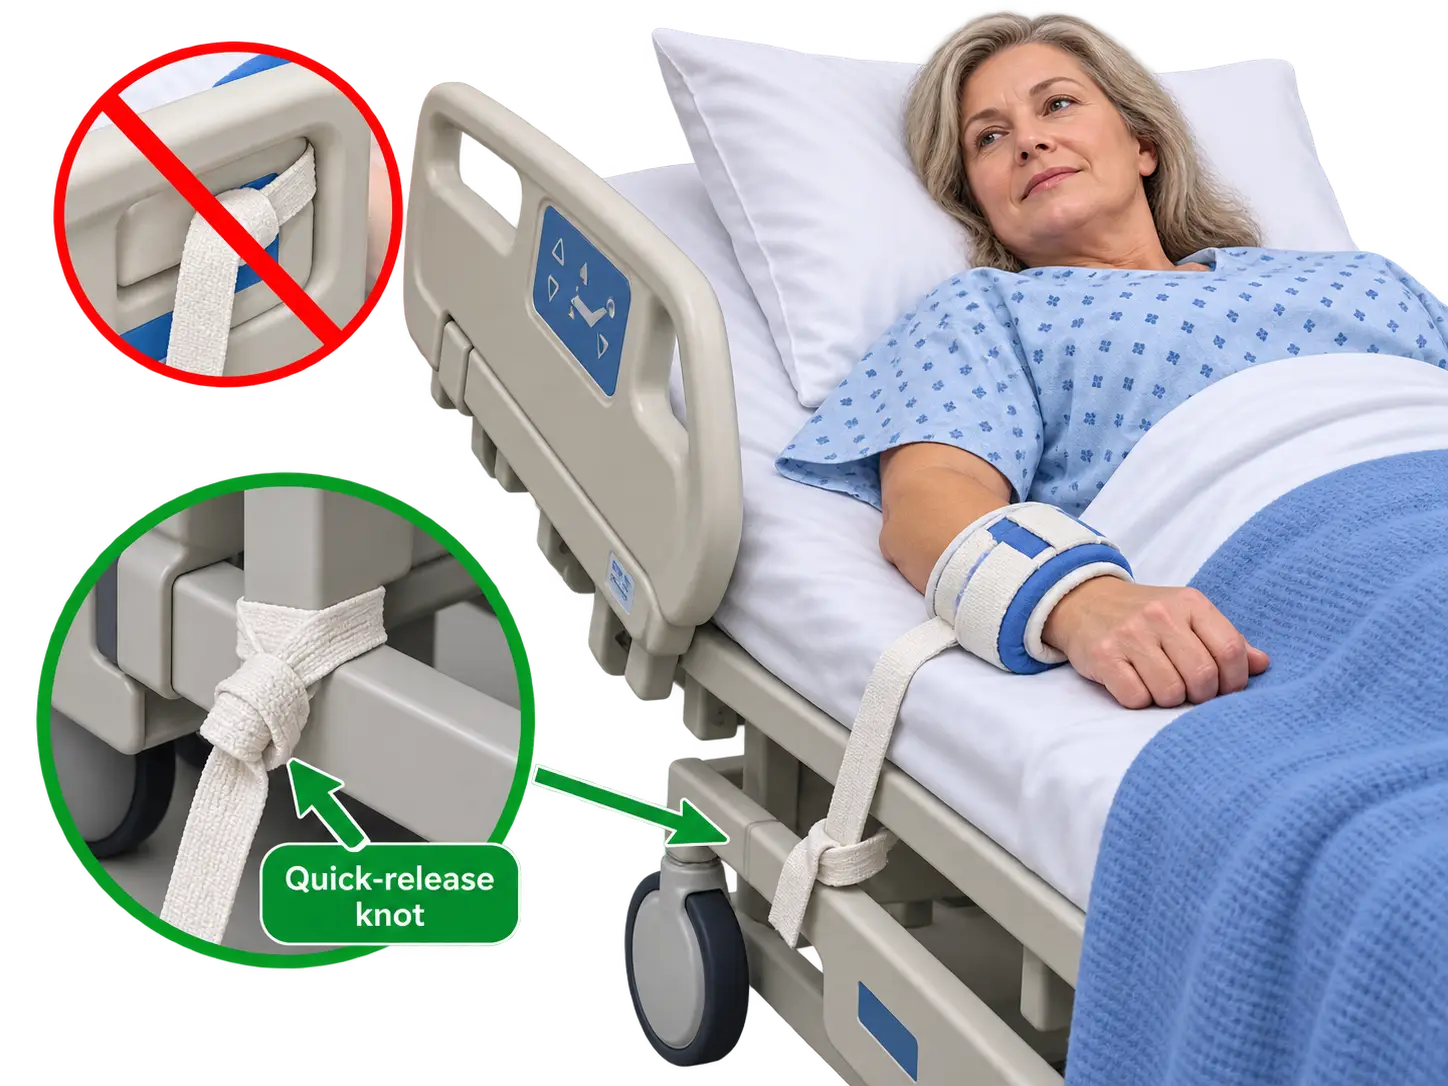
Application & monitoring: Restraints must be tied with a quick-release knot to a non-movable part of the bed frame (never side rails). Assess circulation, skin integrity, and patient comfort at least every 30 minutes; remove restraints every 2 hours to allow repositioning, toileting, and range of motion.

Discontinuation: As soon as the client no longer poses risk, restraints must be discontinued. Don’t wait for the order to expire. Act proactively.

alt_text
//////Caption: Safe application of physical restraints
Illustration type: Clinical illustration
Illustration note: Show soft wrist restraints secured to the bed frame with a quick-release knot, never to the side rails. Include arrows highlighting correct placement.///////

Nursing interventions

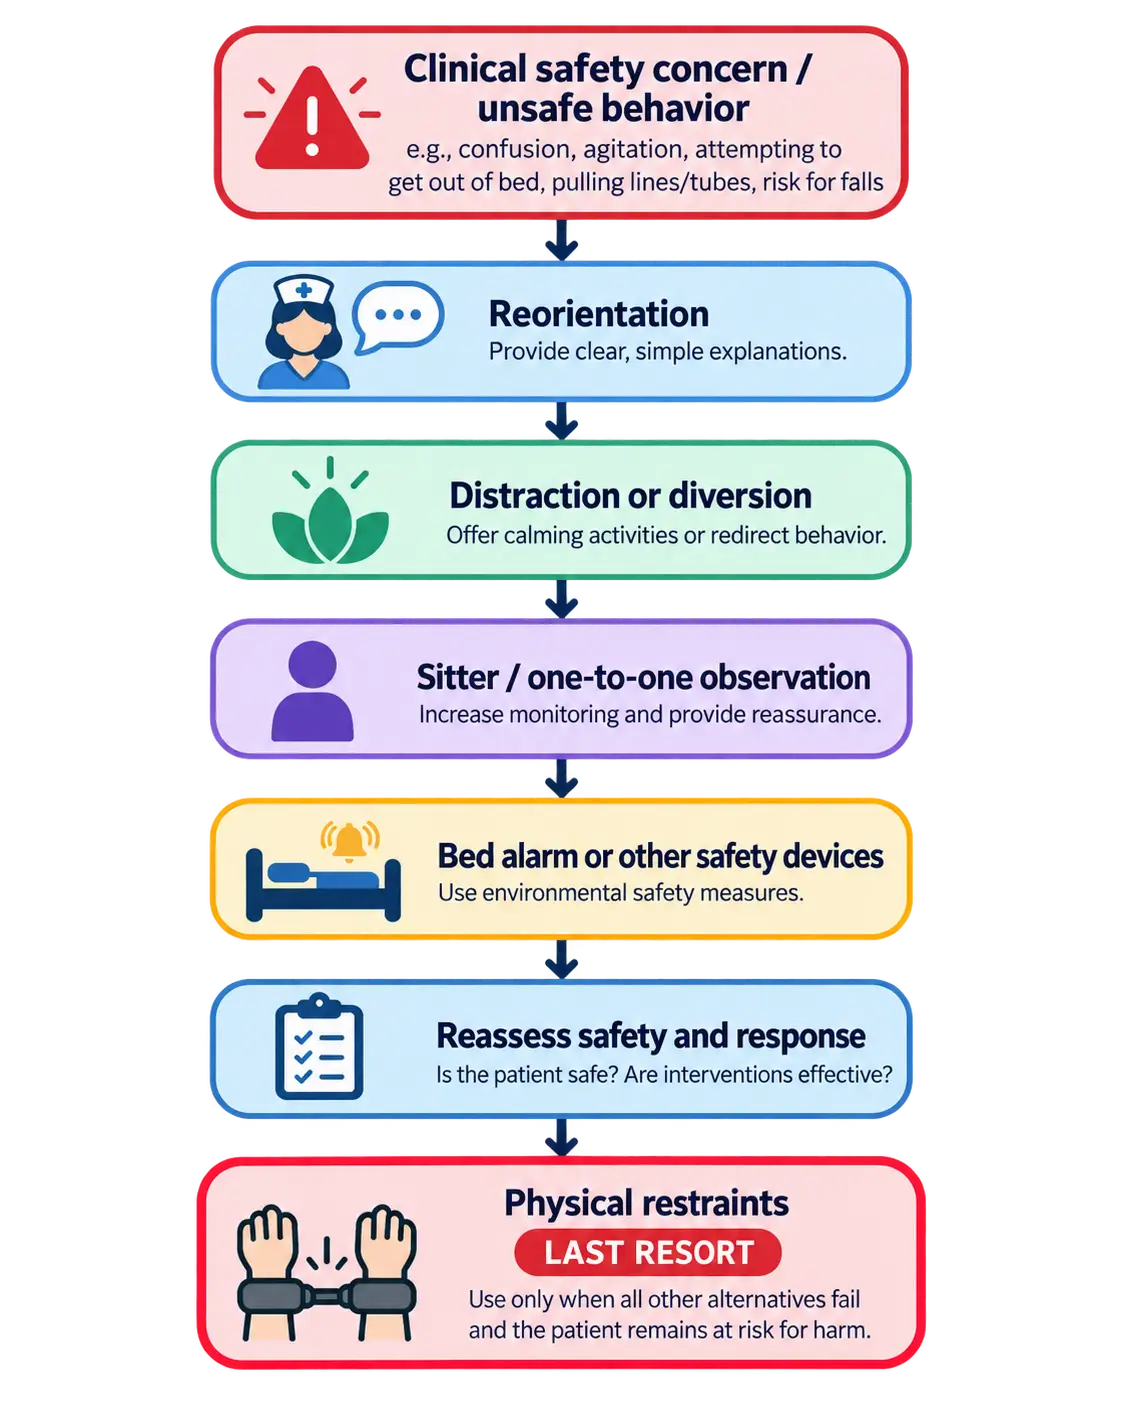
  • Try alternatives first (reorientation, sitters, bed/chair alarms)
  • Secure restraints to the bed frame, never the side rails, with a quick-release knot
  • Leave enough slack for circulation and comfort
  • Reassess circulation, skin integrity, and need for restraint at least every 30 minutes
  • Remove every 2 hours for range-of-motion and repositioning
  • Document thoroughly: type, reason, time applied, assessments, alternatives attempted
NGN tip:
Remember! Use the least restrictive intervention first. Restraints are a last resort and should be discontinued as soon as they are no longer needed.
alt_text
//////Caption: Least restrictive interventions for client safety
Illustration type: Decision flowchart
Illustration note: Show progression from least restrictive interventions (reorientation, distraction, sitter, bed alarm) to physical restraints only when all alternatives fail, emphasizing that restraints are a last resort.///////
Definitions
Quick-release knot
A slipknot used for restraints that allows the nurse or caregiver to release it rapidly in an emergency
Least-restrictive restraint
The mildest method or device that effectively prevents harm while preserving the greatest freedom for the client.

Fall prevention

The most important risk for falls is a previous fall. The idea is to avoid the first one and the disability, pain, and recurrence that usually follow.

Risk factors & assessment: Factors include age, mobility impairment, medications, confusion, history of falls, and environmental hazards. Use validated fall-risk tools on admission and periodically.

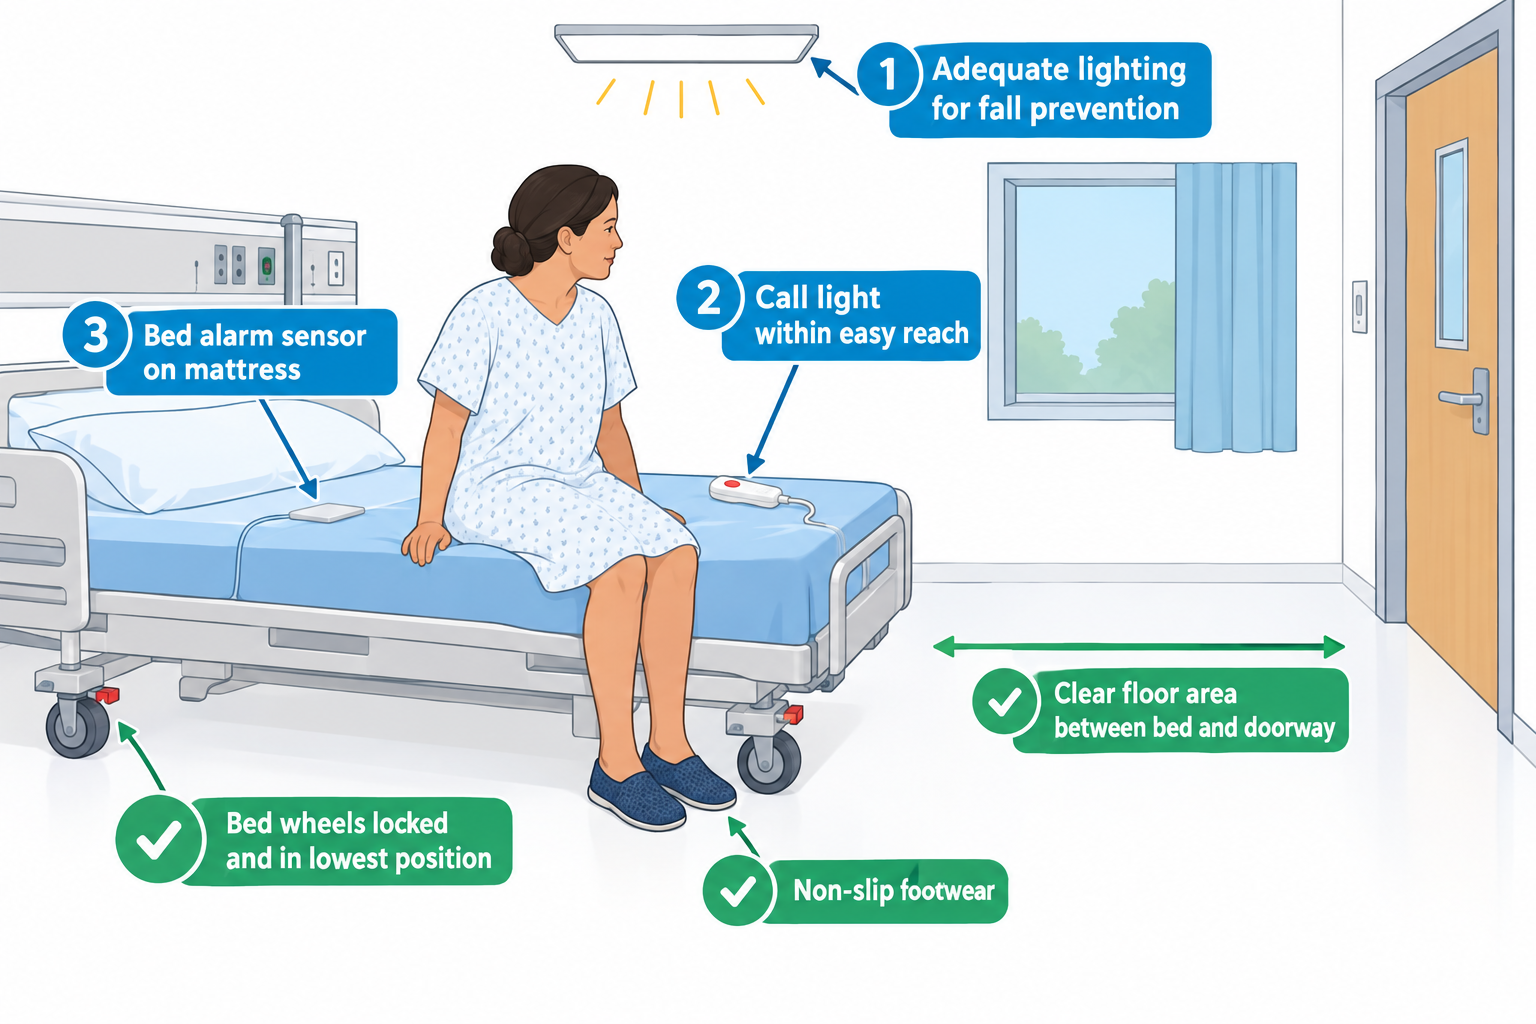
Preventive interventions: Keep beds low, wheels locked, call light within reach, and pathway clear of clutter. Use non-slip footwear, adequate lighting, and bed/exit alarms for high-risk clients. Move high-risk clients closer to nurses’ stations and round proactively.

Nursing interventions for fall prevention

  • Perform a fall risk assessment on admission and regularly thereafter
  • Keep the bed in the lowest position, wheels locked, and call light within reach
  • Provide non-slip footwear and adequate lighting
  • Eliminate clutter and keep frequently used items nearby
  • Use bed or chair alarms when appropriate
  • Encourage use of the call light before ambulating
  • Involve families in prevention education
NGN insight:
A history of previous falls is the strongest predictor of future falls. Prevention begins with identifying risk early.
alt_text
//////Caption: Common fall prevention measures
Illustration type: Infographic
Illustration note: Illustrate a low bed with locked wheels, call light within reach, non-slip footwear, uncluttered floor, bed alarm, and adequate lighting.///////

Equipment checks

Medical devices can protect life or threaten it if broken. Regular checks ensure they serve the client, not endanger them.

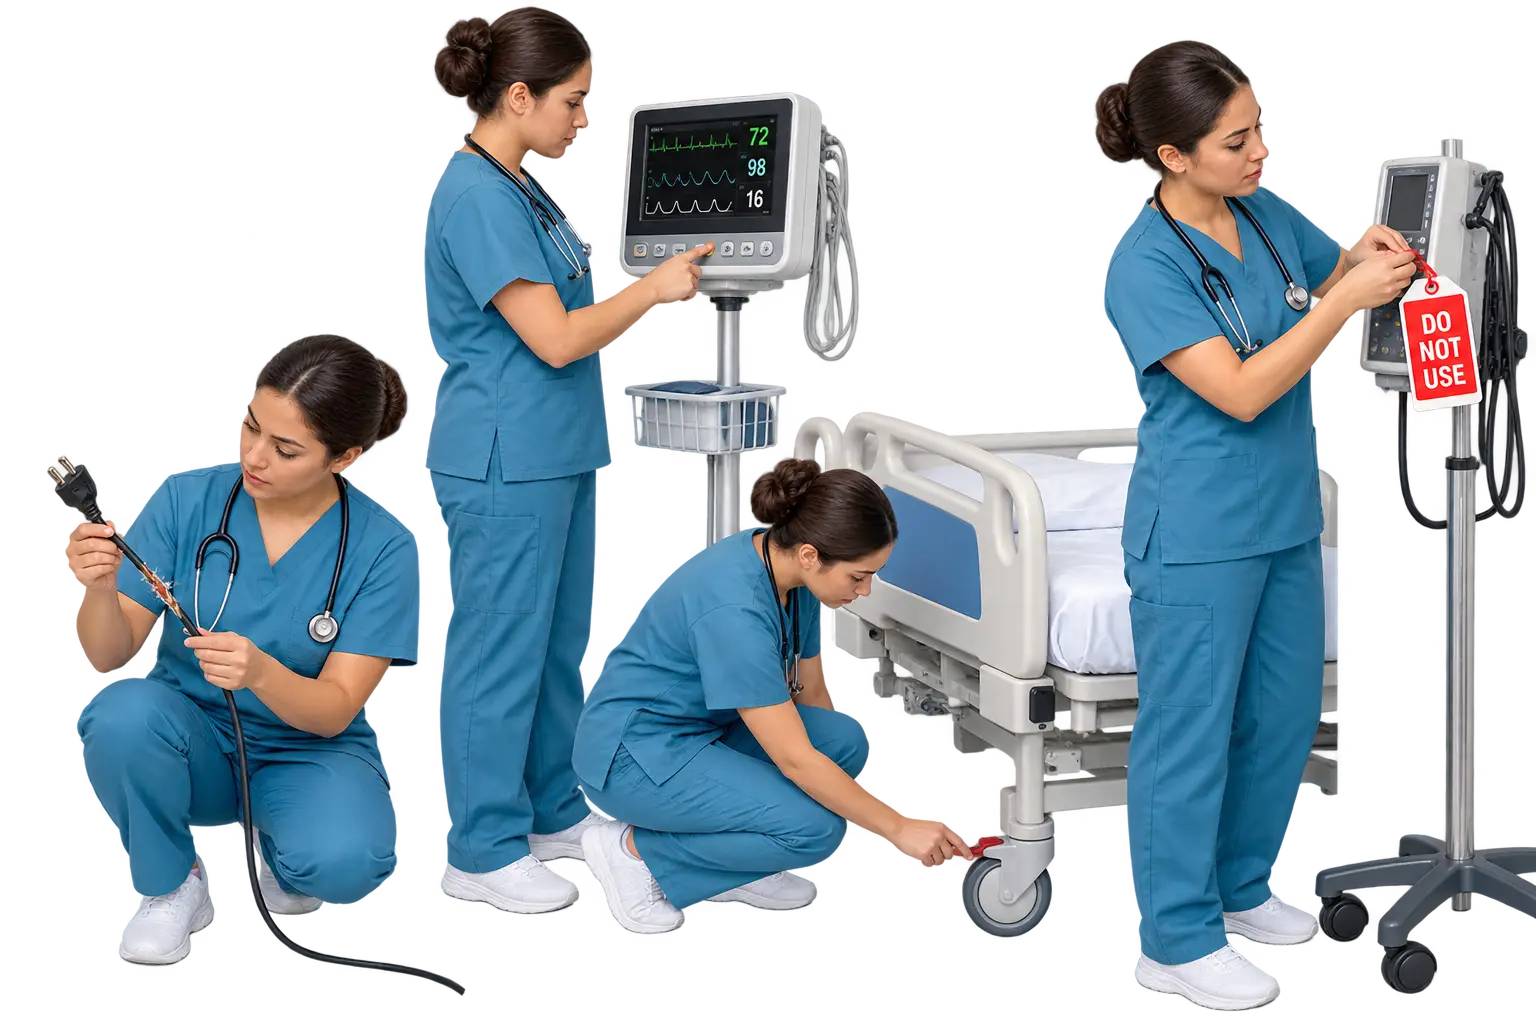
Inspection & safety: Inspect all medical devices and safety equipment before use. Look for frayed cords, alarms, loose connections, and integrity. Never use equipment you suspect is unsafe. Tag malfunctioning equipment “Do Not Use” and remove it from service immediately.

Emergency readiness: Confirm that oxygen, suction, defibrillators, wheelchairs, and monitors are functional at shift start. Secure wheels on stretchers, beds, and chairs before transfer.

Nursing interventions for equipment checks

  • Inspect equipment before each use for safety and function
  • Tag and remove malfunctioning devices (“Do Not Use”)
  • Confirm emergency equipment (oxygen, suction, defibrillator) is functional at the start of each shift
  • Lock wheels on beds, stretchers, and wheelchairs before transfers
alt_text
//////Caption: Equipment safety inspection
Illustration type: Clinical illustration
Illustration note: Show a nurse inspecting equipment for frayed cords, checking monitor alarms, locking bed wheels, and tagging faulty equipment with a “Do Not Use” label.///////

Clinical vignette: Mrs. P is restless and repeatedly attempts to remove her IV tubing. The nurse first tries reorientation, distraction, and a sitter, but these measures are unsuccessful. Soft wrist restraints are then applied to the bed frame using a quick-release knot. Every 30 minutes, the nurse assesses skin integrity and circulation. Every 2 hours, the restraints are removed for range-of-motion exercises, repositioning, toileting, and reassessment before being reapplied if still necessary. All interventions are documented thoroughly.

Safety considerations and client education

  • Restraints can cause injury, impaired circulation, and emotional distress. Use sparingly and reassess often.
  • Four raised side rails are generally considered a restraint when used to prevent a client from exiting the bed. Padded side rails are sometimes used for seizure precautions, though current teaching increasingly avoids restraint-like measures during a seizure.
  • Families should understand that restraints are temporary safety measures, not punishment.
  • Educate clients and families about fall precautions and safe equipment use.

Common pitfalls on the NCLEX

  • Applying restraints by tying them to the side rails rather than the bed frame.
  • Forgetting to reassess restraints every 30 minutes or remove them every 2 hours for range of motion, toileting, and repositioning.
  • Using restraints for convenience (staff ease) rather than genuine safety risk.
  • Delegating restraint assessment entirely to UAP without RN oversight.
  • Failing to document the rationale, assessment, or discontinuation plan.
  • Neglecting to check equipment like bed wheels or alarms before transfers.
  • Restraints are a last resort—always try alternatives first.
  • Tie restraints with quick-release knots to non-moving bed frame components.
  • Monitor and document restraint use every 30 minutes; remove every 2 hours.
  • Use fall prevention systematically (locks, low bed, alarms, lighting).
  • Inspect equipment before use; tag and remove unsafe devices immediately.

Sign up for free to take 7 quiz questions on this topic

Previous
Next  | 1.2.4 Hazardous materials and emergency response
All rights reserved ©2016 - 2026 Achievable, Inc.

Use of safety devices

Introduction

Safety devices are meant to protect, not to punish. They are the guardrails of nursing practice, but if misused, they can cause harm as easily as they prevent it. Nurses must balance autonomy and dignity with the duty to shield clients from injury, using the least restrictive measure first, and reassessing often. The NCLEX will test your ability to choose, monitor, document, and discontinue these devices safely and ethically.

Learning objectives

By the end of this section, you should be able to:

  • Distinguish between least-restrictive restraint options and know when restraints are permissible
  • Implement fall prevention measures and assess equipment safety
  • Document, monitor, and evaluate safety device use according to standards

Restraints

There are two types of restraints: Physical restraints limit movement (mitts, belts, and vests), while chemical restraints use sedating medications (benzodiazepines and antipsychotics) to restrict behavior. Use the least restrictive method possible.

Indications & orders: Restraints are used only to prevent harm to self or others, when all alternatives fail. A provider order is required and time-limited: as short as 1 to 4 hours for violent/self-destructive behavior restraints (depending on age), renewable up to a maximum of 24 hours before a face-to-face physician reassessment is required. A PRN or standing restraint order is never permitted

Application & monitoring: Restraints must be tied with a quick-release knot to a non-movable part of the bed frame (never side rails). Assess circulation, skin integrity, and patient comfort at least every 30 minutes; remove restraints every 2 hours to allow repositioning, toileting, and range of motion.

Discontinuation: As soon as the client no longer poses risk, restraints must be discontinued. Don’t wait for the order to expire. Act proactively.

alt_text
//////Caption: Safe application of physical restraints
Illustration type: Clinical illustration
Illustration note: Show soft wrist restraints secured to the bed frame with a quick-release knot, never to the side rails. Include arrows highlighting correct placement.///////

Nursing interventions

  • Try alternatives first (reorientation, sitters, bed/chair alarms)
  • Secure restraints to the bed frame, never the side rails, with a quick-release knot
  • Leave enough slack for circulation and comfort
  • Reassess circulation, skin integrity, and need for restraint at least every 30 minutes
  • Remove every 2 hours for range-of-motion and repositioning
  • Document thoroughly: type, reason, time applied, assessments, alternatives attempted
NGN tip:
Remember! Use the least restrictive intervention first. Restraints are a last resort and should be discontinued as soon as they are no longer needed.
alt_text
//////Caption: Least restrictive interventions for client safety
Illustration type: Decision flowchart
Illustration note: Show progression from least restrictive interventions (reorientation, distraction, sitter, bed alarm) to physical restraints only when all alternatives fail, emphasizing that restraints are a last resort.///////
Definitions
Quick-release knot
A slipknot used for restraints that allows the nurse or caregiver to release it rapidly in an emergency
Least-restrictive restraint
The mildest method or device that effectively prevents harm while preserving the greatest freedom for the client.

Fall prevention

The most important risk for falls is a previous fall. The idea is to avoid the first one and the disability, pain, and recurrence that usually follow.

Risk factors & assessment: Factors include age, mobility impairment, medications, confusion, history of falls, and environmental hazards. Use validated fall-risk tools on admission and periodically.

Preventive interventions: Keep beds low, wheels locked, call light within reach, and pathway clear of clutter. Use non-slip footwear, adequate lighting, and bed/exit alarms for high-risk clients. Move high-risk clients closer to nurses’ stations and round proactively.

Nursing interventions for fall prevention

  • Perform a fall risk assessment on admission and regularly thereafter
  • Keep the bed in the lowest position, wheels locked, and call light within reach
  • Provide non-slip footwear and adequate lighting
  • Eliminate clutter and keep frequently used items nearby
  • Use bed or chair alarms when appropriate
  • Encourage use of the call light before ambulating
  • Involve families in prevention education
NGN insight:
A history of previous falls is the strongest predictor of future falls. Prevention begins with identifying risk early.
alt_text
//////Caption: Common fall prevention measures
Illustration type: Infographic
Illustration note: Illustrate a low bed with locked wheels, call light within reach, non-slip footwear, uncluttered floor, bed alarm, and adequate lighting.///////

Equipment checks

Medical devices can protect life or threaten it if broken. Regular checks ensure they serve the client, not endanger them.

Inspection & safety: Inspect all medical devices and safety equipment before use. Look for frayed cords, alarms, loose connections, and integrity. Never use equipment you suspect is unsafe. Tag malfunctioning equipment “Do Not Use” and remove it from service immediately.

Emergency readiness: Confirm that oxygen, suction, defibrillators, wheelchairs, and monitors are functional at shift start. Secure wheels on stretchers, beds, and chairs before transfer.

Nursing interventions for equipment checks

  • Inspect equipment before each use for safety and function
  • Tag and remove malfunctioning devices (“Do Not Use”)
  • Confirm emergency equipment (oxygen, suction, defibrillator) is functional at the start of each shift
  • Lock wheels on beds, stretchers, and wheelchairs before transfers
alt_text
//////Caption: Equipment safety inspection
Illustration type: Clinical illustration
Illustration note: Show a nurse inspecting equipment for frayed cords, checking monitor alarms, locking bed wheels, and tagging faulty equipment with a “Do Not Use” label.///////

Clinical vignette: Mrs. P is restless and repeatedly attempts to remove her IV tubing. The nurse first tries reorientation, distraction, and a sitter, but these measures are unsuccessful. Soft wrist restraints are then applied to the bed frame using a quick-release knot. Every 30 minutes, the nurse assesses skin integrity and circulation. Every 2 hours, the restraints are removed for range-of-motion exercises, repositioning, toileting, and reassessment before being reapplied if still necessary. All interventions are documented thoroughly.

Safety considerations and client education

  • Restraints can cause injury, impaired circulation, and emotional distress. Use sparingly and reassess often.
  • Four raised side rails are generally considered a restraint when used to prevent a client from exiting the bed. Padded side rails are sometimes used for seizure precautions, though current teaching increasingly avoids restraint-like measures during a seizure.
  • Families should understand that restraints are temporary safety measures, not punishment.
  • Educate clients and families about fall precautions and safe equipment use.

Common pitfalls on the NCLEX

  • Applying restraints by tying them to the side rails rather than the bed frame.
  • Forgetting to reassess restraints every 30 minutes or remove them every 2 hours for range of motion, toileting, and repositioning.
  • Using restraints for convenience (staff ease) rather than genuine safety risk.
  • Delegating restraint assessment entirely to UAP without RN oversight.
  • Failing to document the rationale, assessment, or discontinuation plan.
  • Neglecting to check equipment like bed wheels or alarms before transfers.
Key points
  • Restraints are a last resort—always try alternatives first.
  • Tie restraints with quick-release knots to non-moving bed frame components.
  • Monitor and document restraint use every 30 minutes; remove every 2 hours.
  • Use fall prevention systematically (locks, low bed, alarms, lighting).
  • Inspect equipment before use; tag and remove unsafe devices immediately.

More from Safety and infection control

  • Standard precautions and transmission-based precautions
  • Surgical asepsis and sterile technique
  • Hazardous materials and emergency response
  • Incident reporting and error prevention
  • Safe handling of equipment and radiation precautions