


Achievable logoAchievable logo
NCLEX
Sign in
Sign up
Purchase
Textbook
Practice exams
Support
How it works
Exam catalog
Mountain with a flag at the peak
Textbook
Introduction
1. Safe and effective care environment
1.1 Management of care
1.2 Safety and infection control
1.2.1 Standard precautions and transmission-based precautions
1.2.2 Surgical asepsis and sterile technique
1.2.3 Use of safety devices
1.2.4 Hazardous materials and emergency response
1.2.5 Incident reporting and error prevention
1.2.6 Safe handling of equipment and radiation precautions
1.2.7 Isolation and infection prevention
2. Health promotion and maintenance
3. Psychosocial Integrity
4. Physiological Integrity
Wrapping up
Achievable logoAchievable logo
1.2.2 Surgical asepsis and sterile technique
Achievable NCLEX
1. Safe and effective care environment
1.2. Safety and infection control
Our NCLEX course is currently in development and is a work-in-progress.

Surgical asepsis and sterile technique

8 min read
Font
Discuss
Share
Feedback

Introduction

When nursing crosses the threshold from “clean” care to invasive procedures, sterile technique becomes nonoptional. Surgical asepsis, the practice of creating and maintaining a microorganism-free field, is a frontline defense against hospital-acquired infections. On the NCLEX, you’ll be tested on when to use it, how to maintain it, and what breaks it.

Learning objectives

By the end of this section, you should be able to:

  • Distinguish medical asepsis (clean technique) from surgical asepsis (sterile technique)
  • List and apply the principles of sterile technique in real-world nursing tasks
  • Identify breaches in sterility and the correct corrective steps
Definitions
Line of sterility
An invisible boundary separating sterile areas from nonsterile ones; crossing it with an unsterile object contaminates the field
Capillary action
The soaking or spreading of liquid through a porous material such as gauze or cloth (also called wicking). If a sterile field becomes wet, microorganisms from a nonsterile surface can travel through the moisture into the sterile area, causing contamination
Sterile field
A designated area free of all microorganisms; everything within it must remain sterile throughout the procedure

Principles of sterile technique

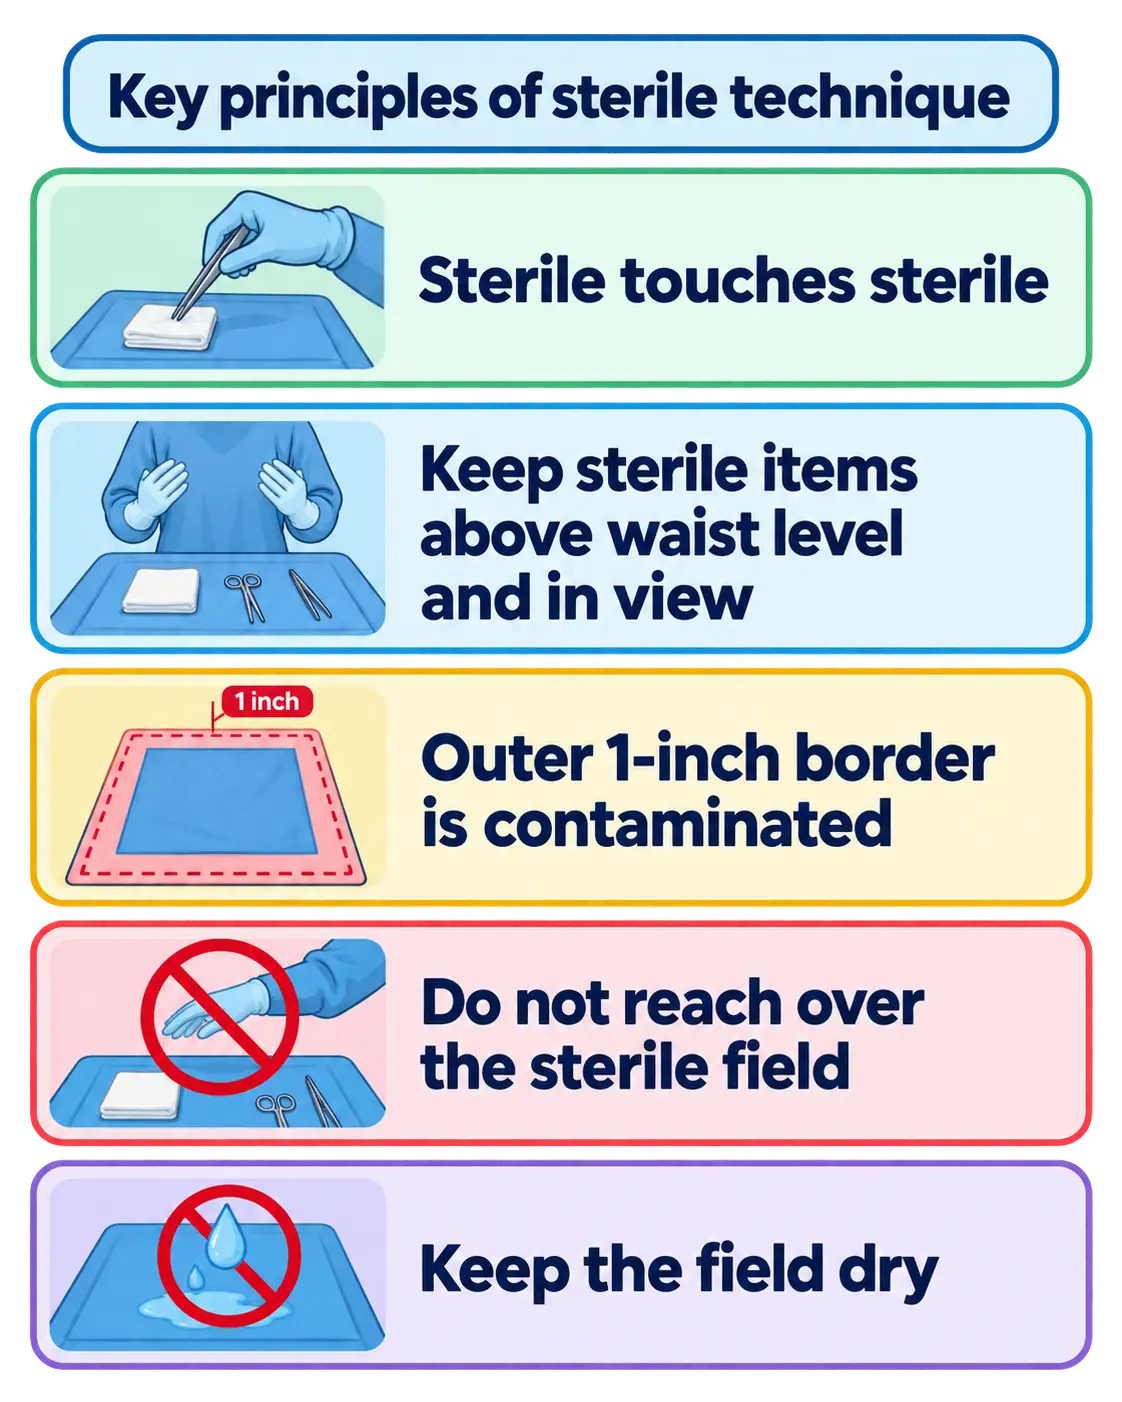
  • Only sterile items may touch other sterile items; if the line of sterility is crossed, contamination results
  • Items below waist level or outside the nurse’s vision are considered contaminated
  • The outer 1-inch border of a sterile field is considered contaminated once exposed
  • Avoid reaching over or turning your back on a sterile field
  • Moisture can permit microbial travel by capillary action. Dryness is required
  • Once sterility is in doubt, the object or field must be considered contaminated
alt_text
//////Caption: Key principles of sterile technique
Illustration type: Infographic
Illustration note: Illustrate the major rules of sterile technique, including the 1-inch border, above waist level, sterile touching sterile, avoiding reaching over the field, and keeping the field dry.///////

When to use surgical asepsis

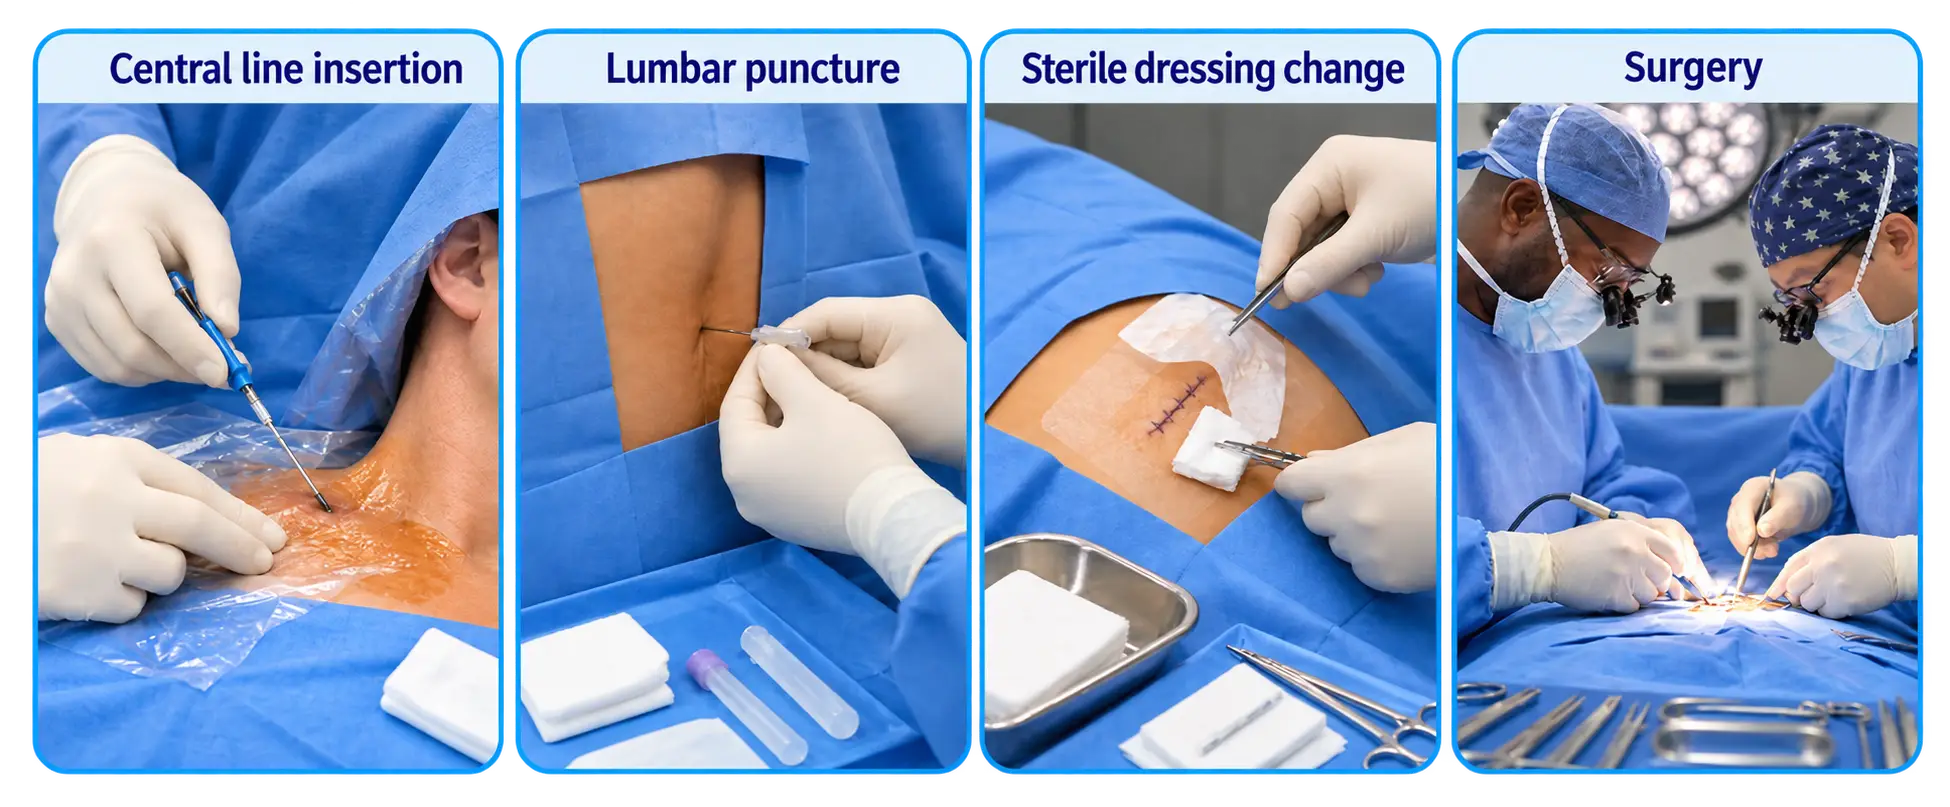
Sterile technique is required whenever the procedure breaks skin or mucous membranes, when entering sterile body cavities, or on open wound sites.

Examples include: insertion of central lines, urinary catheters, sterile dressing changes, and surgical procedures.

Clinical vignette: You are preparing to change a central line dressing. You inspect all sterile packages for intact seals and expiration dates, open them away from your body, set up a sterile field, don sterile gloves, and begin the procedure. Midway, you realize a forceps has fallen outside the 1-inch sterile border. You discard it, obtain a new sterile instrument, and continue because any item that crosses the line of sterility must be removed immediately to protect the sterile field.

alt_text
//////Caption: Common procedures requiring surgical asepsis
Illustration type: Medical illustration
Illustration note: Depict common sterile procedures such as central line insertion, urinary catheterization, sterile dressing changes, and surgery, with sterile gloves and sterile field highlighted.///////

Nursing interventions

To ensure client safety and prevent healthcare-associated infections, meticulous adherence to surgical asepsis and sterile technique is paramount in all clinical settings. This involves a comprehensive approach encompassing preparation, maintenance, and post-procedure protocols.

Preparation and set-up

Thorough preparation is the first line of defense against contamination. Before initiating any sterile procedure, nurses must:

  • Verify package integrity, expiration dates, and sterility indicators: Each sterile package must be carefully inspected for any signs of compromise, such as tears, punctures, or moisture. The expiration date on the package must be checked to ensure the product’s sterility. Furthermore, internal and external sterility indicators (e.g., chemical indicators that change color when exposed to sterilizing agents) must be examined to confirm proper sterilization processes have occurred. Any package that is damaged, expired, or shows an inadequate sterility indicator must be discarded immediately.
  • Open packages away from your body: When opening sterile packages, always peel open the outer wrapper away from your body. This technique minimizes the risk of inadvertently contaminating the inner sterile contents with your uniform, arms, or breath. The inner contents should then be carefully dropped onto the sterile field without touching the edges of the wrapper.

Maintaining a sterile field

Once a sterile field has been established, its integrity must be rigorously maintained throughout the entire procedure. This requires constant vigilance and adherence to specific principles:

  • Keep hands and supplies above waist level, always in sight: The area from the waist up is generally considered sterile in the context of a sterile field. Therefore, hands and any sterile supplies must always be kept within this sterile zone and in constant visual contact. Dropping hands or items below waist level, or out of sight, is considered a breach of sterility.
  • Do not reach over or turn your back on a sterile field: Reaching over a sterile field can introduce microorganisms from your clothing or body. Similarly, turning your back on a sterile field makes it impossible to monitor its integrity and can lead to inadvertent contamination. Always face the sterile field and maintain a safe distance when moving around it.
  • Minimize unnecessary movement, talking, and coughing near the field: Air currents can carry microorganisms, and excessive movement can stir up dust particles. Talking and coughing release respiratory droplets that can contaminate the sterile field. Therefore, all personnel involved in the procedure should minimize movement, speak only when necessary, and turn their heads away from the sterile field if coughing or sneezing cannot be avoided. Masks should be worn by all personnel within the sterile field during surgical procedures, and are recommended for bedside sterile procedures (e.g., central line insertion) when there is risk of respiratory droplet contamination.
alt_text
//////Caption: Maintaining a sterile field
Illustration type: Instructional illustration
Illustration note: Show correct and incorrect practices side by side, including keeping hands above waist level, avoiding reaching over the field, maintaining visual contact, and preventing moisture contamination.///////

During procedures

Specific actions during the procedure are critical to upholding sterile technique:

  • Use sterile gloves when handling sterile items: Sterile gloves create a sterile barrier between the healthcare provider’s hands and the sterile field. They must be donned using an aseptic technique and never allowed to come into contact with non-sterile surfaces. If a glove becomes contaminated, it must be removed and replaced immediately with a new sterile glove.
  • Replace contaminated supplies immediately: Any sterile item that comes into contact with a non-sterile surface, or that is suspected of contamination, must be considered non-sterile and replaced with a new, sterile item without delay. This includes instruments, dressings, and drapes.
  • Pour sterile solutions correctly: Pour without touching the sterile container, and discard the first small amount over a waste receptacle (a technique called “lipping”) to clean the bottle’s pouring edge of any dust or particles before the solution is poured. Pour slowly and from a safe height to avoid splashing, since splashes can carry microorganisms from non-sterile surfaces onto the sterile field.
alt_text
//////Caption: Correct technique for pouring sterile solutions
Illustration type: Step-by-step illustration
Illustration note: Show removing the bottle cap without contaminating it, lipping the solution into a waste receptacle, pouring without touching the sterile container, and avoiding splashing.///////

After procedures

Proper post-procedure care is essential for infection control and maintaining a safe environment:

  • Dispose of used materials safely: All used sterile and non-sterile materials, including sharps, soiled dressings, and drapes, must be disposed of according to institutional policies and biohazard waste regulations. This prevents the spread of microorganisms to other patients, healthcare workers, and the environment.
  • Perform hand hygiene: Immediately after the procedure and after disposing of all materials, thorough hand hygiene (either handwashing with soap and water or using an alcohol-based hand rub) must be performed. This is a critical step in breaking the chain of infection and protecting both the healthcare provider and subsequent patients.
NGN tip:
Remember! Keep the sterile field in view and above waist level. When sterility is in doubt, consider it contaminated.

Client education

  • Explain to clients that sterile supplies must not be touched.
  • Clarify the difference between “clean” technique at home and “sterile” technique in hospital.
  • Reassure clients that these steps prevent infection and protect vulnerable clients.

Common pitfalls on the NCLEX

  • Believing that anything held above waist level, above the table or near the sterile field is automatically sterile (it’s not). Only items within the established sterile field are truly sterile.
  • Forgetting the 1-inch border rule; any contact with it invalidates sterility.
  • Reaching over the sterile field or turning away during a procedure.
  • Allowing moisture (wet drapes, spills) to cross into the sterile field.
  • Using a sterile item dropped onto a nonsterile surface.
  • Sterile = absolutely free of microbes; “clean” only reduces microbes.
  • The outer 1-inch border of a sterile field is considered contaminated.
  • Keep all sterile items in sight and above waist level.
  • Liquids must be poured carefully; moisture compromises sterility.
  • When in doubt, throw it out.

Sign up for free to take 6 quiz questions on this topic

Previous
Next  | 1.2.3 Use of safety devices
All rights reserved ©2016 - 2026 Achievable, Inc.

Surgical asepsis and sterile technique

Introduction

When nursing crosses the threshold from “clean” care to invasive procedures, sterile technique becomes nonoptional. Surgical asepsis, the practice of creating and maintaining a microorganism-free field, is a frontline defense against hospital-acquired infections. On the NCLEX, you’ll be tested on when to use it, how to maintain it, and what breaks it.

Learning objectives

By the end of this section, you should be able to:

  • Distinguish medical asepsis (clean technique) from surgical asepsis (sterile technique)
  • List and apply the principles of sterile technique in real-world nursing tasks
  • Identify breaches in sterility and the correct corrective steps
Definitions
Line of sterility
An invisible boundary separating sterile areas from nonsterile ones; crossing it with an unsterile object contaminates the field
Capillary action
The soaking or spreading of liquid through a porous material such as gauze or cloth (also called wicking). If a sterile field becomes wet, microorganisms from a nonsterile surface can travel through the moisture into the sterile area, causing contamination
Sterile field
A designated area free of all microorganisms; everything within it must remain sterile throughout the procedure

Principles of sterile technique

  • Only sterile items may touch other sterile items; if the line of sterility is crossed, contamination results
  • Items below waist level or outside the nurse’s vision are considered contaminated
  • The outer 1-inch border of a sterile field is considered contaminated once exposed
  • Avoid reaching over or turning your back on a sterile field
  • Moisture can permit microbial travel by capillary action. Dryness is required
  • Once sterility is in doubt, the object or field must be considered contaminated
alt_text
//////Caption: Key principles of sterile technique
Illustration type: Infographic
Illustration note: Illustrate the major rules of sterile technique, including the 1-inch border, above waist level, sterile touching sterile, avoiding reaching over the field, and keeping the field dry.///////

When to use surgical asepsis

Sterile technique is required whenever the procedure breaks skin or mucous membranes, when entering sterile body cavities, or on open wound sites.

Examples include: insertion of central lines, urinary catheters, sterile dressing changes, and surgical procedures.

Clinical vignette: You are preparing to change a central line dressing. You inspect all sterile packages for intact seals and expiration dates, open them away from your body, set up a sterile field, don sterile gloves, and begin the procedure. Midway, you realize a forceps has fallen outside the 1-inch sterile border. You discard it, obtain a new sterile instrument, and continue because any item that crosses the line of sterility must be removed immediately to protect the sterile field.

alt_text
//////Caption: Common procedures requiring surgical asepsis
Illustration type: Medical illustration
Illustration note: Depict common sterile procedures such as central line insertion, urinary catheterization, sterile dressing changes, and surgery, with sterile gloves and sterile field highlighted.///////

Nursing interventions

To ensure client safety and prevent healthcare-associated infections, meticulous adherence to surgical asepsis and sterile technique is paramount in all clinical settings. This involves a comprehensive approach encompassing preparation, maintenance, and post-procedure protocols.

Preparation and set-up

Thorough preparation is the first line of defense against contamination. Before initiating any sterile procedure, nurses must:

  • Verify package integrity, expiration dates, and sterility indicators: Each sterile package must be carefully inspected for any signs of compromise, such as tears, punctures, or moisture. The expiration date on the package must be checked to ensure the product’s sterility. Furthermore, internal and external sterility indicators (e.g., chemical indicators that change color when exposed to sterilizing agents) must be examined to confirm proper sterilization processes have occurred. Any package that is damaged, expired, or shows an inadequate sterility indicator must be discarded immediately.
  • Open packages away from your body: When opening sterile packages, always peel open the outer wrapper away from your body. This technique minimizes the risk of inadvertently contaminating the inner sterile contents with your uniform, arms, or breath. The inner contents should then be carefully dropped onto the sterile field without touching the edges of the wrapper.

Maintaining a sterile field

Once a sterile field has been established, its integrity must be rigorously maintained throughout the entire procedure. This requires constant vigilance and adherence to specific principles:

  • Keep hands and supplies above waist level, always in sight: The area from the waist up is generally considered sterile in the context of a sterile field. Therefore, hands and any sterile supplies must always be kept within this sterile zone and in constant visual contact. Dropping hands or items below waist level, or out of sight, is considered a breach of sterility.
  • Do not reach over or turn your back on a sterile field: Reaching over a sterile field can introduce microorganisms from your clothing or body. Similarly, turning your back on a sterile field makes it impossible to monitor its integrity and can lead to inadvertent contamination. Always face the sterile field and maintain a safe distance when moving around it.
  • Minimize unnecessary movement, talking, and coughing near the field: Air currents can carry microorganisms, and excessive movement can stir up dust particles. Talking and coughing release respiratory droplets that can contaminate the sterile field. Therefore, all personnel involved in the procedure should minimize movement, speak only when necessary, and turn their heads away from the sterile field if coughing or sneezing cannot be avoided. Masks should be worn by all personnel within the sterile field during surgical procedures, and are recommended for bedside sterile procedures (e.g., central line insertion) when there is risk of respiratory droplet contamination.
alt_text
//////Caption: Maintaining a sterile field
Illustration type: Instructional illustration
Illustration note: Show correct and incorrect practices side by side, including keeping hands above waist level, avoiding reaching over the field, maintaining visual contact, and preventing moisture contamination.///////

During procedures

Specific actions during the procedure are critical to upholding sterile technique:

  • Use sterile gloves when handling sterile items: Sterile gloves create a sterile barrier between the healthcare provider’s hands and the sterile field. They must be donned using an aseptic technique and never allowed to come into contact with non-sterile surfaces. If a glove becomes contaminated, it must be removed and replaced immediately with a new sterile glove.
  • Replace contaminated supplies immediately: Any sterile item that comes into contact with a non-sterile surface, or that is suspected of contamination, must be considered non-sterile and replaced with a new, sterile item without delay. This includes instruments, dressings, and drapes.
  • Pour sterile solutions correctly: Pour without touching the sterile container, and discard the first small amount over a waste receptacle (a technique called “lipping”) to clean the bottle’s pouring edge of any dust or particles before the solution is poured. Pour slowly and from a safe height to avoid splashing, since splashes can carry microorganisms from non-sterile surfaces onto the sterile field.
alt_text
//////Caption: Correct technique for pouring sterile solutions
Illustration type: Step-by-step illustration
Illustration note: Show removing the bottle cap without contaminating it, lipping the solution into a waste receptacle, pouring without touching the sterile container, and avoiding splashing.///////

After procedures

Proper post-procedure care is essential for infection control and maintaining a safe environment:

  • Dispose of used materials safely: All used sterile and non-sterile materials, including sharps, soiled dressings, and drapes, must be disposed of according to institutional policies and biohazard waste regulations. This prevents the spread of microorganisms to other patients, healthcare workers, and the environment.
  • Perform hand hygiene: Immediately after the procedure and after disposing of all materials, thorough hand hygiene (either handwashing with soap and water or using an alcohol-based hand rub) must be performed. This is a critical step in breaking the chain of infection and protecting both the healthcare provider and subsequent patients.
NGN tip:
Remember! Keep the sterile field in view and above waist level. When sterility is in doubt, consider it contaminated.

Client education

  • Explain to clients that sterile supplies must not be touched.
  • Clarify the difference between “clean” technique at home and “sterile” technique in hospital.
  • Reassure clients that these steps prevent infection and protect vulnerable clients.

Common pitfalls on the NCLEX

  • Believing that anything held above waist level, above the table or near the sterile field is automatically sterile (it’s not). Only items within the established sterile field are truly sterile.
  • Forgetting the 1-inch border rule; any contact with it invalidates sterility.
  • Reaching over the sterile field or turning away during a procedure.
  • Allowing moisture (wet drapes, spills) to cross into the sterile field.
  • Using a sterile item dropped onto a nonsterile surface.
Key points
  • Sterile = absolutely free of microbes; “clean” only reduces microbes.
  • The outer 1-inch border of a sterile field is considered contaminated.
  • Keep all sterile items in sight and above waist level.
  • Liquids must be poured carefully; moisture compromises sterility.
  • When in doubt, throw it out.

More from Safety and infection control

  • Standard precautions and transmission-based precautions
  • Use of safety devices
  • Hazardous materials and emergency response
  • Incident reporting and error prevention
  • Safe handling of equipment and radiation precautions