


Achievable logoAchievable logo
NCLEX
Sign in
Sign up
Purchase
Textbook
Practice exams
Support
How it works
Exam catalog
Mountain with a flag at the peak
Textbook
Introduction
1. Safe and effective care environment
2. Health promotion and maintenance
3. Psychosocial Integrity
4. Physiological Integrity
4.1 Basic care and comfort
4.2 Pharmacological and parenteral therapies
4.3 Reduction of risk potential
4.3.1 Diagnostic tests and lab values
4.3.2 Monitoring for complications of procedures
4.3.3 Changes in vital signs and neurological status
4.3.4 Electrolyte imbalances and fluid status
4.3.5 Medical equipment use and safety
4.3.6 Potential complications of devices and procedures
4.4 Physiological adaptation
Wrapping up
Achievable logoAchievable logo
4.3.5 Medical equipment use and safety
Achievable NCLEX
4. Physiological Integrity
4.3. Reduction of risk potential
Our NCLEX course is currently in development and is a work-in-progress.

Medical equipment use and safety

9 min read
Font
Discuss
Share
Feedback

Introduction

Medical equipment is essential to modern client care, but it also introduces risk when misused, malfunctions, or is poorly monitored. On the Next Generation NCLEX (NGN), questions in this domain focus on client safety, early complication detection, infection prevention, and prioritization.

This section emphasizes commonly tested hospital equipment, especially that used in older adults, post-operative clients, and high-acuity settings.

Learning objectives

By the end of this section, the learner should be able to:

  • Identify common medical devices and their associated risks
  • Recognize early signs of device-related complications
  • Apply safety checks and nursing responsibilities
  • Prioritize interventions when equipment failure is suspected

Core concept: Equipment supports physiology, not replaces assessment

Medical equipment provides data and support, but the nurse must always assess the client first.

When alarms sound, the first step is to check the client, not the machine.

Nursing accountability & legal responsibility

Medical equipment safety is not just technical; it is a professional responsibility.

The nurse is accountable for:

  • Verifying correct settings at the start of shift
  • Ensuring equipment is functioning properly
  • Reporting malfunction immediately
  • Documenting:
    • Settings
    • Client response
    • Interventions performed
    • Provider notification (if applicable)

If equipment malfunctions:

  1. Remove from patient if unsafe
  2. Tag per facility policy
  3. Notify biomedical engineering
  4. Document objectively

Oxygen delivery devices

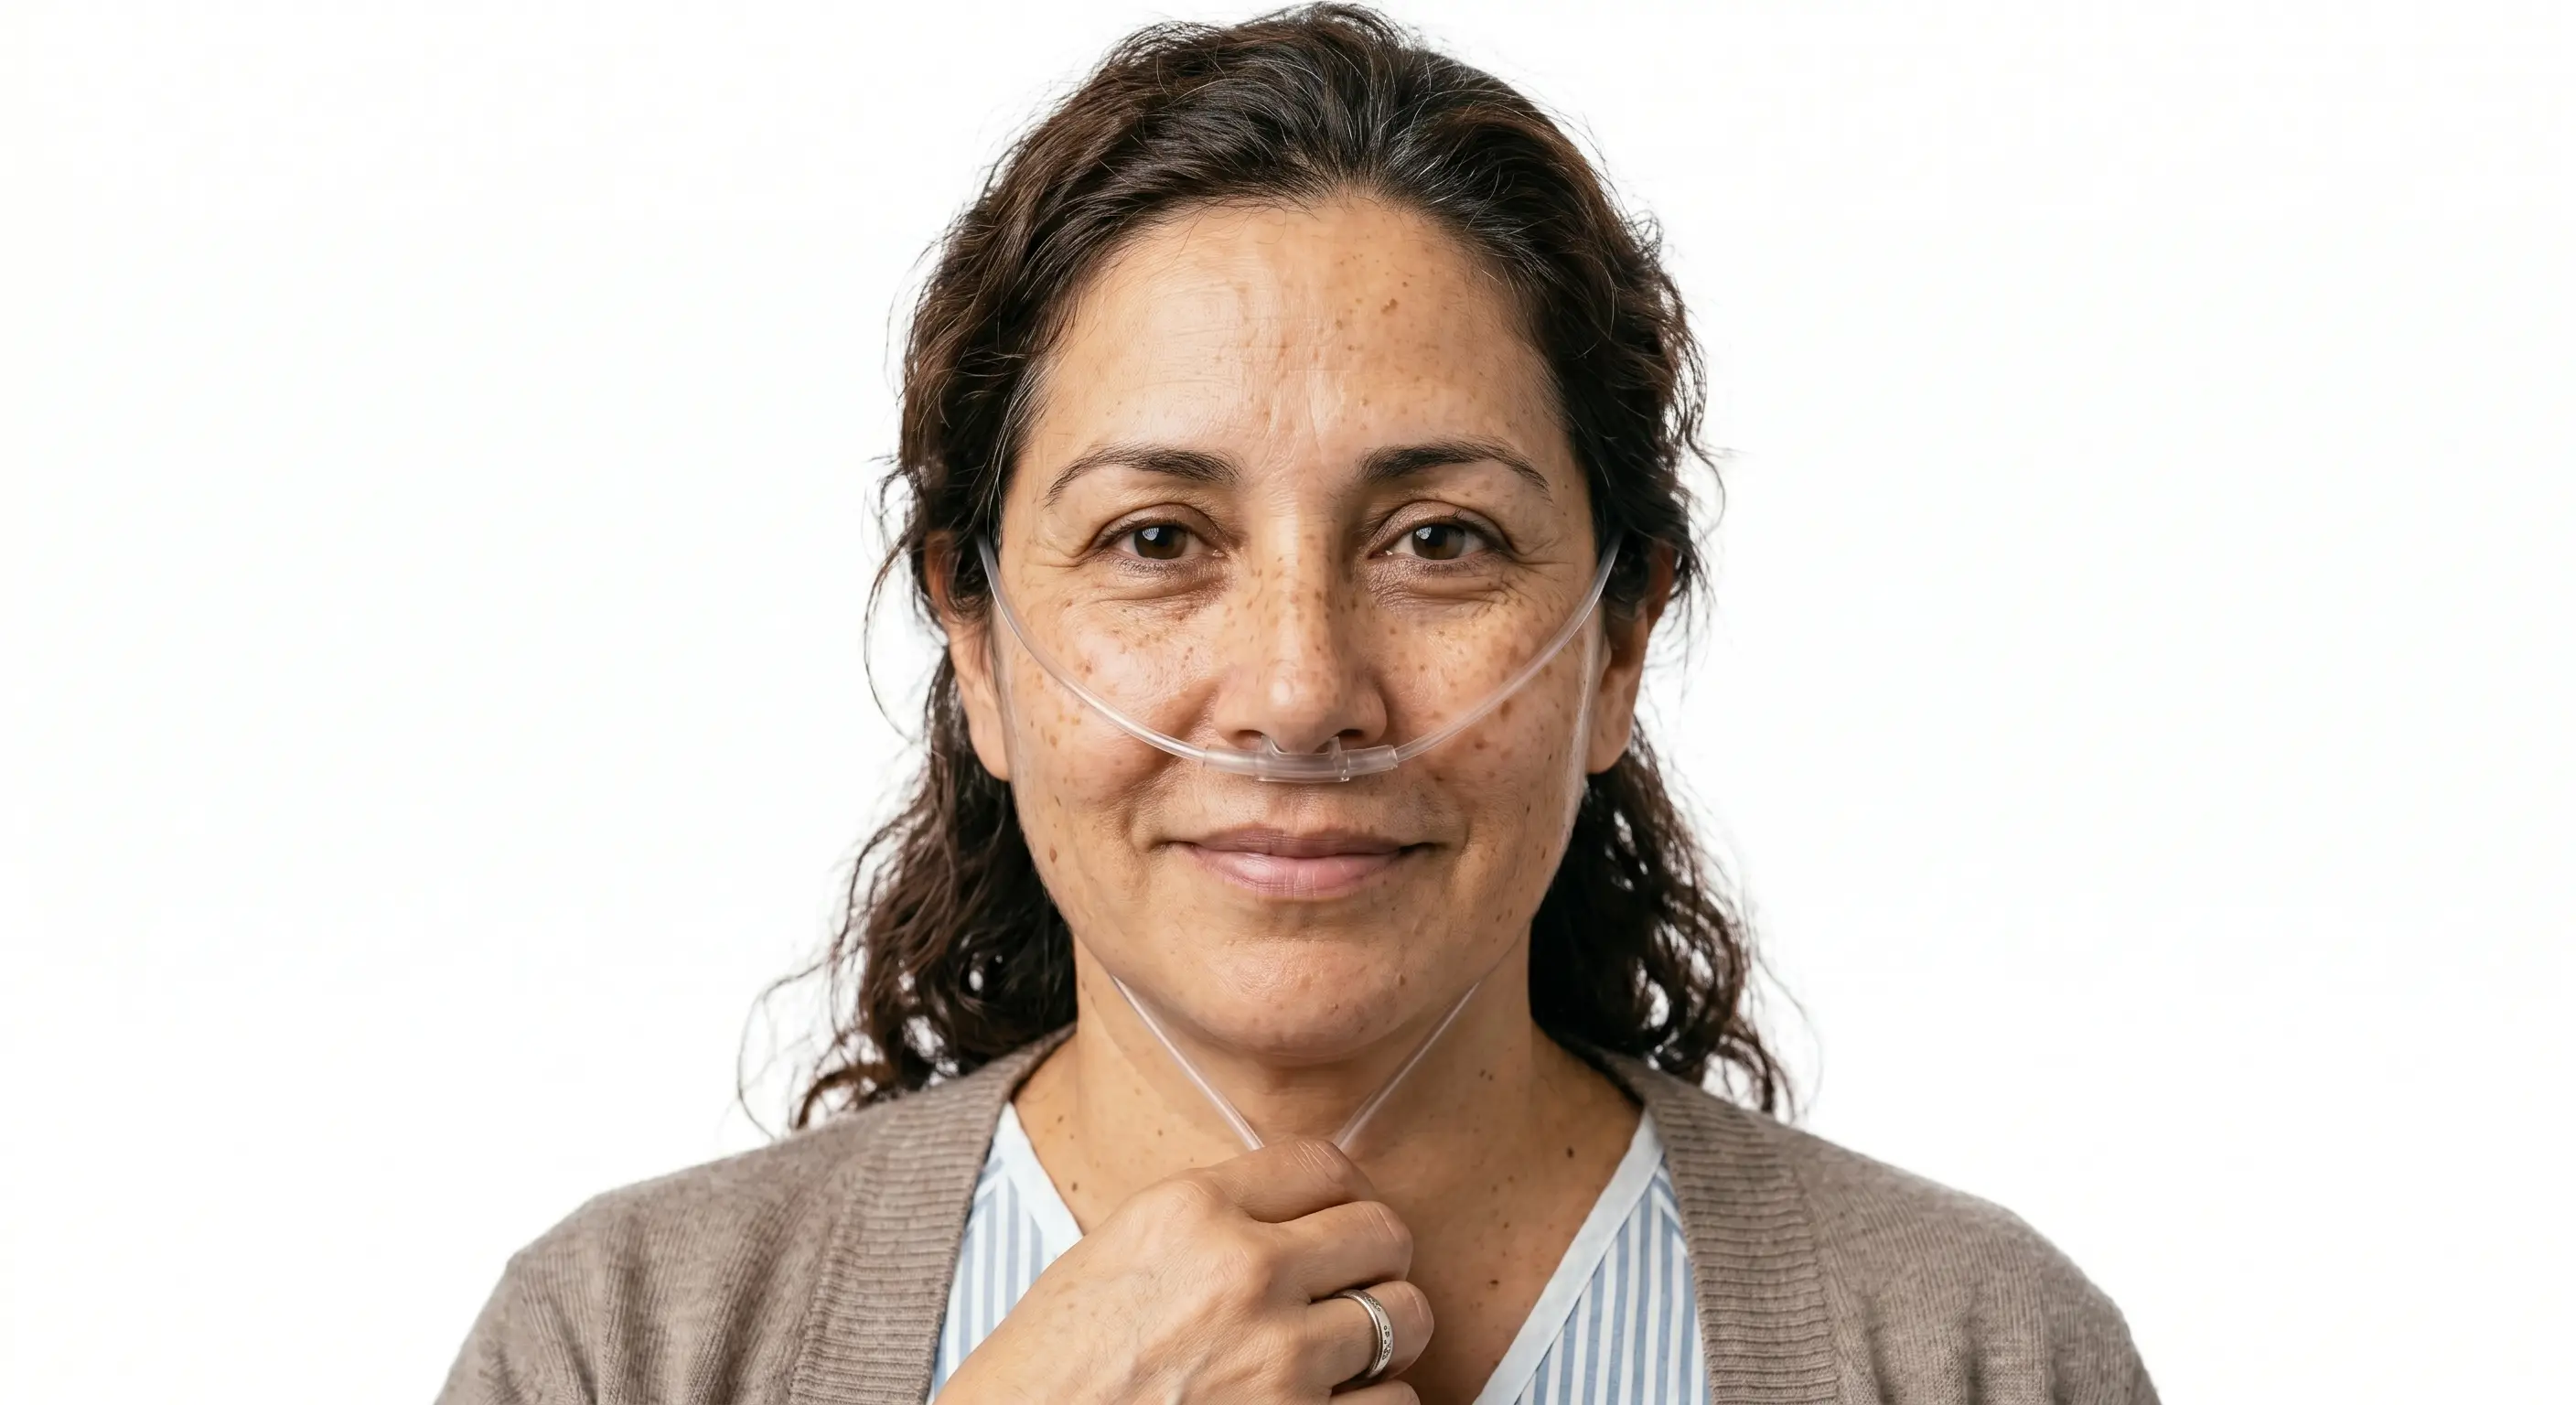
Nasal canula

Typically used for oxygen flow rates of 1–6 L/min. Higher flow rates may cause nasal dryness and discomfort.

Oxygenation device
Nasal cannula - Adult

Rebreather mask

Used to deliver high concentrations of oxygen to clients with significant hypoxemia. Ensure the reservoir bag remains partially inflated during use.

alt_text //////Image suggestion: Non-rebreather mask with reservoir bag" — labeled diagram showing the one-way valves and reservoir bag, useful since students often confuse rebreather vs. non-rebreather masks.////////

Common risks

  • Hypoxia from dislodgement
  • Dry mucous membranes
  • Skin breakdown
  • Oxygen toxicity (high concentrations)
alt_text
//////Caption: Common Oxygen Delivery Devices
Illustration type: Comparison chart
Illustration note: Compare common oxygen delivery devices, including nasal cannula and rebreather mask, highlighting typical oxygen delivery, common uses, and key nursing safety considerations.///////

Oxygen safety

Oxygen supports combustion.

Safety measures

  • Post “No Smoking” signage
  • Keep oxygen 5–10 feet away from heat sources
  • Avoid petroleum-based products (e.g., Vaseline)
  • Ensure humidification if >4 L/min
  • Secure oxygen tanks upright

Oxygen toxicity

Risk increases with:

  • High FiOâ‚‚ concentrations
  • Prolonged exposure (>24–48 hours)
  • Mechanically ventilated clients
NGN tip:
If hypoxia is suspected, apply oxygen first. Then investigate the cause.

Signs may include:

  • Restlessness
  • Non-productive cough
  • Chest pain
Definitions
Hypoxia
Inadequate oxygen delivery to tissues
Ventilation
The movement of air into and out of the lungs
Oxygenation
The process by which oxygen moves from the lungs into the bloodstream
Infiltration
Leakage of non-vesicant fluid into the surrounding tissue
CAUTI
Infection related to indwelling urinary catheter use
NGN tip:
Always verify oxygen flow rate and device placement when SpOâ‚‚ declines.

Pulse oximetry

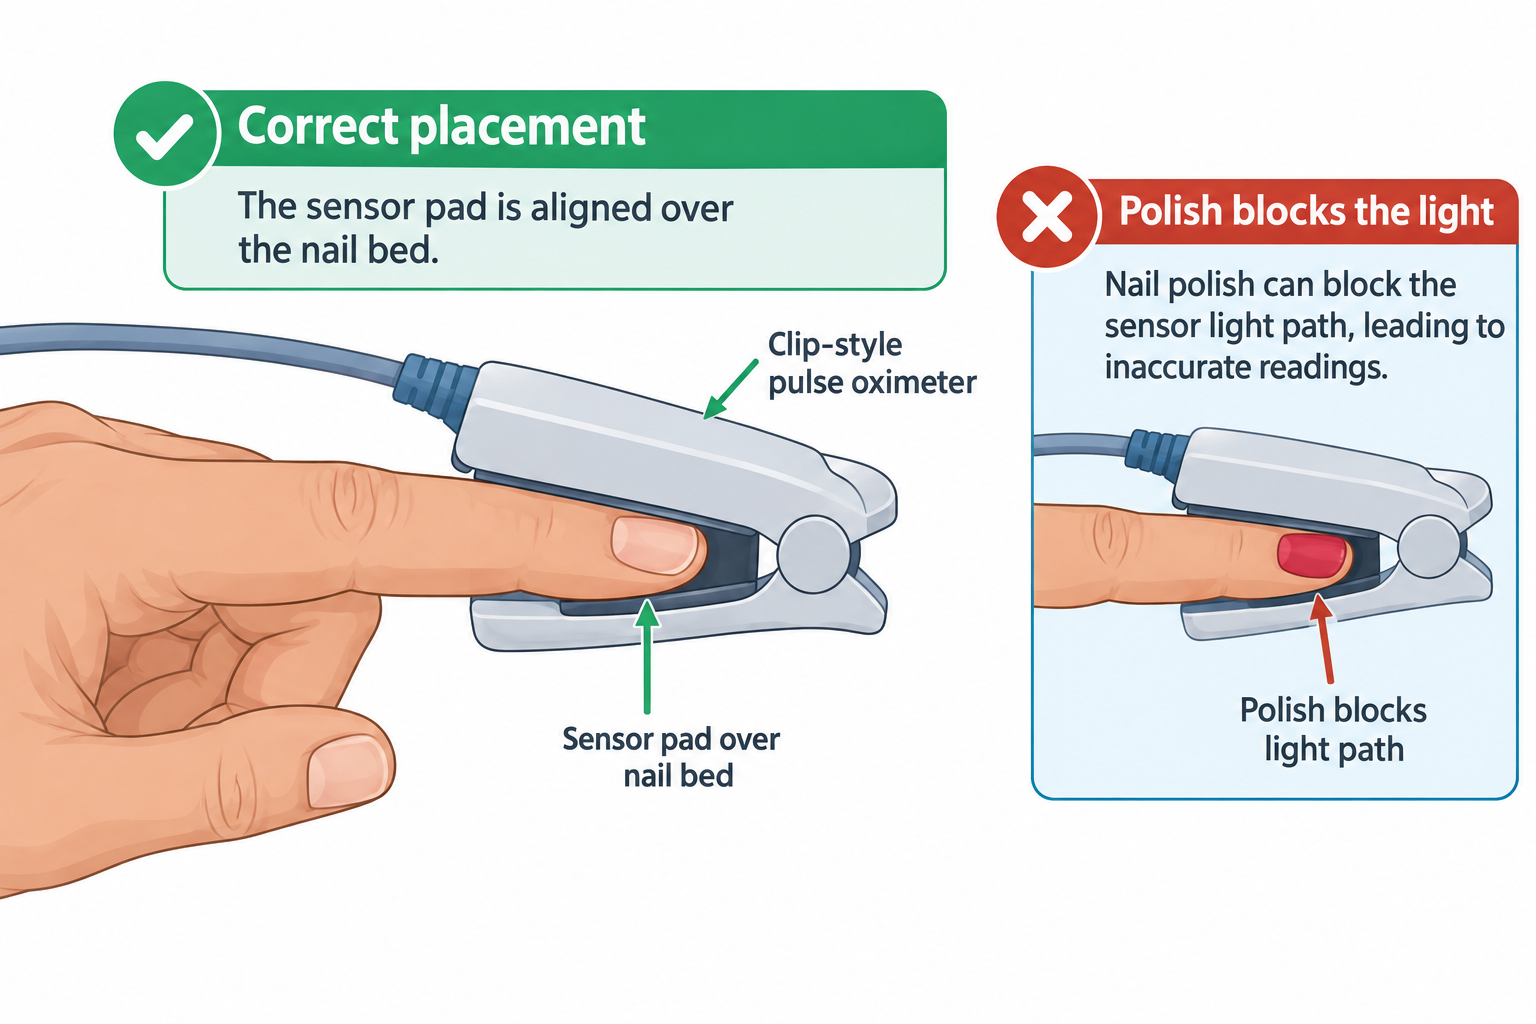
alt_text ////////📷 Image suggestion: “Pulse oximeter placement and limitations” — hand/finger with pulse ox probe, with callouts showing common interference factors (nail polish, cold extremity, motion)./////////

Limitations

  • Poor perfusion
  • Cold extremities
  • Nail polish or artificial nails
  • Motion artifact
NGN tip:
Pulse oximetry measures oxygen saturation, not ventilation.

Capnography

Capnography measures end-tidal COâ‚‚ (ETCOâ‚‚) and reflects ventilation. Capnography is often used with oxygen delivery devices (e.g., specialized nasal cannulas) to monitor ventilation and help detect airway or device-related problems.

This is especially relevant in:

  • Post-operative clients
  • Clients receiving opioids
  • Procedural sedation

Normal ETCO₂: 35–45 mmHg

Early respiratory depression sign: ⬆ Rising ETCO₂ before oxygen saturation drops.

NGN insight:
Pulse oximetry measures oxygenation. Capnography measures ventilation.
alt_text
//////Caption: Pulse Oximetry vs Capnography
Illustration type: Comparison chart
Illustration note: Compare pulse oximetry and capnography, emphasizing what each measures, normal values, limitations, and their roles in monitoring oxygenation versus ventilation.///////

Intravenous (IV) therapy equipment

alt_text ////////📷 Image suggestion: “Peripheral IV insertion sites and infiltration vs. phlebitis” — side-by-side diagram or photo comparison showing infiltration (cool, swollen, pale) vs. phlebitis (warm, red, cord-like vein), since these are commonly confused on NCLEX.////////

Potential complications

  • Infiltration
  • Extravasation
  • Phlebitis
  • Infection
  • Air embolism (rare but serious)
NGN tip:
Any liquid categorized as a vesicant requires frequent site assessment to detect extravasation early.

IV pump safety & high-alert medications

Infusion pumps are frequently tested due to medication error risk.

High-alert medications:

  • Insulin
  • Heparin
  • Chemotherapy
  • Vasopressors

Safety checks

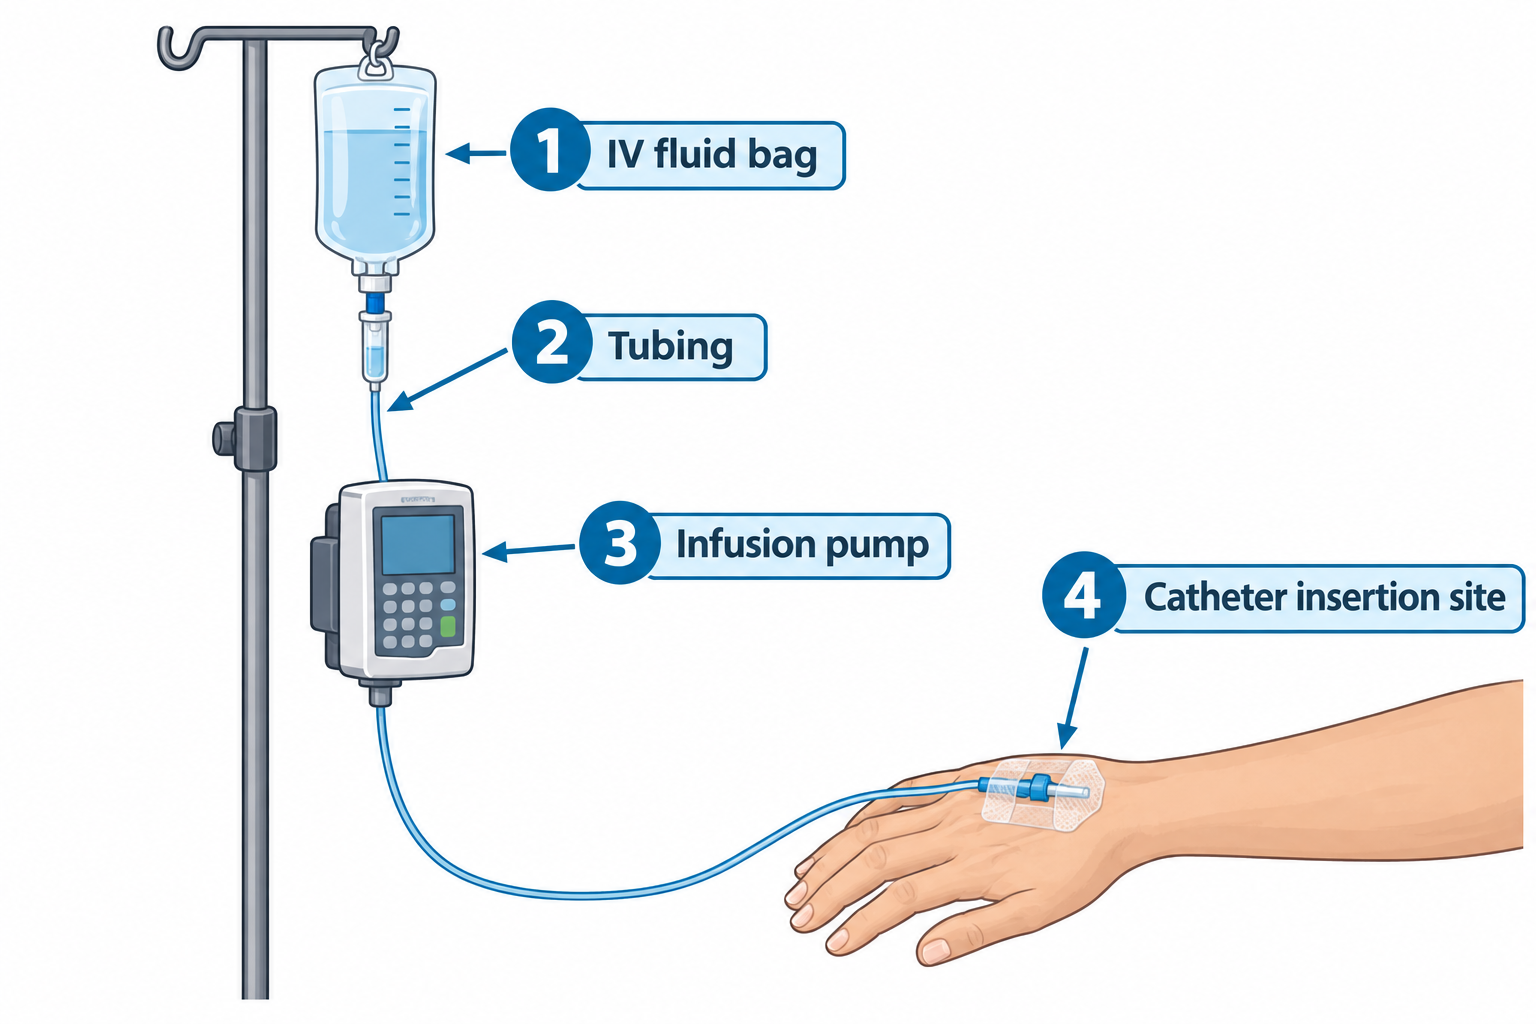
  • Trace tubing from bag to insertion site
  • Verify rate with order
  • Double-check pump programming
  • Label all tubing clearly.

If an occlusion alarm sounds:

  • Check for kinks
  • Assess insertion site
  • Ensure clamps are open
alt_text
//////Caption: Safe IV Pump Assessment
Illustration type: Clinical flowchart
Illustration note: Illustrate the sequence for assessing an IV pump alarm: trace tubing, inspect for kinks, verify clamps are open, assess the insertion site, verify pump settings, and respond appropriately.///////

Air embolism recognition

Although rare, signs include:

  • Sudden dyspnea
  • Chest pain
  • Hypotension

Immediate action: If suspected, clamp tubing immediately and position the client in left lateral Trendelenburg position (left side-lying, head down) to trap air in the right atrium.

alt_text
//////Caption: Recognizing and Managing an Air Embolism
Illustration type: Clinical flowchart
Illustration note: Illustrate the recognition of sudden dyspnea, chest pain, and hypotension during IV therapy, followed by stopping the infusion, clamping the tubing if appropriate, positioning the client in the left lateral Trendelenburg position, and notifying the provider.///////

Enteral feeding equipment

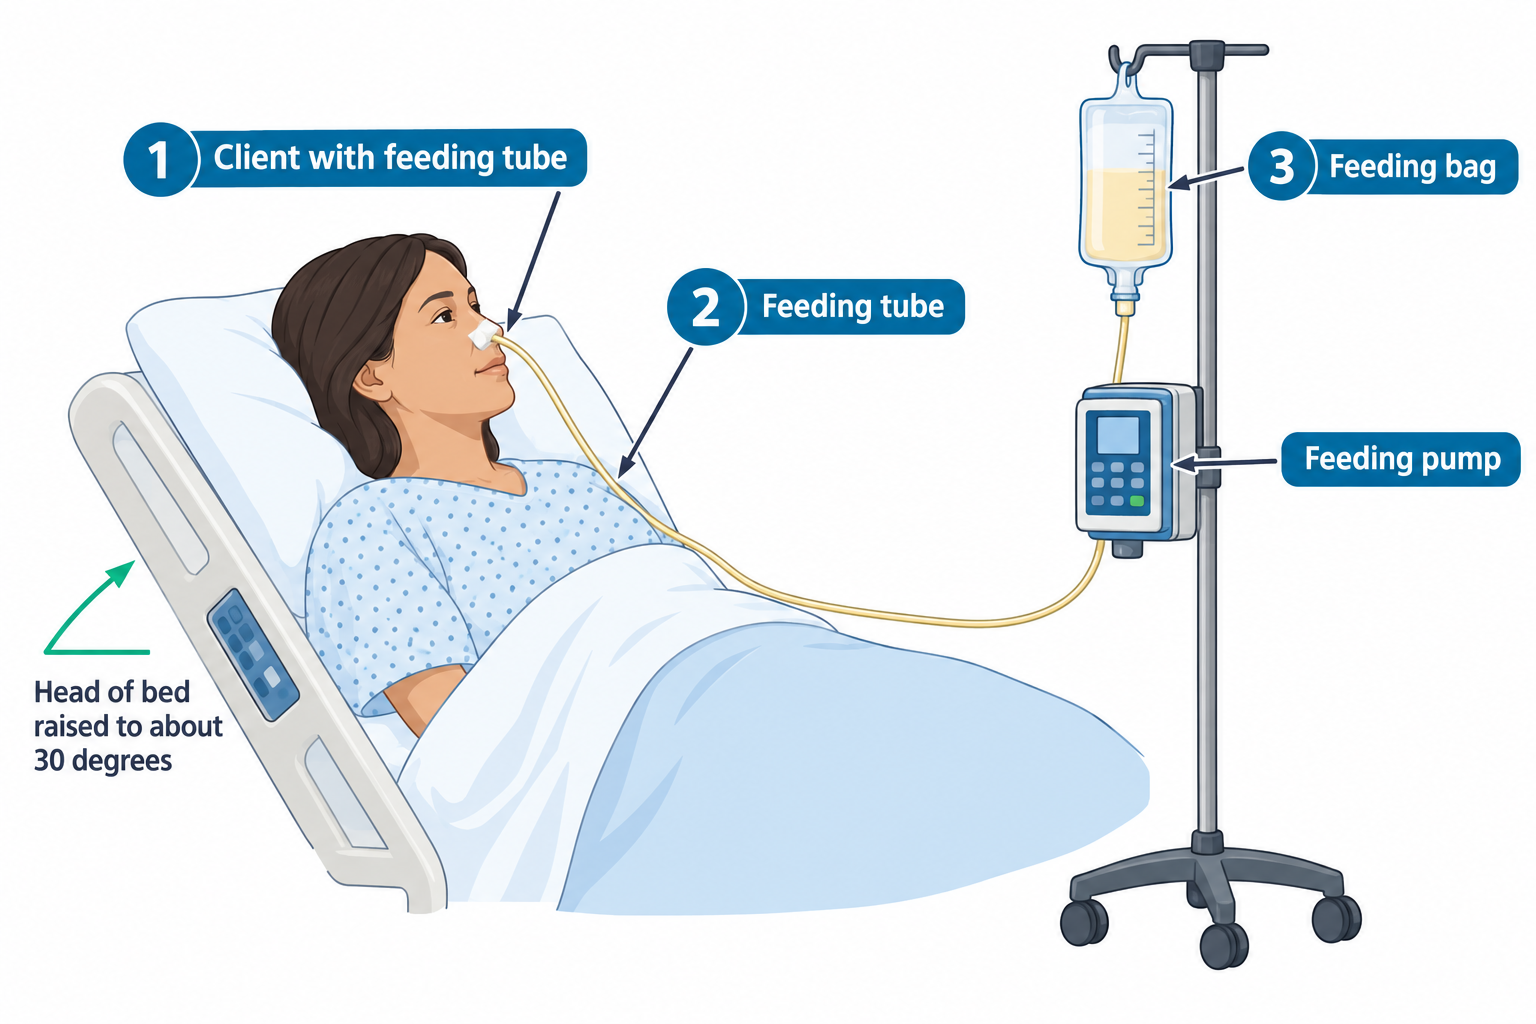
alt_text //////////📷 Image suggestion: “Enteral feeding tube placement and HOB elevation” — diagram of NG/PEG tube placement with head-of-bed at 30°+ angle labeled, showing correct aspiration-prevention positioning.////////

Key safety considerations

  • Verify tube placement before feeding
  • Elevate head of bed ≥30°
  • Monitor for aspiration
  • Check residuals per protocol
NGN tip:
Aspiration risk increases when the client is in the supine position.
alt_text
//////Caption: Preventing Aspiration During Enteral Feeding
Illustration type: Safety checklist
Illustration note: Illustrate essential enteral feeding safety measures, including verifying tube placement, elevating the head of the bed to at least 30°, monitoring for aspiration, and checking gastric residual volume according to institutional protocol.///////

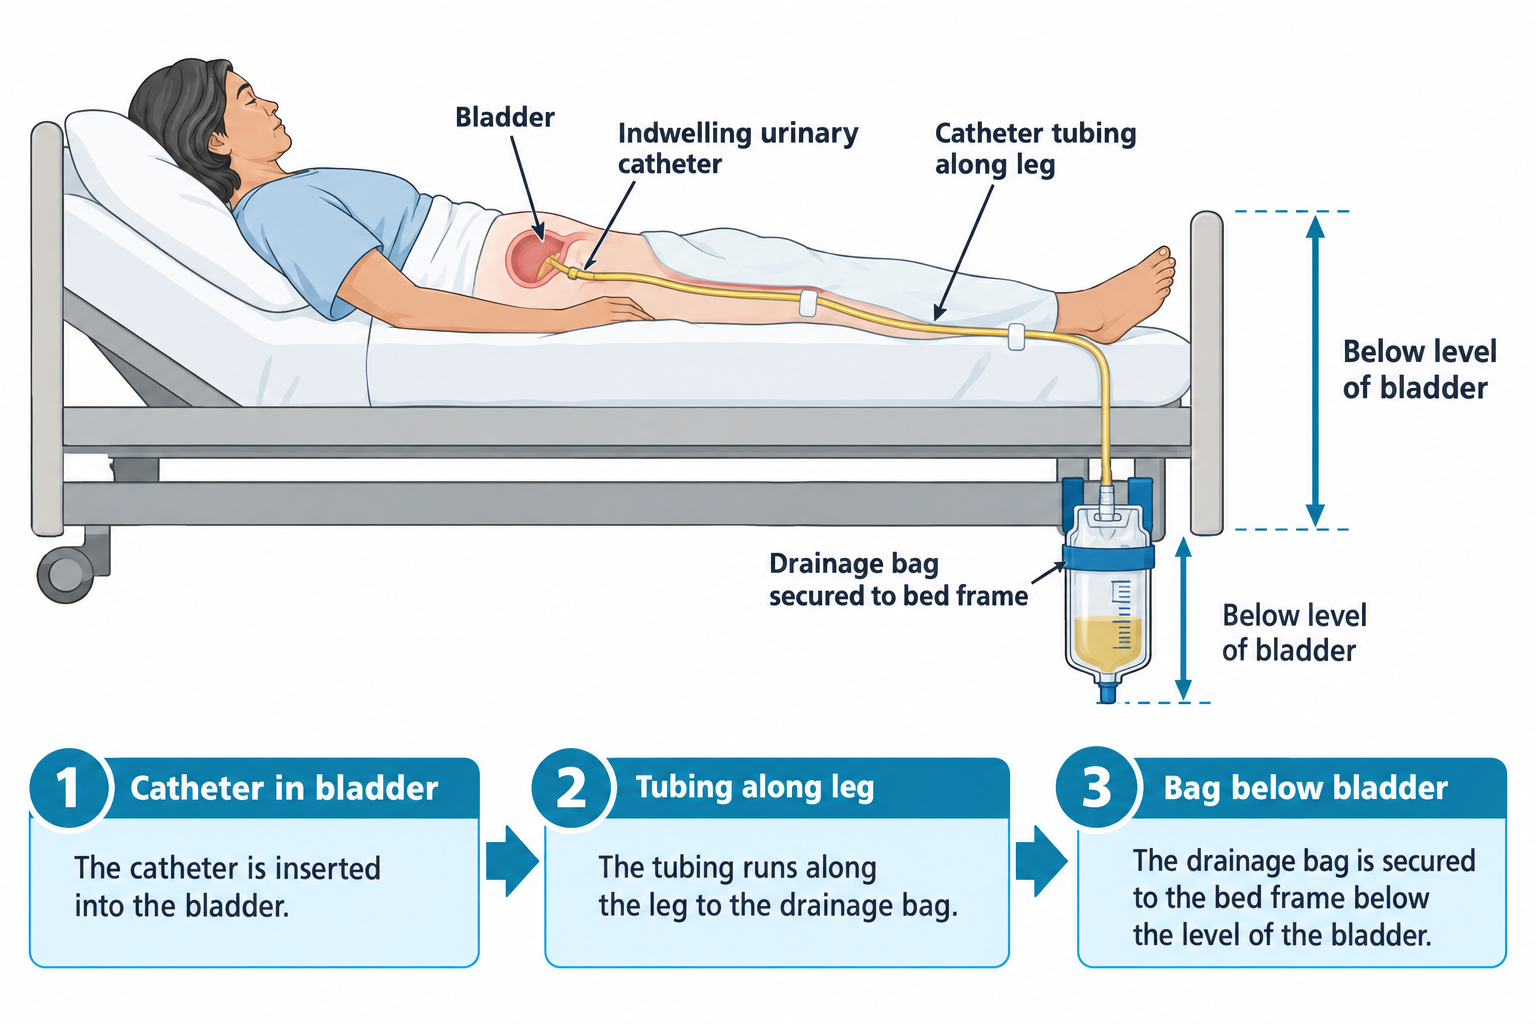
Urinary catheters

alt_text ////////📷 Image suggestion: “Urinary catheter drainage bag positioning” — diagram showing drainage bag below bladder level, tubing without kinks, to reinforce the “never above bladder level” NCLEX pitfall listed later.////////

Major risks

  • Catheter-associated urinary tract infection (CAUTI)
  • Obstruction
  • Trauma during insertion
NGN tip:
Use indwelling urinary catheters only when clinically necessary and remove them as soon as they are no longer needed.

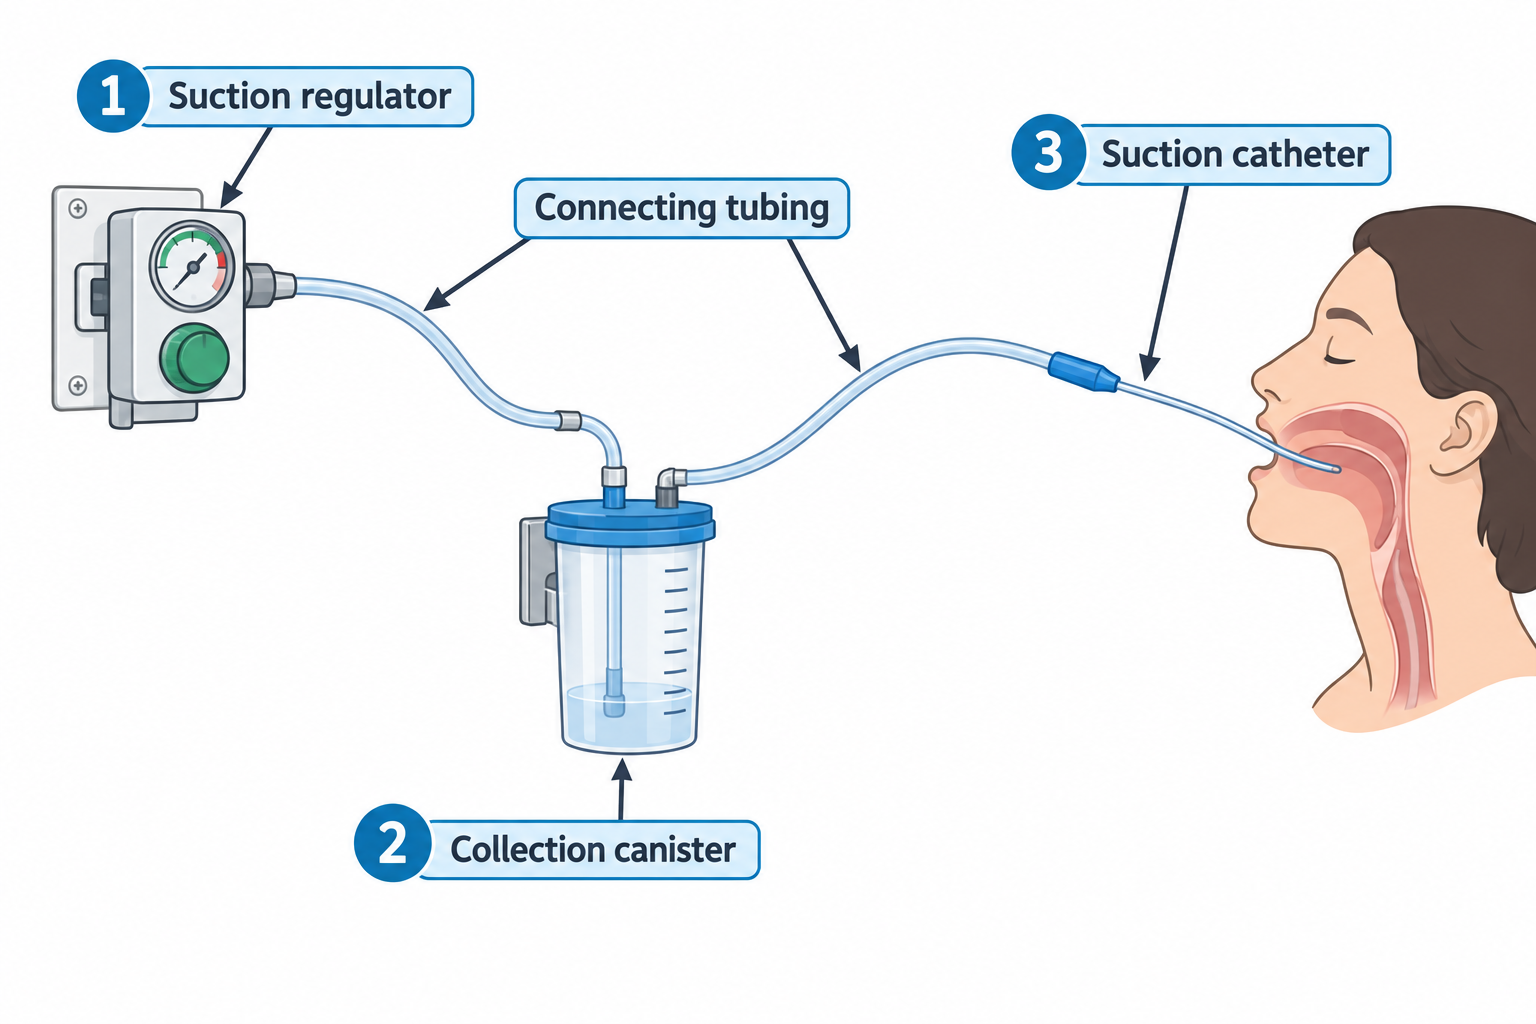
Suction equipment

alt_text ////////📷 Image suggestion: “Suction catheter technique” — diagram showing suction applied only on withdrawal, not insertion, with max duration labeled (commonly taught as ≤10-15 seconds per pass).//////////

Safety risks

  • Hypoxia
  • Mucosal trauma
  • Dysrhythmias from vagal stimulation
NGN tip:
Suctioning should be brief (typically ≤10–15 seconds per pass) and only as needed.

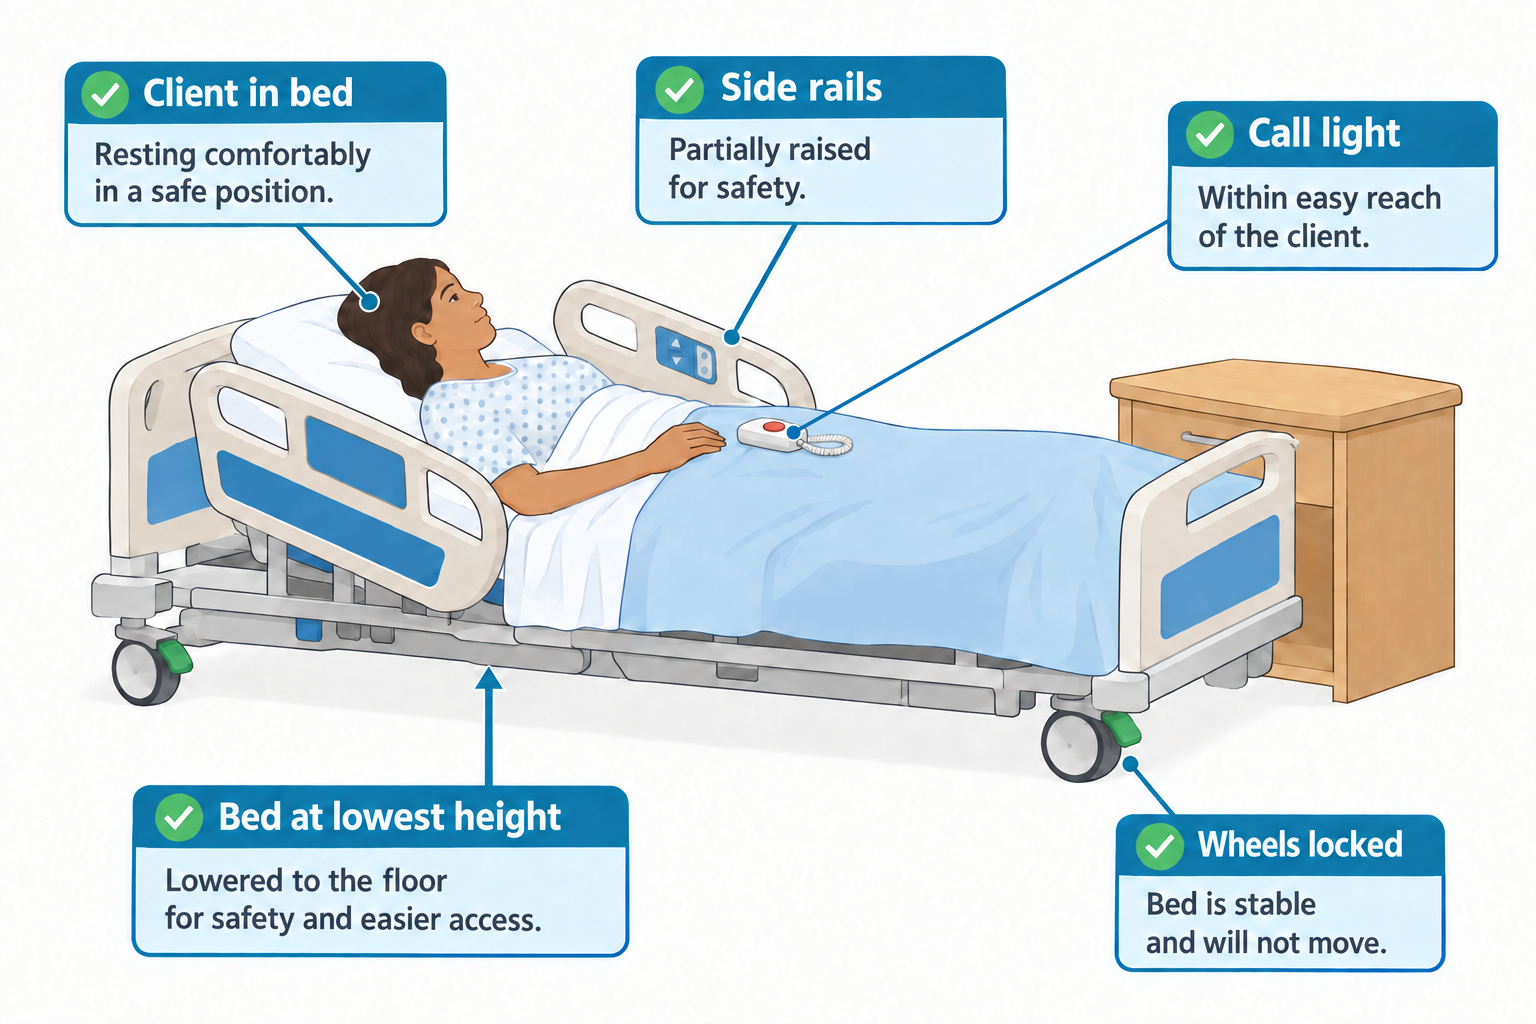
Bed safety and mobility equipment

alt_text ////////📷 Image suggestion: “Bed safety setup” — labeled diagram showing lowest bed position, locked wheels, call light within reach, and a bed-exit alarm pad.////////

Bed pad: Client exiting bed alarm

Safety principles

  • Lowest bed position
  • Wheels locked
  • Call light within reach
  • Proper use of alarms
NGN insight:
Bed rails are not restraints unless they restrict voluntary movement.

Alarm management

alt_text ////////📷 Image suggestion: “Alarm response algorithm” — simple flowchart: alarm sounds → assess client first → identify cause → resolve → document, to reinforce the “check patient, not machine” principle from earlier.////////

Key concepts

  • Do not silence alarms without assessment
  • Address cause, not just sound
  • Prevent alarm fatigue through proper settings
NGN tip:
Ignoring alarms is a client safety violation.
alt_text
//////Caption: Responding to Medical Equipment Alarms
Illustration type: Illustrate the appropriate response to equipment alarms by emphasizing assessment of the client first, identification of the alarm cause, correction of the underlying problem, and avoidance of simply silencing the alarm.///////

Clinical vignette 1

A client receiving oxygen via nasal cannula has an SpOâ‚‚ drop from 95% to 88%. The cannula is found displaced.

(spoiler)

Nursing action: The nurse reapplies the nasal cannula, reassesses the client’s oxygen saturation and respiratory status, ensures the prescribed oxygen is being delivered correctly, and notifies the provider if hypoxemia persists.

Rationale: A displaced oxygen delivery device is a reversible cause of hypoxemia. Restoring oxygen delivery and reassessing the client’s response should occur before escalating care.

Clinical vignette 2

An IV pump alarm sounds. The client reports swelling and discomfort at the IV site.

(spoiler)

Nursing action: Stop the infusion, assess the IV site, remove the catheter if infiltration is confirmed according to institutional policy, elevate the affected extremity as appropriate, and restart the IV at a new site if prescribed.

Rationale: Swelling and discomfort with an IV pump alarm suggest infiltration, which requires prompt intervention to prevent tissue injury.

Common pitfalls on the NCLEX

  • Fixing equipment before assessing the client
  • Silencing alarms without investigation
  • Leaving drainage bags above bladder level
  • Failing to verify tube placement
  • Equipment enhances care but introduces risk
  • Patient assessment always comes first
  • Early recognition prevents harm
  • Infection prevention is central to device safety
  • NGN emphasizes prioritization and judgment

Sign up for free to take 5 quiz questions on this topic

Previous
Next  | 4.3.6 Potential complications of devices and procedures
All rights reserved ©2016 - 2026 Achievable, Inc.

Medical equipment use and safety

Introduction

Medical equipment is essential to modern client care, but it also introduces risk when misused, malfunctions, or is poorly monitored. On the Next Generation NCLEX (NGN), questions in this domain focus on client safety, early complication detection, infection prevention, and prioritization.

This section emphasizes commonly tested hospital equipment, especially that used in older adults, post-operative clients, and high-acuity settings.

Learning objectives

By the end of this section, the learner should be able to:

  • Identify common medical devices and their associated risks
  • Recognize early signs of device-related complications
  • Apply safety checks and nursing responsibilities
  • Prioritize interventions when equipment failure is suspected

Core concept: Equipment supports physiology, not replaces assessment

Medical equipment provides data and support, but the nurse must always assess the client first.

When alarms sound, the first step is to check the client, not the machine.

Nursing accountability & legal responsibility

Medical equipment safety is not just technical; it is a professional responsibility.

The nurse is accountable for:

  • Verifying correct settings at the start of shift
  • Ensuring equipment is functioning properly
  • Reporting malfunction immediately
  • Documenting:
    • Settings
    • Client response
    • Interventions performed
    • Provider notification (if applicable)

If equipment malfunctions:

  1. Remove from patient if unsafe
  2. Tag per facility policy
  3. Notify biomedical engineering
  4. Document objectively

Oxygen delivery devices

Nasal canula

Typically used for oxygen flow rates of 1–6 L/min. Higher flow rates may cause nasal dryness and discomfort.

Rebreather mask

Used to deliver high concentrations of oxygen to clients with significant hypoxemia. Ensure the reservoir bag remains partially inflated during use.

alt_text //////Image suggestion: Non-rebreather mask with reservoir bag" — labeled diagram showing the one-way valves and reservoir bag, useful since students often confuse rebreather vs. non-rebreather masks.////////

Common risks

  • Hypoxia from dislodgement
  • Dry mucous membranes
  • Skin breakdown
  • Oxygen toxicity (high concentrations)
alt_text
//////Caption: Common Oxygen Delivery Devices
Illustration type: Comparison chart
Illustration note: Compare common oxygen delivery devices, including nasal cannula and rebreather mask, highlighting typical oxygen delivery, common uses, and key nursing safety considerations.///////

Oxygen safety

Oxygen supports combustion.

Safety measures

  • Post “No Smoking” signage
  • Keep oxygen 5–10 feet away from heat sources
  • Avoid petroleum-based products (e.g., Vaseline)
  • Ensure humidification if >4 L/min
  • Secure oxygen tanks upright

Oxygen toxicity

Risk increases with:

  • High FiOâ‚‚ concentrations
  • Prolonged exposure (>24–48 hours)
  • Mechanically ventilated clients
NGN tip:
If hypoxia is suspected, apply oxygen first. Then investigate the cause.

Signs may include:

  • Restlessness
  • Non-productive cough
  • Chest pain
Definitions
Hypoxia
Inadequate oxygen delivery to tissues
Ventilation
The movement of air into and out of the lungs
Oxygenation
The process by which oxygen moves from the lungs into the bloodstream
Infiltration
Leakage of non-vesicant fluid into the surrounding tissue
CAUTI
Infection related to indwelling urinary catheter use
NGN tip:
Always verify oxygen flow rate and device placement when SpOâ‚‚ declines.

Pulse oximetry

alt_text ////////📷 Image suggestion: “Pulse oximeter placement and limitations” — hand/finger with pulse ox probe, with callouts showing common interference factors (nail polish, cold extremity, motion)./////////

Limitations

  • Poor perfusion
  • Cold extremities
  • Nail polish or artificial nails
  • Motion artifact
NGN tip:
Pulse oximetry measures oxygen saturation, not ventilation.

Capnography

Capnography measures end-tidal COâ‚‚ (ETCOâ‚‚) and reflects ventilation. Capnography is often used with oxygen delivery devices (e.g., specialized nasal cannulas) to monitor ventilation and help detect airway or device-related problems.

This is especially relevant in:

  • Post-operative clients
  • Clients receiving opioids
  • Procedural sedation

Normal ETCO₂: 35–45 mmHg

Early respiratory depression sign: ⬆ Rising ETCO₂ before oxygen saturation drops.

NGN insight:
Pulse oximetry measures oxygenation. Capnography measures ventilation.
alt_text
//////Caption: Pulse Oximetry vs Capnography
Illustration type: Comparison chart
Illustration note: Compare pulse oximetry and capnography, emphasizing what each measures, normal values, limitations, and their roles in monitoring oxygenation versus ventilation.///////

Intravenous (IV) therapy equipment

alt_text ////////📷 Image suggestion: “Peripheral IV insertion sites and infiltration vs. phlebitis” — side-by-side diagram or photo comparison showing infiltration (cool, swollen, pale) vs. phlebitis (warm, red, cord-like vein), since these are commonly confused on NCLEX.////////

Potential complications

  • Infiltration
  • Extravasation
  • Phlebitis
  • Infection
  • Air embolism (rare but serious)
NGN tip:
Any liquid categorized as a vesicant requires frequent site assessment to detect extravasation early.

IV pump safety & high-alert medications

Infusion pumps are frequently tested due to medication error risk.

High-alert medications:

  • Insulin
  • Heparin
  • Chemotherapy
  • Vasopressors

Safety checks

  • Trace tubing from bag to insertion site
  • Verify rate with order
  • Double-check pump programming
  • Label all tubing clearly.

If an occlusion alarm sounds:

  • Check for kinks
  • Assess insertion site
  • Ensure clamps are open
alt_text
//////Caption: Safe IV Pump Assessment
Illustration type: Clinical flowchart
Illustration note: Illustrate the sequence for assessing an IV pump alarm: trace tubing, inspect for kinks, verify clamps are open, assess the insertion site, verify pump settings, and respond appropriately.///////

Air embolism recognition

Although rare, signs include:

  • Sudden dyspnea
  • Chest pain
  • Hypotension

Immediate action: If suspected, clamp tubing immediately and position the client in left lateral Trendelenburg position (left side-lying, head down) to trap air in the right atrium.

alt_text
//////Caption: Recognizing and Managing an Air Embolism
Illustration type: Clinical flowchart
Illustration note: Illustrate the recognition of sudden dyspnea, chest pain, and hypotension during IV therapy, followed by stopping the infusion, clamping the tubing if appropriate, positioning the client in the left lateral Trendelenburg position, and notifying the provider.///////

Enteral feeding equipment

alt_text //////////📷 Image suggestion: “Enteral feeding tube placement and HOB elevation” — diagram of NG/PEG tube placement with head-of-bed at 30°+ angle labeled, showing correct aspiration-prevention positioning.////////

Key safety considerations

  • Verify tube placement before feeding
  • Elevate head of bed ≥30°
  • Monitor for aspiration
  • Check residuals per protocol
NGN tip:
Aspiration risk increases when the client is in the supine position.
alt_text
//////Caption: Preventing Aspiration During Enteral Feeding
Illustration type: Safety checklist
Illustration note: Illustrate essential enteral feeding safety measures, including verifying tube placement, elevating the head of the bed to at least 30°, monitoring for aspiration, and checking gastric residual volume according to institutional protocol.///////

Urinary catheters

alt_text ////////📷 Image suggestion: “Urinary catheter drainage bag positioning” — diagram showing drainage bag below bladder level, tubing without kinks, to reinforce the “never above bladder level” NCLEX pitfall listed later.////////

Major risks

  • Catheter-associated urinary tract infection (CAUTI)
  • Obstruction
  • Trauma during insertion
NGN tip:
Use indwelling urinary catheters only when clinically necessary and remove them as soon as they are no longer needed.

Suction equipment

alt_text ////////📷 Image suggestion: “Suction catheter technique” — diagram showing suction applied only on withdrawal, not insertion, with max duration labeled (commonly taught as ≤10-15 seconds per pass).//////////

Safety risks

  • Hypoxia
  • Mucosal trauma
  • Dysrhythmias from vagal stimulation
NGN tip:
Suctioning should be brief (typically ≤10–15 seconds per pass) and only as needed.

Bed safety and mobility equipment

alt_text ////////📷 Image suggestion: “Bed safety setup” — labeled diagram showing lowest bed position, locked wheels, call light within reach, and a bed-exit alarm pad.////////

Bed pad: Client exiting bed alarm

Safety principles

  • Lowest bed position
  • Wheels locked
  • Call light within reach
  • Proper use of alarms
NGN insight:
Bed rails are not restraints unless they restrict voluntary movement.

Alarm management

alt_text ////////📷 Image suggestion: “Alarm response algorithm” — simple flowchart: alarm sounds → assess client first → identify cause → resolve → document, to reinforce the “check patient, not machine” principle from earlier.////////

Key concepts

  • Do not silence alarms without assessment
  • Address cause, not just sound
  • Prevent alarm fatigue through proper settings
NGN tip:
Ignoring alarms is a client safety violation.
alt_text
//////Caption: Responding to Medical Equipment Alarms
Illustration type: Illustrate the appropriate response to equipment alarms by emphasizing assessment of the client first, identification of the alarm cause, correction of the underlying problem, and avoidance of simply silencing the alarm.///////

Clinical vignette 1

A client receiving oxygen via nasal cannula has an SpOâ‚‚ drop from 95% to 88%. The cannula is found displaced.

(spoiler)

Nursing action: The nurse reapplies the nasal cannula, reassesses the client’s oxygen saturation and respiratory status, ensures the prescribed oxygen is being delivered correctly, and notifies the provider if hypoxemia persists.

Rationale: A displaced oxygen delivery device is a reversible cause of hypoxemia. Restoring oxygen delivery and reassessing the client’s response should occur before escalating care.

Clinical vignette 2

An IV pump alarm sounds. The client reports swelling and discomfort at the IV site.

(spoiler)

Nursing action: Stop the infusion, assess the IV site, remove the catheter if infiltration is confirmed according to institutional policy, elevate the affected extremity as appropriate, and restart the IV at a new site if prescribed.

Rationale: Swelling and discomfort with an IV pump alarm suggest infiltration, which requires prompt intervention to prevent tissue injury.

Common pitfalls on the NCLEX

  • Fixing equipment before assessing the client
  • Silencing alarms without investigation
  • Leaving drainage bags above bladder level
  • Failing to verify tube placement
Key points
  • Equipment enhances care but introduces risk
  • Patient assessment always comes first
  • Early recognition prevents harm
  • Infection prevention is central to device safety
  • NGN emphasizes prioritization and judgment

More from Reduction of risk potential

  • Diagnostic tests and lab values
  • Monitoring for complications of procedures
  • Changes in vital signs and neurological status
  • Electrolyte imbalances and fluid status
  • Potential complications of devices and procedures