


Achievable logoAchievable logo
CCMA
Sign in
Sign up
Purchase
Textbook
Practice exams
Support
How it works
Exam catalog
Mountain with a flag at the peak
Textbook
1. Medical assistant
2. Electronic records
3. Medical terminology and anatomy
4. The fundamentals of infection control
5. Introduction to vital signs
6. The patient interview and history
7. The physical examination
8. Appointment scheduling
9. Insurance billing
10. Diagnostic coding and the ICD-10-CM System
11. Procedural coding
12. Medical billing and reimbursement essentials
13. Assisting with medical specialties
14. Assisting with the musculoskeletal system
15. Assisting with the cardiovascular system
16. Assisting with the respiratory system
17. Assisting with the nervous system
18. Anatomy and physiology of the urinary system
19. Assisting in obstetrics and gynecology
20. Assisting in endocrinology
21. Assisting in ophthalmology & otolaryngology
22. Assisting in gastroenterology
23. Assisting in the immune & lymphatic systems
24. Assisting in pediatrics: the developmental stages and care
25. The medical assistant’s role in caring for the older patient
26. The role of the medical assistant in physical therapy examination and assessment
26.1 Immobilization and treatment techniques
26.2 Assisting in physical therapy & rehabilitation
26.3 Assisting with cold and heat therapies
26.4 Assistive devices: crutches, walkers, canes, and wheelchairs
27. Preparing for minor surgery: room, solutions, and supplies
28. Introduction to the clinical laboratory
29. Urinalysis
30. Blood collection
31. Analysis of blood
32. Electrocardiography and heart structure
33. The principles of pharmacology
34. Essential calculations and measurement systems
35. Solid, liquid, & solutions medication doses
36. Administering medications
37. Metabolism and core nutrient roles
38. Medical emergencies in the healthcare setting
Achievable logoAchievable logo
26.1 Immobilization and treatment techniques
Achievable CCMA
26. The role of the medical assistant in physical therapy examination and assessment
Our CCMA course is currently in development and is a work-in-progress.

Immobilization and treatment techniques

10 min read
Font
Discuss
Share
Feedback

Elastic bandages

An elastic bandage, a roller bandage, is sometimes called an ACE wrap, ACE bandage, and compression wrap. Besides being used as a bandage over a wound, an elastic bandage is used to limit swelling (edema) in the injured or operative extremity. Commonly, elastic bandages are used for sprains and can restrict movement and provide support to an extremity. Special skill is required to apply elastic bandages properly. Different wrap techniques can be used when applying the elastic bandage. Bandages that are too loose fall off, and those that are too tight can compromise circulation and further harm the patient. It takes practice and attention in order to apply bandages correctly.

Bandaging techniques

Before beginning the bandaging process, the medical assistant must select the correct size bandage if it is not indicated by the provider. Usually for older teens and adults, a 2-inch-wide elastic bandage is used for the hand; a 3-inch-wide bandage is used for the forearm, arm, and lower leg; and a 4 to 6-inch-wide bandage is used for the thigh. The extremity should be clean and dry. During the bandaging process, the body part should be positioned in a normal resting position (position of function). As the bandage is applied, ensure it is smooth and free of wrinkles.

Start the wrapping at the distal end of the extremity, moving proximally. Leave the fingers or toes exposed for circulation checks. Check the circulation below the bandage. Loosen the bandage if the circulation is impaired.

Several bandaging techniques can be used:

  • Anchor technique: Can be used at the beginning of the bandaging procedure to secure the elastic bandage. To start, place the end of the bandage at an angle on the extremity, then wrap the bandage around the limb twice. The angled corner edge of the bandage forms a small triangle. Fold the corner edge over the second turn and cover the corner as you wrap the bandage around the limb the third time. This will anchor the bandage• Circular technique: Can be used at the beginning of the bandaging procedure in place of the anchor technique and is most commonly used at the end of the procedure to secure the bandage before applying tape, clips, or the Velcro. Roll the elastic bandage over the affected area in a circular motion. The second and subsequent layers should overlap the previous layer completely.
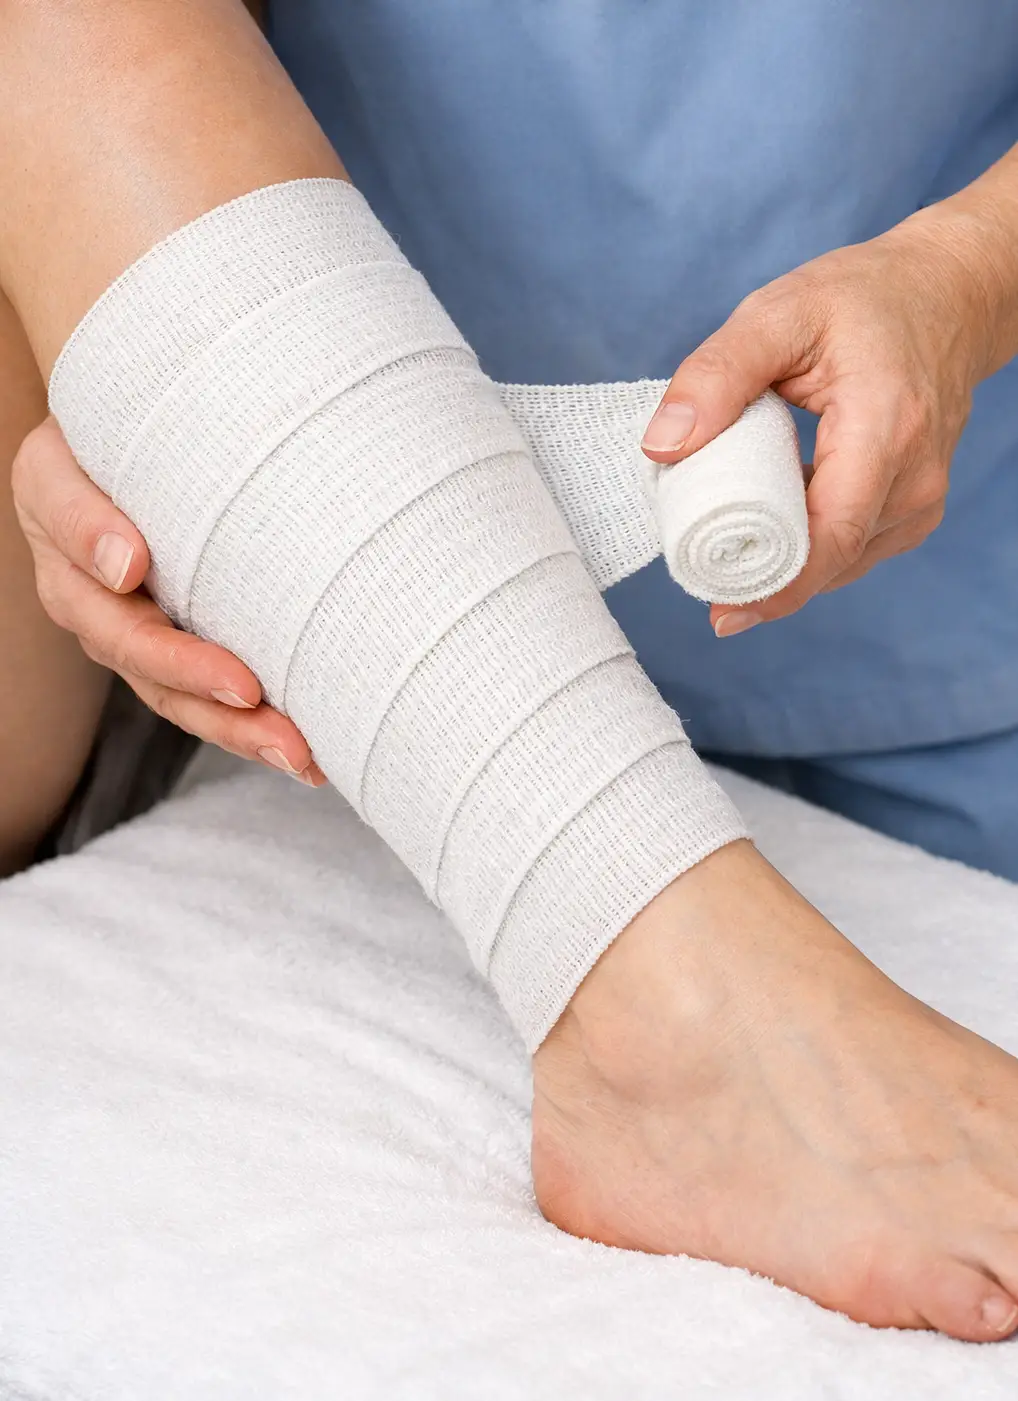
  • Spiral technique: Is used to cover the arm or leg. Start by using an anchor or circular technique. Then wrap the limb in a spiral manner with the new layer of wrapping covering about one-third of the previous layer. Continue until the limb is wrapped, and complete the procedure with a circular technique before securing the bandage.
  • Spiral reverse technique: Is used to cover the arm or leg. Start by using an anchor or circular technique. Then use the spiral technique for four turns, then reverse the spiral turn. Place a finger on the top edge of the bandage on the extremity and then direct the bandage downward so it folds onto itself. The upper edge of the bandage should be parallel to the lower edge of the previous turn, and overlap it by two-thirds of the width. Continue until the limb is wrapped, and complete the procedure with a circular technique before securing the bandage.
  • Figure-eight technique: Is used to support and limit joint movement. Start with the anchor or circular technique. Next, wrap the bandage below the joint, then bring the bandage up diagonally and across the joint. Wrap the bandage around the extremity above the joint, then bring it down across the joint diagonally so that it crosses the upward portion. This creates the figure-eight appearance. Continue to wrap using the figure-eight method and overlapping two-thirds of the previous layer. Continue until the joint is wrapped, and complete the procedure with a circular technique before securing the bandage
Spiral bandaging technique demonstrated
Spiral bandaging

Splints

Splints are temporarily applied to immobilize joints and bones after injury or surgery. The splint can be adjusted as the swelling changes. It provides partial protection while the site heals.

A splint consists of a strip of rigid material that immobilizes an extremity. Custom-designed and ready-made splints are used in the ambulatory care environment. Custom-designed splints commonly use a strip of fiberglass as the rigid material. The fiberglass is held in place by elastic bandages (e.g., ACE bandages). The medical assistant can help the provider apply custom-designed splints. Ready-made splints usually have Velcro straps, which help when taking off or putting on the splints.

Immobilizers, braces, and ankle boots

Immobilizers, braces, and ankle boots are usually used after an injury or surgery. Often the terms immobilizer and brace are used interchangeably, but they are different. An immobilizer keeps the joint from moving. A brace provides stability and protection to the joint while allowing the joint to still function. Some knee braces have metal hinges that allow the knee to bend and straighten.

An ankle boot (also called a moon boot or walker boot) is a rigid, removable boot. It is used to protect and stabilize the ankle and lower leg after an injury or surgery. These boots can be used for partial, full, or non–weight-bearing extremities.

Slings

A sling is a device used to support and immobilize an injured part of the body, such as the arm, wrist, or shoulder. A sling is often used to help support the arm if a person has an arm casted. A sling can help keep the hand elevated to reduce swelling in the hand and fingers. Slings come in adult and pediatric sizes. If the sling is too loose, it may place stress and strain on the arm. The elbow should be kept at a 90-degree angle. If the sling is too tight, it can compromise or restrict circulation. The patient may have numbness, tingling, or swelling in the hand. The fingers and hand may be blue and cool to the touch.

Casts

Casts are applied to immobilize joints and bones after injury or surgery and provide additional protection. Casts are made from fiberglass or plaster. Fiberglass casts can be colorful, lightweight, durable, and porous. X-rays penetrate fiberglass casts better than plaster casts. Thus, fiberglass casts do not need to be removed for x-rays. Plaster casts are cheaper and easier to shape. The medical assistant can help the provider apply the cast.

Casts applied in ambulatory care facilities are usually either long or short casts:

  • A short arm cast extends from the palm to just before the elbow.
  • A long arm cast extends from the palm to the mid-upper arm.
  • A short leg cast extends from the foot to just before the kneecap (patella).
  • A long leg cast extends from the foot to the mid-thigh.

Extremity casts do not cover the fingers or toes because it is important to check circulation.

During the fiberglass cast application, the medical assistant assembles the supplies and assists the provider with the application.

Patient coaching on CMST

The medical assistant needs to provide cast care instructions to patients. It is important to teach patients about checking the CMST and comparing the casted extremity with the unaffected extremity. Here is what CMST stands for:

  • Color: The color of the extremity and nail beds should match those of the opposite extremity. It should be pink. The patient should contact the provider if the toes or fingers are bluish or pale.
  • Motion: Being able to move the toes and fingers of the casted extremity is normal. There should be no swelling. Patients should contact the provider if they are unable to move the toes or fingers or if swelling occurs in the fingers and toes.
  • Sensation: Normal sensation should be intact. The person should be able to feel light touch on the fingers or toes. Patients should contact the provider if they notice any of the following:
  • An increased pain, burning, stinging, or numbness in the toes or fingers
  • A “sleeping” or pins-and-needles sensation
  • An inability to feel light touch on the toes or fingers
  • Temperature: The temperature of the toes or fingers on the casted extremity should match that of the opposite extremity. The fingers or toes should be warm. The patient should contact the provider if the fingers or toes are cooler than those of the opposite extremity.

Any suspicious abnormal findings should be reported to the provider immediately. If the extremity swells too much for the size of the cast, compartment syndrome can occur. The swelling of the casted extremity can cause damage to the muscles, blood vessels, and nerves. The damage can be permanent if not treated.

Patient coaching on cast care

It is important for the patient to learn how to care for the cast and the extremity:

  • Elevate and place dry cold packs on the casted extremity as indicated by the provider. Usually, this is done for the first 24 hours after an injury.
  • Continue to move the fingers or toes, which helps to return the blood to the heart and to reduce the swelling.
  • Keep the cast clean and dry. Contact the provider if the cast becomes smelly, moldy, or if drainage is noted.
  • Cover the cast with a plastic bag prior to bathing or showering. If the fiberglass cast gets wet, use a hair dryer on a cool setting to dry it.
  • Avoid putting weight or pressure on the cast.
  • Do not put anything inside the cast, including sharp objects, powder, or lotion.
  • A metal file can be used to smooth down rough sections of a fiberglass cast. Pad the rough areas to protect the skin.
  • A sling can be used to support a casted arm.

Removing casts

The medical assistant can remove casts in the ambulatory care facility (Procedure 36.4). During the removal procedure, the medical assistant should provide adequate support for the extremity. Once the cast is off, the extremity should be washed with a mild soap and warm water, then dried. Skin lotion can be applied. This might be done in the ambulatory care facility or can be done at home.

The medical assistant must coach the patient prior to the cast removal that the extremity may look different. The skin may be dry and flaky. The extremity may be smaller and weaker than the other side. The patient may have some discomfort in the bones and joints that were immobilized. Sometimes patients will need physical therapy to help regain strength and movement in the affected side.

Elastic bandages

  • Used for compression, swelling control, and support
  • Proper application requires skill; too tight = impaired circulation, too loose = ineffective
  • Commonly used for sprains and post-operative care

Bandaging techniques

  • Select correct bandage size; keep extremity clean, dry, and in position of function
  • Start wrap distally, move proximally; leave fingers/toes exposed for circulation checks
  • Key techniques:
    • Anchor: secures bandage start
    • Circular: used to start/end bandage, overlaps previous layer
    • Spiral: covers limbs, overlaps one-third of previous layer
    • Spiral reverse: for limbs, reverses direction for better fit, overlaps two-thirds
    • Figure-eight: supports joints, crosses joint in figure-eight pattern

Splints

  • Temporarily immobilize joints/bones post-injury or surgery
  • Rigid material (e.g., fiberglass) held by elastic bandages or Velcro straps
  • Custom or ready-made options; adjustable for swelling

Immobilizers, braces, and ankle boots

  • Immobilizer: prevents joint movement
  • Brace: stabilizes/protects joint, allows some movement (e.g., hinged knee brace)
  • Ankle boot (moon boot): rigid, removable, stabilizes/protects ankle/lower leg

Slings

  • Supports and immobilizes arm, wrist, or shoulder
  • Keeps hand elevated to reduce swelling
  • Elbow at 90°; improper fit can cause circulation issues (numbness, swelling, color changes)

Casts

  • Immobilize/protect joints and bones after injury/surgery
  • Made of fiberglass (lightweight, x-ray friendly) or plaster (cheaper, shapeable)
  • Types:
    • Short/long arm cast: palm to elbow/mid-upper arm
    • Short/long leg cast: foot to below knee/mid-thigh
  • Fingers/toes left exposed for circulation checks

Patient coaching on CMST

  • CMST: Color, Motion, Sensation, Temperature
    • Color: should be pink, match opposite extremity
    • Motion: able to move fingers/toes, no swelling
    • Sensation: normal feeling, no numbness or increased pain
    • Temperature: warm, matches opposite extremity
  • Report abnormal findings immediately (risk of compartment syndrome)

Patient coaching on cast care

  • Elevate and apply cold packs as directed (first 24 hours)
  • Move fingers/toes regularly
  • Keep cast clean and dry; cover for bathing
  • Do not insert objects or substances inside cast
  • Use metal file/padding for rough fiberglass edges
  • Use sling for arm casts if needed

Removing casts

  • Provide extremity support during removal
  • Wash, dry, and moisturize skin after removal
  • Extremity may appear smaller, weaker, or dry; possible discomfort
  • Physical therapy may be needed for recovery

Sign up for free to take 19 quiz questions on this topic

Previous
Next  | 26.2 Assisting in physical therapy & rehabilitation
All rights reserved ©2016 - 2026 Achievable, Inc.

Immobilization and treatment techniques

Elastic bandages

An elastic bandage, a roller bandage, is sometimes called an ACE wrap, ACE bandage, and compression wrap. Besides being used as a bandage over a wound, an elastic bandage is used to limit swelling (edema) in the injured or operative extremity. Commonly, elastic bandages are used for sprains and can restrict movement and provide support to an extremity. Special skill is required to apply elastic bandages properly. Different wrap techniques can be used when applying the elastic bandage. Bandages that are too loose fall off, and those that are too tight can compromise circulation and further harm the patient. It takes practice and attention in order to apply bandages correctly.

Bandaging techniques

Before beginning the bandaging process, the medical assistant must select the correct size bandage if it is not indicated by the provider. Usually for older teens and adults, a 2-inch-wide elastic bandage is used for the hand; a 3-inch-wide bandage is used for the forearm, arm, and lower leg; and a 4 to 6-inch-wide bandage is used for the thigh. The extremity should be clean and dry. During the bandaging process, the body part should be positioned in a normal resting position (position of function). As the bandage is applied, ensure it is smooth and free of wrinkles.

Start the wrapping at the distal end of the extremity, moving proximally. Leave the fingers or toes exposed for circulation checks. Check the circulation below the bandage. Loosen the bandage if the circulation is impaired.

Several bandaging techniques can be used:

  • Anchor technique: Can be used at the beginning of the bandaging procedure to secure the elastic bandage. To start, place the end of the bandage at an angle on the extremity, then wrap the bandage around the limb twice. The angled corner edge of the bandage forms a small triangle. Fold the corner edge over the second turn and cover the corner as you wrap the bandage around the limb the third time. This will anchor the bandage• Circular technique: Can be used at the beginning of the bandaging procedure in place of the anchor technique and is most commonly used at the end of the procedure to secure the bandage before applying tape, clips, or the Velcro. Roll the elastic bandage over the affected area in a circular motion. The second and subsequent layers should overlap the previous layer completely.
  • Spiral technique: Is used to cover the arm or leg. Start by using an anchor or circular technique. Then wrap the limb in a spiral manner with the new layer of wrapping covering about one-third of the previous layer. Continue until the limb is wrapped, and complete the procedure with a circular technique before securing the bandage.
  • Spiral reverse technique: Is used to cover the arm or leg. Start by using an anchor or circular technique. Then use the spiral technique for four turns, then reverse the spiral turn. Place a finger on the top edge of the bandage on the extremity and then direct the bandage downward so it folds onto itself. The upper edge of the bandage should be parallel to the lower edge of the previous turn, and overlap it by two-thirds of the width. Continue until the limb is wrapped, and complete the procedure with a circular technique before securing the bandage.
  • Figure-eight technique: Is used to support and limit joint movement. Start with the anchor or circular technique. Next, wrap the bandage below the joint, then bring the bandage up diagonally and across the joint. Wrap the bandage around the extremity above the joint, then bring it down across the joint diagonally so that it crosses the upward portion. This creates the figure-eight appearance. Continue to wrap using the figure-eight method and overlapping two-thirds of the previous layer. Continue until the joint is wrapped, and complete the procedure with a circular technique before securing the bandage

Splints

Splints are temporarily applied to immobilize joints and bones after injury or surgery. The splint can be adjusted as the swelling changes. It provides partial protection while the site heals.

A splint consists of a strip of rigid material that immobilizes an extremity. Custom-designed and ready-made splints are used in the ambulatory care environment. Custom-designed splints commonly use a strip of fiberglass as the rigid material. The fiberglass is held in place by elastic bandages (e.g., ACE bandages). The medical assistant can help the provider apply custom-designed splints. Ready-made splints usually have Velcro straps, which help when taking off or putting on the splints.

Immobilizers, braces, and ankle boots

Immobilizers, braces, and ankle boots are usually used after an injury or surgery. Often the terms immobilizer and brace are used interchangeably, but they are different. An immobilizer keeps the joint from moving. A brace provides stability and protection to the joint while allowing the joint to still function. Some knee braces have metal hinges that allow the knee to bend and straighten.

An ankle boot (also called a moon boot or walker boot) is a rigid, removable boot. It is used to protect and stabilize the ankle and lower leg after an injury or surgery. These boots can be used for partial, full, or non–weight-bearing extremities.

Slings

A sling is a device used to support and immobilize an injured part of the body, such as the arm, wrist, or shoulder. A sling is often used to help support the arm if a person has an arm casted. A sling can help keep the hand elevated to reduce swelling in the hand and fingers. Slings come in adult and pediatric sizes. If the sling is too loose, it may place stress and strain on the arm. The elbow should be kept at a 90-degree angle. If the sling is too tight, it can compromise or restrict circulation. The patient may have numbness, tingling, or swelling in the hand. The fingers and hand may be blue and cool to the touch.

Casts

Casts are applied to immobilize joints and bones after injury or surgery and provide additional protection. Casts are made from fiberglass or plaster. Fiberglass casts can be colorful, lightweight, durable, and porous. X-rays penetrate fiberglass casts better than plaster casts. Thus, fiberglass casts do not need to be removed for x-rays. Plaster casts are cheaper and easier to shape. The medical assistant can help the provider apply the cast.

Casts applied in ambulatory care facilities are usually either long or short casts:

  • A short arm cast extends from the palm to just before the elbow.
  • A long arm cast extends from the palm to the mid-upper arm.
  • A short leg cast extends from the foot to just before the kneecap (patella).
  • A long leg cast extends from the foot to the mid-thigh.

Extremity casts do not cover the fingers or toes because it is important to check circulation.

During the fiberglass cast application, the medical assistant assembles the supplies and assists the provider with the application.

Patient coaching on CMST

The medical assistant needs to provide cast care instructions to patients. It is important to teach patients about checking the CMST and comparing the casted extremity with the unaffected extremity. Here is what CMST stands for:

  • Color: The color of the extremity and nail beds should match those of the opposite extremity. It should be pink. The patient should contact the provider if the toes or fingers are bluish or pale.
  • Motion: Being able to move the toes and fingers of the casted extremity is normal. There should be no swelling. Patients should contact the provider if they are unable to move the toes or fingers or if swelling occurs in the fingers and toes.
  • Sensation: Normal sensation should be intact. The person should be able to feel light touch on the fingers or toes. Patients should contact the provider if they notice any of the following:
  • An increased pain, burning, stinging, or numbness in the toes or fingers
  • A “sleeping” or pins-and-needles sensation
  • An inability to feel light touch on the toes or fingers
  • Temperature: The temperature of the toes or fingers on the casted extremity should match that of the opposite extremity. The fingers or toes should be warm. The patient should contact the provider if the fingers or toes are cooler than those of the opposite extremity.

Any suspicious abnormal findings should be reported to the provider immediately. If the extremity swells too much for the size of the cast, compartment syndrome can occur. The swelling of the casted extremity can cause damage to the muscles, blood vessels, and nerves. The damage can be permanent if not treated.

Patient coaching on cast care

It is important for the patient to learn how to care for the cast and the extremity:

  • Elevate and place dry cold packs on the casted extremity as indicated by the provider. Usually, this is done for the first 24 hours after an injury.
  • Continue to move the fingers or toes, which helps to return the blood to the heart and to reduce the swelling.
  • Keep the cast clean and dry. Contact the provider if the cast becomes smelly, moldy, or if drainage is noted.
  • Cover the cast with a plastic bag prior to bathing or showering. If the fiberglass cast gets wet, use a hair dryer on a cool setting to dry it.
  • Avoid putting weight or pressure on the cast.
  • Do not put anything inside the cast, including sharp objects, powder, or lotion.
  • A metal file can be used to smooth down rough sections of a fiberglass cast. Pad the rough areas to protect the skin.
  • A sling can be used to support a casted arm.

Removing casts

The medical assistant can remove casts in the ambulatory care facility (Procedure 36.4). During the removal procedure, the medical assistant should provide adequate support for the extremity. Once the cast is off, the extremity should be washed with a mild soap and warm water, then dried. Skin lotion can be applied. This might be done in the ambulatory care facility or can be done at home.

The medical assistant must coach the patient prior to the cast removal that the extremity may look different. The skin may be dry and flaky. The extremity may be smaller and weaker than the other side. The patient may have some discomfort in the bones and joints that were immobilized. Sometimes patients will need physical therapy to help regain strength and movement in the affected side.

Key points

Elastic bandages

  • Used for compression, swelling control, and support
  • Proper application requires skill; too tight = impaired circulation, too loose = ineffective
  • Commonly used for sprains and post-operative care

Bandaging techniques

  • Select correct bandage size; keep extremity clean, dry, and in position of function
  • Start wrap distally, move proximally; leave fingers/toes exposed for circulation checks
  • Key techniques:
    • Anchor: secures bandage start
    • Circular: used to start/end bandage, overlaps previous layer
    • Spiral: covers limbs, overlaps one-third of previous layer
    • Spiral reverse: for limbs, reverses direction for better fit, overlaps two-thirds
    • Figure-eight: supports joints, crosses joint in figure-eight pattern

Splints

  • Temporarily immobilize joints/bones post-injury or surgery
  • Rigid material (e.g., fiberglass) held by elastic bandages or Velcro straps
  • Custom or ready-made options; adjustable for swelling

Immobilizers, braces, and ankle boots

  • Immobilizer: prevents joint movement
  • Brace: stabilizes/protects joint, allows some movement (e.g., hinged knee brace)
  • Ankle boot (moon boot): rigid, removable, stabilizes/protects ankle/lower leg

Slings

  • Supports and immobilizes arm, wrist, or shoulder
  • Keeps hand elevated to reduce swelling
  • Elbow at 90°; improper fit can cause circulation issues (numbness, swelling, color changes)

Casts

  • Immobilize/protect joints and bones after injury/surgery
  • Made of fiberglass (lightweight, x-ray friendly) or plaster (cheaper, shapeable)
  • Types:
    • Short/long arm cast: palm to elbow/mid-upper arm
    • Short/long leg cast: foot to below knee/mid-thigh
  • Fingers/toes left exposed for circulation checks

Patient coaching on CMST

  • CMST: Color, Motion, Sensation, Temperature
    • Color: should be pink, match opposite extremity
    • Motion: able to move fingers/toes, no swelling
    • Sensation: normal feeling, no numbness or increased pain
    • Temperature: warm, matches opposite extremity
  • Report abnormal findings immediately (risk of compartment syndrome)

Patient coaching on cast care

  • Elevate and apply cold packs as directed (first 24 hours)
  • Move fingers/toes regularly
  • Keep cast clean and dry; cover for bathing
  • Do not insert objects or substances inside cast
  • Use metal file/padding for rough fiberglass edges
  • Use sling for arm casts if needed

Removing casts

  • Provide extremity support during removal
  • Wash, dry, and moisturize skin after removal
  • Extremity may appear smaller, weaker, or dry; possible discomfort
  • Physical therapy may be needed for recovery

More from The role of the medical assistant in physical therapy examination and assessment

  • Assisting in physical therapy & rehabilitation
  • Assisting with cold and heat therapies
  • Assistive devices: crutches, walkers, canes, and wheelchairs