


Achievable logoAchievable logo
CCMA
Sign in
Sign up
Purchase
Textbook
Practice exams
Support
How it works
Exam catalog
Mountain with a flag at the peak
Textbook
1. Medical assistant
2. Electronic records
3. Medical terminology and anatomy
4. The fundamentals of infection control
5. Introduction to vital signs
6. The patient interview and history
7. The physical examination
8. Appointment scheduling
9. Insurance billing
10. Diagnostic coding and the ICD-10-CM System
11. Procedural coding
12. Medical billing and reimbursement essentials
13. Assisting with medical specialties
14. Assisting with the musculoskeletal system
15. Assisting with the cardiovascular system
16. Assisting with the respiratory system
17. Assisting with the nervous system
18. Anatomy and physiology of the urinary system
19. Assisting in obstetrics and gynecology
20. Assisting in endocrinology
21. Assisting in ophthalmology & otolaryngology
22. Assisting in gastroenterology
23. Assisting in the immune & lymphatic systems
24. Assisting in pediatrics: the developmental stages and care
25. The medical assistant’s role in caring for the older patient
26. The role of the medical assistant in physical therapy examination and assessment
26.1 Immobilization and treatment techniques
26.2 Assisting in physical therapy & rehabilitation
26.3 Assisting with cold and heat therapies
26.4 Assistive devices: crutches, walkers, canes, and wheelchairs
27. Preparing for minor surgery: room, solutions, and supplies
28. Introduction to the clinical laboratory
29. Urinalysis
30. Blood collection
31. Analysis of blood
32. Electrocardiography and heart structure
33. The principles of pharmacology
34. Essential calculations and measurement systems
35. Solid, liquid, & solutions medication doses
36. Administering medications
37. Metabolism and core nutrient roles
38. Medical emergencies in the healthcare setting
Achievable logoAchievable logo
26.4 Assistive devices: crutches, walkers, canes, and wheelchairs
Achievable CCMA
26. The role of the medical assistant in physical therapy examination and assessment
Our CCMA course is currently in development and is a work-in-progress.

Assistive devices: crutches, walkers, canes, and wheelchairs

10 min read
Font
Discuss
Share
Feedback

An assistive device is used to help a person perform a specific task, such as walking. Crutches, walkers, canes, and wheelchairs are considered assistive devices. Many times, these assistive devices can be purchased at pharmacies and medical supply stores. The medical assistant should know how to adjust the device to fit the patient. Medical assistants may also coach patients on the proper use of the assistive device. Improper use of assistive devices can lead to falls and injuries.

Crutches

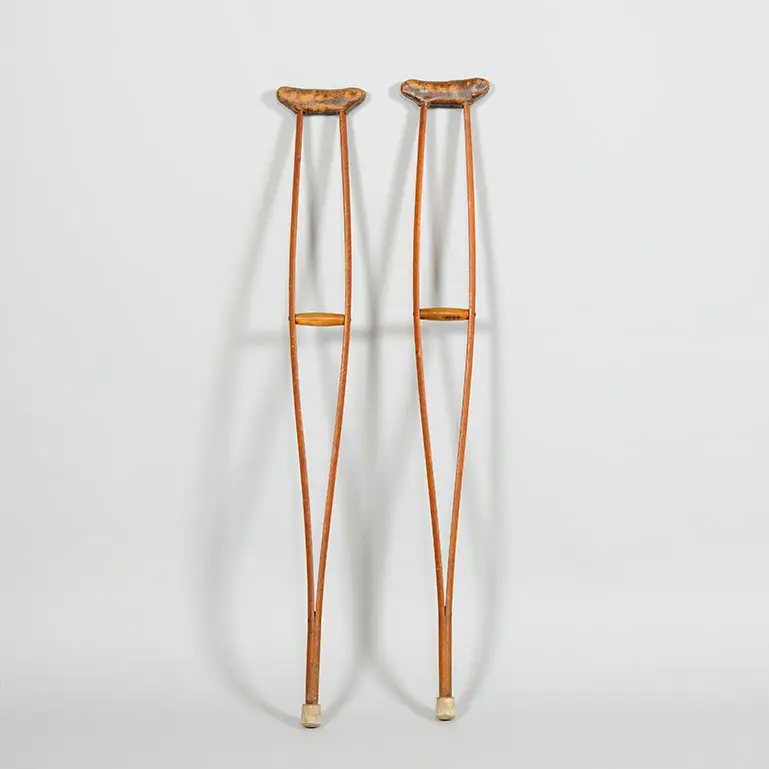
Crutches are used to help a person walk. Crutches can be made out of aluminum or wood and can be adjusted for the patient. The more common crutches are as follows:

  • Axillary crutches: Most common type; used when recovering from a foot, ankle, or leg injury or surgery.
  • Forearm crutches: Also called Lofstrand or elbow crutches; require more upper body strength. An open elbow cuff fits around the patient’s forearm. These crutches help with proper posture and body mechanics.
  • Extension crutches: Also called Canadian crutches. These combine the underarm crutch with an elbow cuff, which provides extra support for the patient.
Forearm and axillary crutches used for mobility assistance
Forearm, axillary crutches
Wikimedia Commons
/
CC BY-SA 3.0
  • Platform crutches: Also called triceps crutches. They have padded armrests with handgrips. These crutches are used when patients cannot straighten their arms to hold the handgrip of the crutch.
  • Hands-free crutch: Straps to the thigh, and a platform supports the lower leg.
  • M+D crutches: The hinged arm cradles the strap to the forearms, thus eliminating pressure in the axillae, wrists, and hands.

Fitting axillary crutches

Axillary crutches need to be fitted correctly to allow for good body mechanics and to reduce the risk of injury. Crutch palsy can occur with poorly fitted crutches or if the patient rests on the top of the crutches while walking. The axillary nerves can be temporarily or permanently damaged. This can cause loss of hand strength and weakening of the wrist and forearm muscles.

When you fit axillary crutches, the patient must be wearing shoes. Have the patient stand straight up. Fit the crutches so they are 1 to 1½ inches (about 2 finger widths) below the armpit. The crutch should be about 4 to 6 inches to the side and front of each foot. Handgrips must be near the wrist and even with the top of the hip line. When the hands are on the handgrip, the elbow should be bent 15 to 30 degrees.

Limitations with crutches

Providers will indicate the type of crutch, along with any limitations. Common limitations with crutches include the following:

  • Weight bearing as tolerated: Patients can place more than half of their body weight on their “bad,” or affected, extremity if it is not painful.
  • Partial weight bearing: The provider will indicate how much weight can be placed on the affected extremity.
  • Toe-touch weight bearing: Patients can touch the ground with their toes on the affected side. The toe-touch helps with balance. No weight bearing is allowed on the affected extremity.
  • Non–weight bearing: Patients cannot put weight on their affected extremity. This type of limitation would require the three-point crutch gait.

Crutch gaits

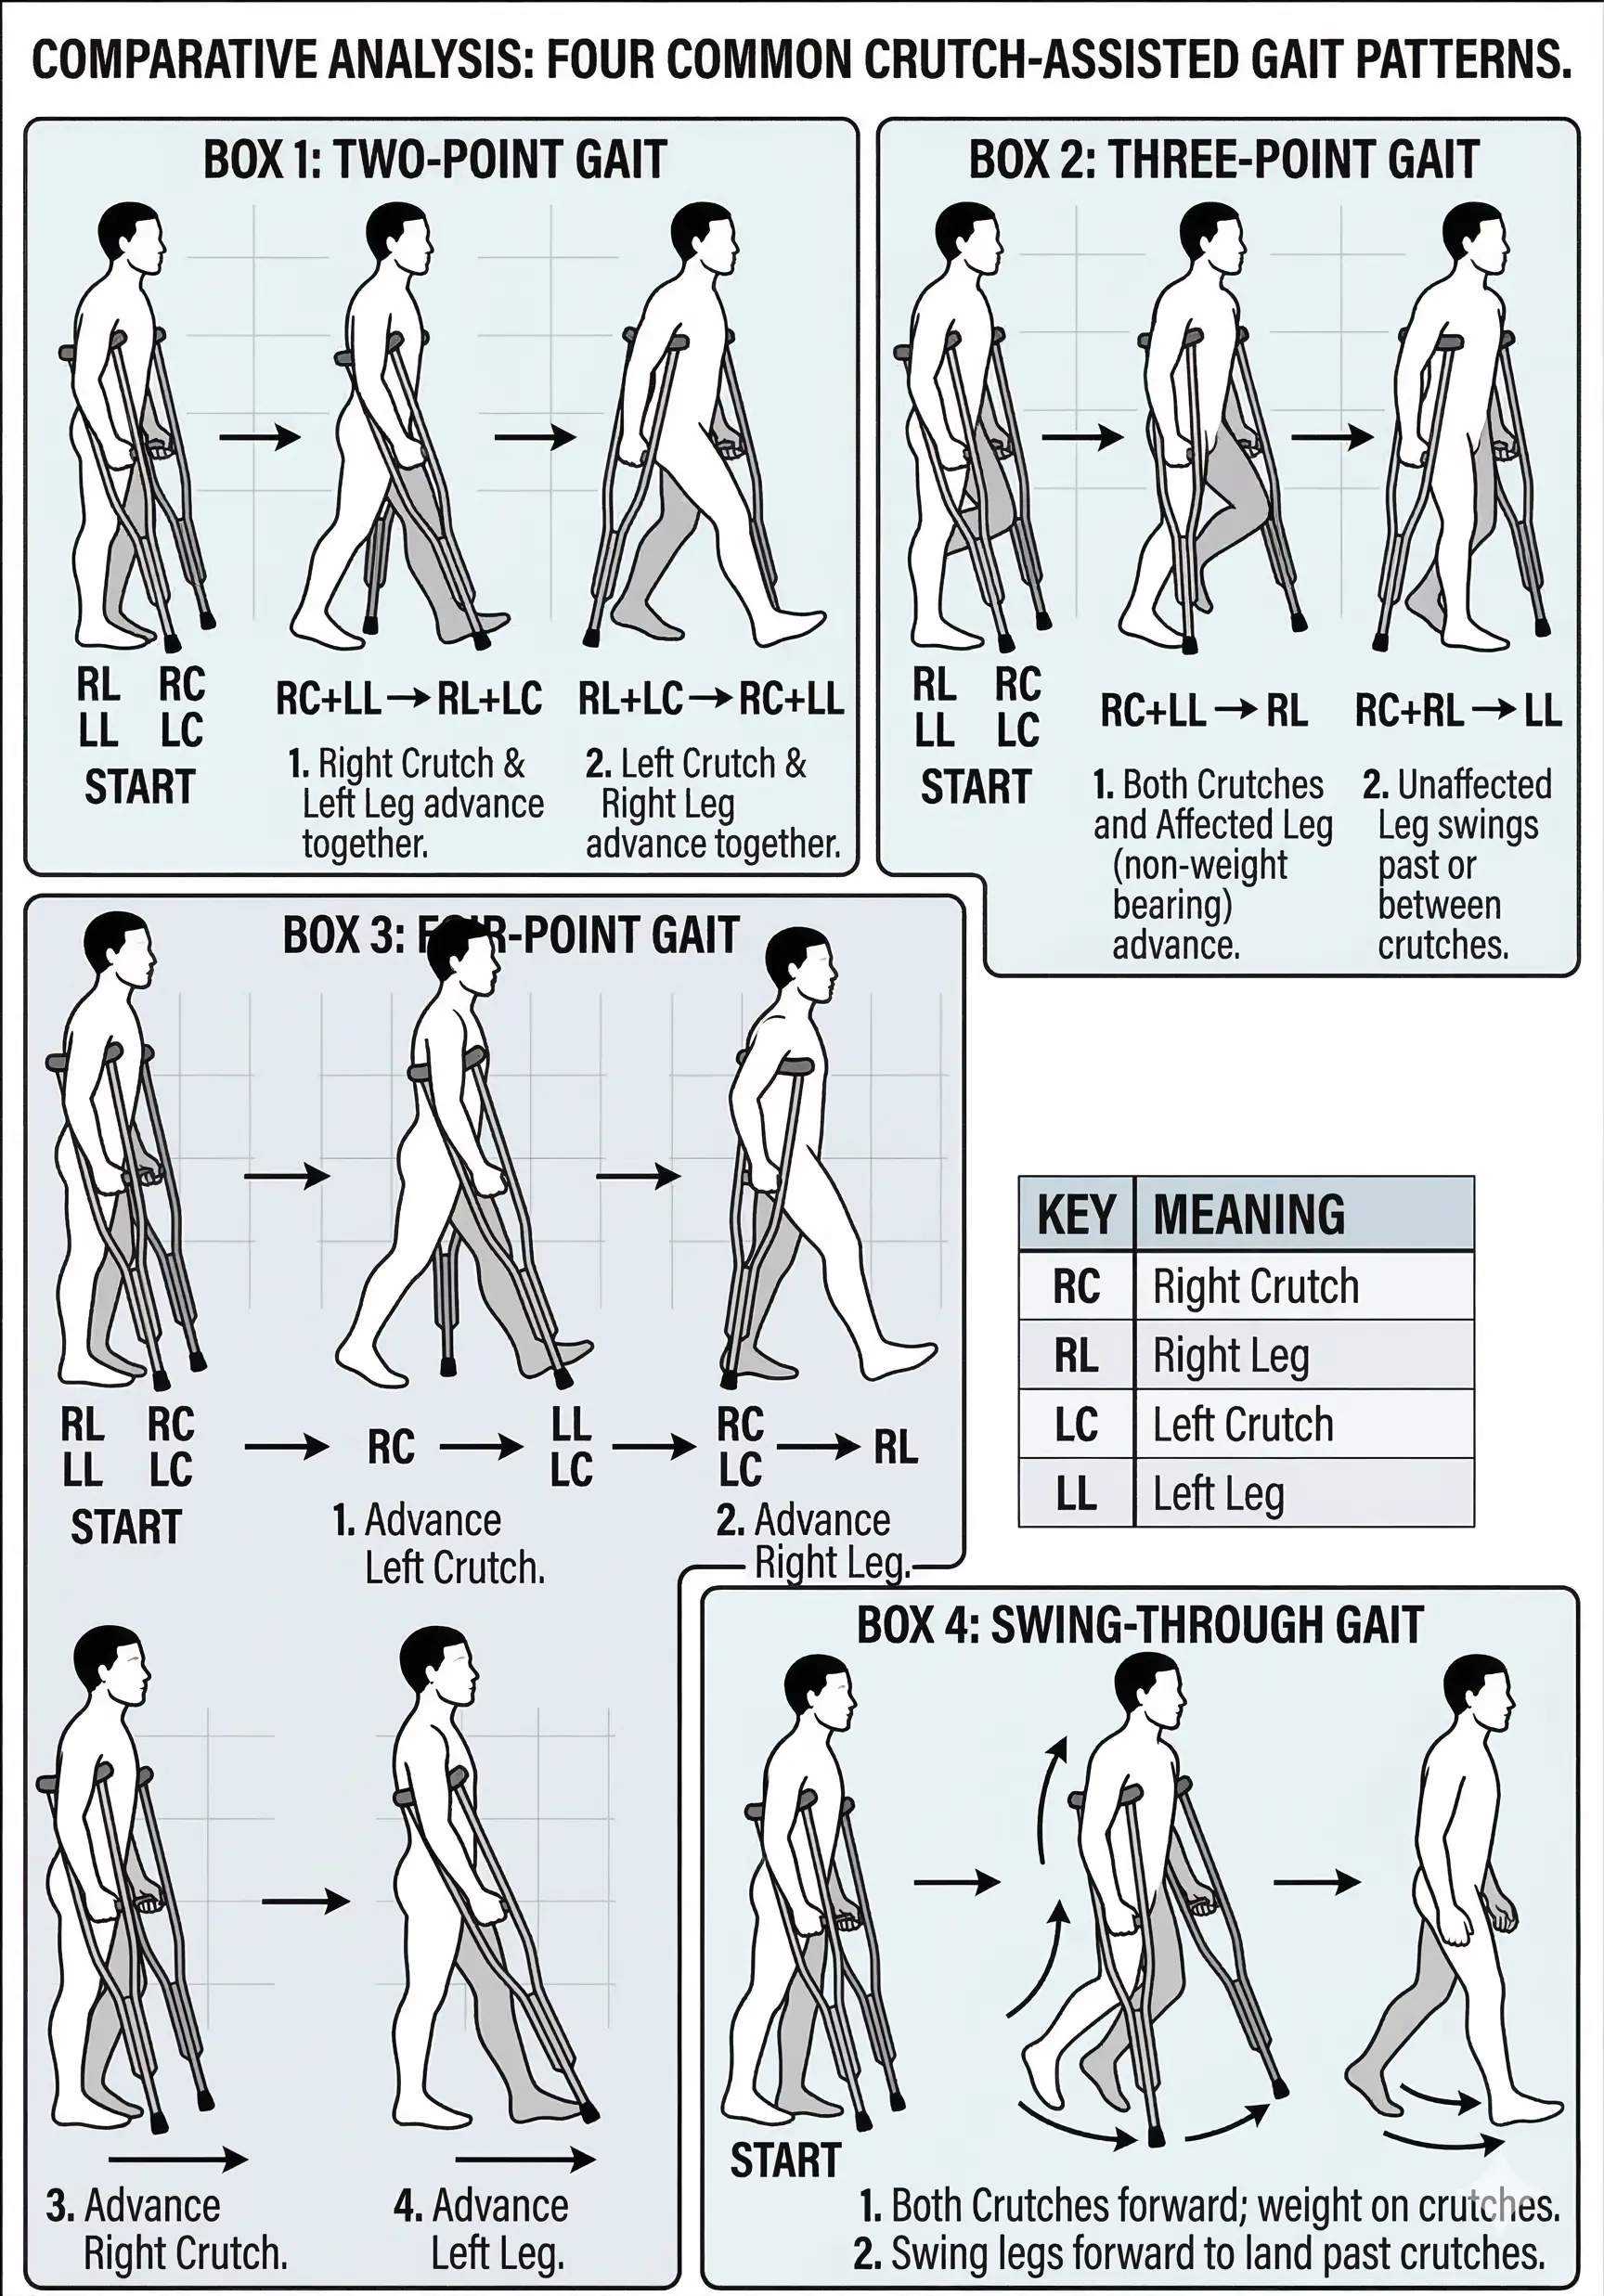
There are several crutch gaits that a medical assistant should know. The provider may also specify the gait the patient should use. The gait depends on whether the patient can put weight on the affected extremity. The following are common gaits:

  • Two-point crutch gait: Mimics normal walking. The patient must be able to put some weight on both legs. From the tripod position (starting position) use this sequence: Move the right crutch with left foot forward and then move the left crutch with the right foot forward. There are two individual movements with this gait. Repeat this pattern.
  • Four-point crutch gait: Must be able to put some weight on both legs. This gait is slower, but safer for those with generalized weakness. From the tripod position, use this sequence: Move the right crutch forward, then move the left foot forward, next move the left crutch forward, and lastly bring the right foot forward. There are four individual movements with this gait. Repeat this pattern.
  • Three-point crutch gait: Used when partial weight bearing or non–weight bearing is indicated. From the tripod position, use this sequence: Move both crutches and the affected leg forward, then move the “good,” or unaffected, leg forward. Repeat this pattern.
  • Swing to crutch gait: Must be able to put some weight on both legs. From the tripod position, use this sequence: Move both crutches forward, then swing the body so the feet are even with the line of the crutches. Repeat this pattern.
  • Swing-through crutch gait: Must be able to put some weight on both legs. From the tripod position, use this sequence: Move both crutches forward, then swing the body so the feet land in front of the line of the crutches. Repeat this pattern.
Different axillary crutch walking gaits shown
Diagram of different axiallary walking

Walkers

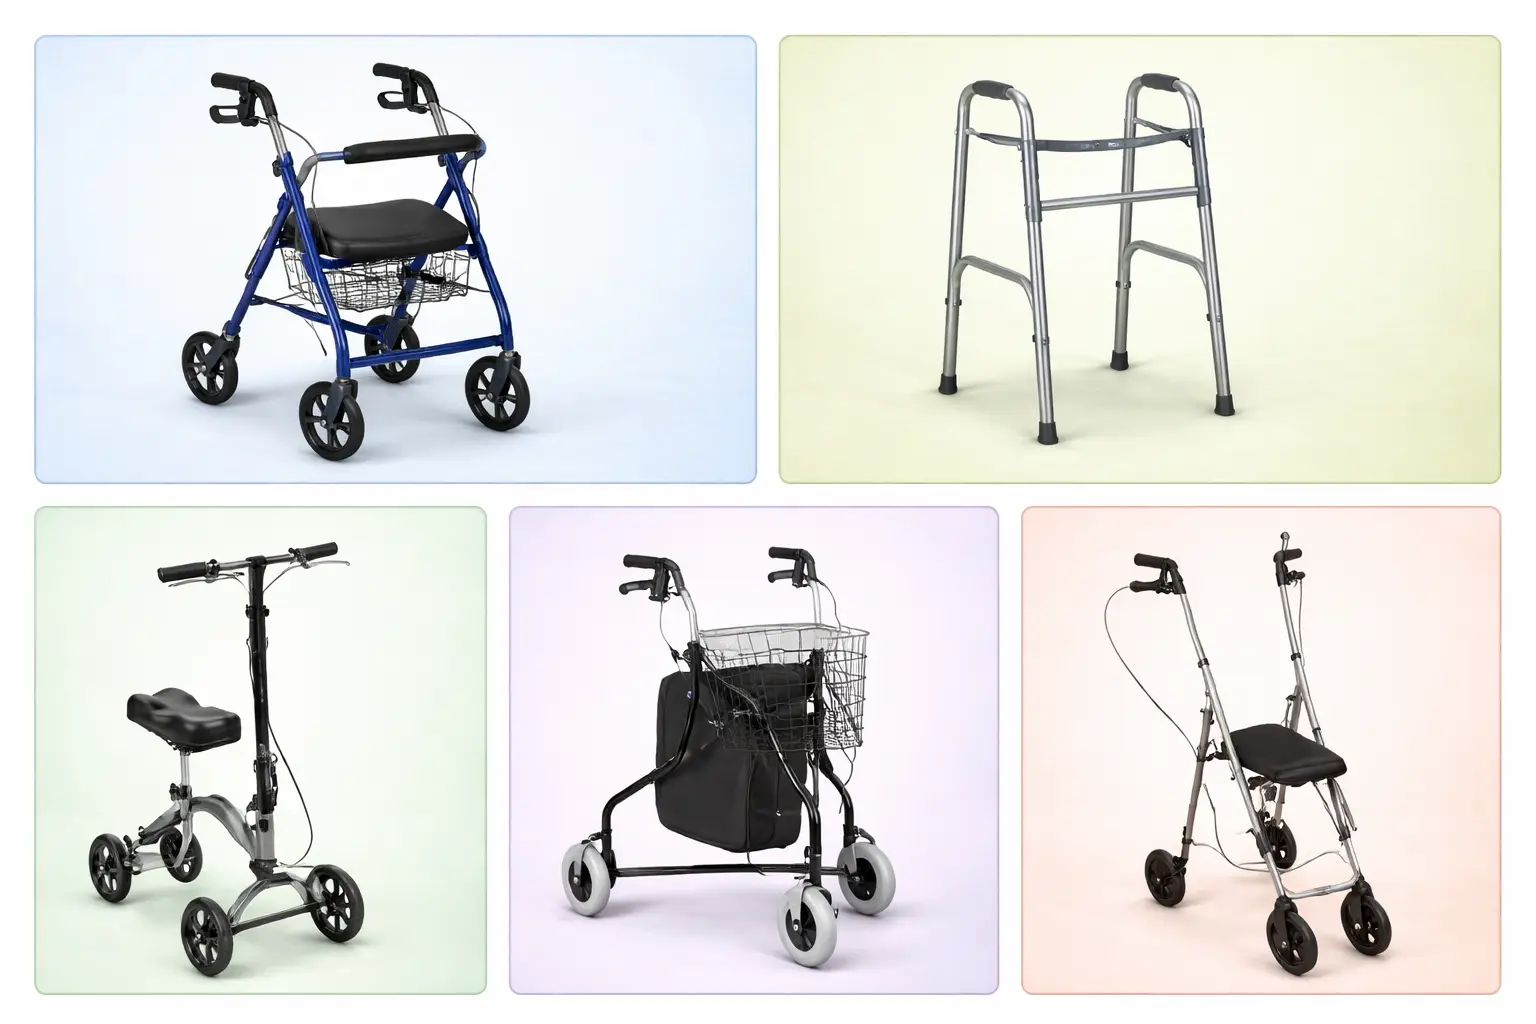
Some patients use walkers after surgery. Many older adults use walkers for help with balance and support. Walkers provide more support than canes. A walker’s wide base helps stabilize the gait of the patient and can support up to 50% of the body weight. Walkers have a metal frame and can easily be adjusted to fit an individual. They are lightweight, and several types can fold flat for storage and travel. Several types of walkers are available:

  • Hemi-walker: Also called a one-hand walker. These walkers are used by patients who can only grasp the walker with one hand due to a stroke or arm/hand amputation.
  • Standard walker: A very common walker; it has four nonskid, rubber-tipped legs. A person needs to pick up the walker with every completed step. Sometimes tennis balls are inserted over the feet to help to move the walker easily across the floor.
  • Two-wheel walker: Resembles the standard walker, but the front two legs have wheels. This type of walker is for those who need some help but not constant weight-bearing help.
  • Three-wheel walker and four-wheel walker: Also called a Rollator. Each leg has a wheel, and many Rollators have brakes by the handles. Some models have a seat and a basket. These walkers are for people who do not need to lean on a walker for balance.
  • Knee walker: A foot-propelled scooter that has a platform to rest the knee and lower leg. This is commonly used instead of axillary crutches for leg or foot conditions.

When you fit a walker, the patient must be wearing shoes. Have the patient step into the walker and relax the arms at the sides of the body. The top of the walker grip should be near the crease in the wrist and even with the top of the hip line. With the shoulders relaxed and the hands on the grips, the elbows should be bent 15 degrees.

When you measure a cane, the patient must be wearing shoes and have the arms relaxed at the sides of the body. The top of the cane should be near the crease in the wrist. With the shoulders relaxed and the hand on the cane, the elbow should be bent 15 degrees. Tingling, numbness, or pain in the hand and fingers may indicate the handle is not appropriate for the person.

Different types of walkers used for patient ambulation
Types of walkers

Canes

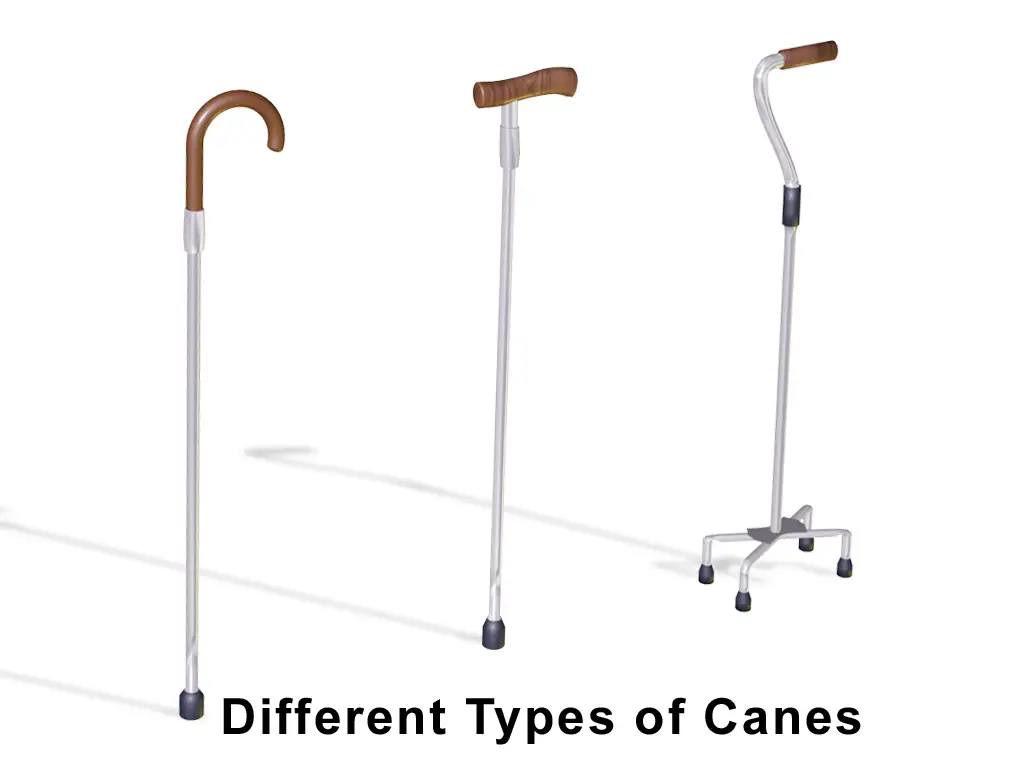
A cane can provide extra assistance for a person who has a minor balance or stability problem. There are two basic types of canes but several different grips or handles. Here are the basic types of canes:

  • Single-tipped cane: Provides minimal assistance with walking.
  • Four-tipped cane: Also called a quad cane. It provides greater stability for patients than the single-tipped cane.

When you measure a cane, the patient must be wearing shoes and have the arms relaxed at the sides of the body. The top of the cane should be near the crease in the wrist. With the shoulders relaxed and the hand on the cane, the elbow should be bent 15 degrees. Tingling, numbness, or pain in the hand and fingers may indicate the handle is not appropriate for the person.

Different types of canes used for patient support
Types of canes
Wikimedia Commons
/
CC BY-SA 4.0

Wheelchairs

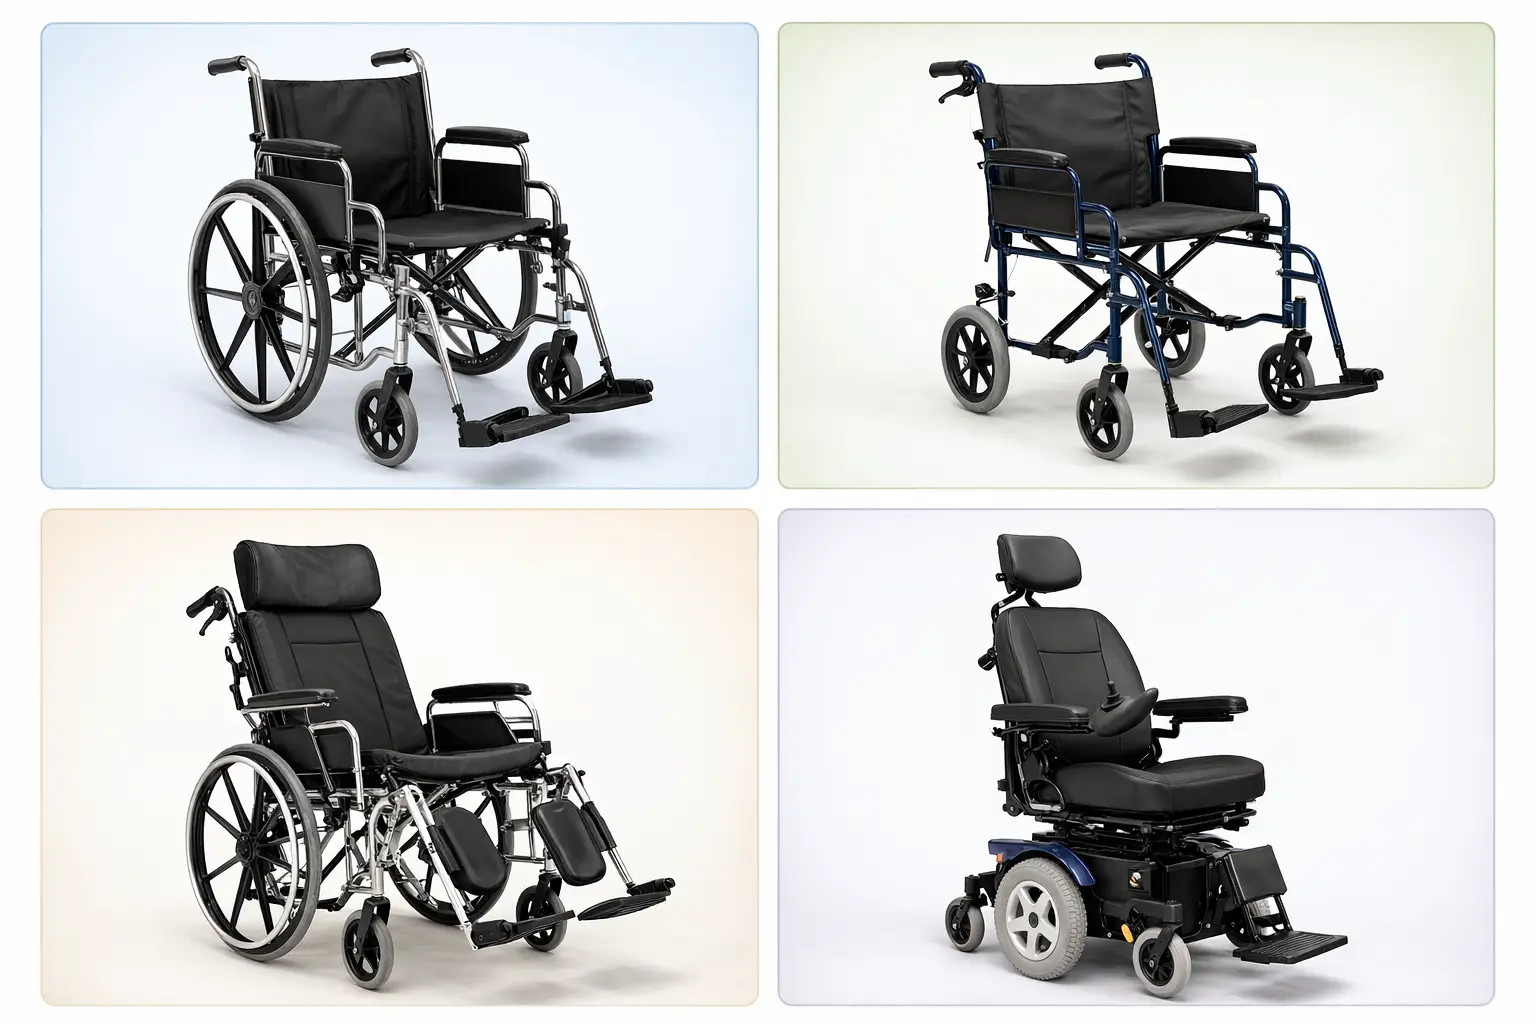
Wheelchairs provide mobility for patients who cannot walk or who are able to walk only short distances. With a regular wheelchair, the patient uses arm muscles for mobility. Motorized wheelchairs are also available. The patient is referred to a medical equipment store, where the appropriate wheelchair is fitted to the individual. It is important to encourage the patient to always lock the wheels before transferring into and out of a wheelchair.

Different types of wheelchairs for patient mobility
Types of wheelchairs

Assisting with assistive devices

  • Assistive devices: crutches, walkers, canes, wheelchairs
  • Proper fitting and coaching essential to prevent falls/injuries
  • Medical assistants adjust devices and instruct on safe use

Crutches

  • Types: axillary, forearm (Lofstrand), extension (Canadian), platform, hands-free, M+D crutches
  • Selection depends on patient’s strength, injury, and needs

Fitting axillary crutches

  • Crutch top: 1–1½ inches below armpit (2 finger widths)
  • Crutch placement: 4–6 inches to side/front of each foot
  • Handgrip: at wrist/hip level; elbow bent 15–30 degrees

Limitations with crutches

  • Weight bearing as tolerated: more than half weight if not painful
  • Partial weight bearing: provider specifies allowed weight
  • Toe-touch: toes touch for balance, no weight
  • Non–weight bearing: no weight on affected extremity; requires three-point gait

Crutch gaits

  • Two-point: right crutch/left foot, left crutch/right foot (some weight on both legs)
  • Four-point: right crutch, left foot, left crutch, right foot (safer, slower)
  • Three-point: both crutches + affected leg, then unaffected leg (partial/non-weight bearing)
  • Swing to: both crutches forward, swing feet to crutches
  • Swing-through: both crutches forward, swing feet past crutches

Walkers

  • Types: hemi-walker, standard, two-wheel, three/four-wheel (Rollator), knee walker
  • Fitting: walker grip at wrist crease/top of hip; elbows bent 15 degrees
  • Provides up to 50% body weight support; more stable than canes

Canes

  • Types: single-tipped (minimal assistance), four-tipped/quad cane (greater stability)
  • Fitting: cane top at wrist crease; elbow bent 15 degrees
  • Improper handle can cause tingling, numbness, pain

Wheelchairs

  • For patients unable to walk or only short distances
  • Manual and motorized options; fitted individually
  • Always lock wheels before transfers

Complementary therapies

  • Used with conventional medicine (not instead)
  • Examples: massage, chiropractic care, acupressure, acupuncture

Massage therapy

  • Deep: for muscle injury, slow/forceful
  • Swedish: relaxation, long strokes/circular movements
  • Sports: for athletes, injury prevention/treatment
  • Trigger point: targets tight muscles from injury/overuse

Chiropractic care

  • Focus: spine alignment, pain relief, improved function
  • Spinal manipulation for back/neck pain, headaches, joint conditions
  • Requires 4+ years training, licensing, continuing education

Acupressure and acupuncture

  • Acupressure: firm pressure on body points
  • Acupuncture: fine needles in specific points
  • Used for pain, nausea, neuropathy, anxiety, depression, sleep issues

Patient coaching

  • Wear rubber/nonskid shoes
  • Remove tripping hazards (rugs, cords, clutter, pets)
  • Ensure clean, dry floors
  • Safe sitting/standing techniques (back up to chair, use armrests)
  • Consider handrails in bathroom

Legal and ethical issues

  • Procedures may require additional training and state-specific authorization
  • Medical assistants must perform procedures correctly and legally

Patient-centered care

  • Provide safety info for home (nonskid shoes, remove hazards)
  • Suggest adaptive tools for bathing/grooming
  • Home care tips improve safety and independence

Professional behaviors

  • Remain calm, composed, and respectful with patients
  • Listen to concerns; understand pain/limited mobility may affect mood

Sign up for free to take 13 quiz questions on this topic

Previous
Next  | 27.1 Assisting in surgery
All rights reserved ©2016 - 2026 Achievable, Inc.

Assistive devices: crutches, walkers, canes, and wheelchairs

An assistive device is used to help a person perform a specific task, such as walking. Crutches, walkers, canes, and wheelchairs are considered assistive devices. Many times, these assistive devices can be purchased at pharmacies and medical supply stores. The medical assistant should know how to adjust the device to fit the patient. Medical assistants may also coach patients on the proper use of the assistive device. Improper use of assistive devices can lead to falls and injuries.

Crutches

Crutches are used to help a person walk. Crutches can be made out of aluminum or wood and can be adjusted for the patient. The more common crutches are as follows:

  • Axillary crutches: Most common type; used when recovering from a foot, ankle, or leg injury or surgery.
  • Forearm crutches: Also called Lofstrand or elbow crutches; require more upper body strength. An open elbow cuff fits around the patient’s forearm. These crutches help with proper posture and body mechanics.
  • Extension crutches: Also called Canadian crutches. These combine the underarm crutch with an elbow cuff, which provides extra support for the patient.
  • Platform crutches: Also called triceps crutches. They have padded armrests with handgrips. These crutches are used when patients cannot straighten their arms to hold the handgrip of the crutch.
  • Hands-free crutch: Straps to the thigh, and a platform supports the lower leg.
  • M+D crutches: The hinged arm cradles the strap to the forearms, thus eliminating pressure in the axillae, wrists, and hands.

Fitting axillary crutches

Axillary crutches need to be fitted correctly to allow for good body mechanics and to reduce the risk of injury. Crutch palsy can occur with poorly fitted crutches or if the patient rests on the top of the crutches while walking. The axillary nerves can be temporarily or permanently damaged. This can cause loss of hand strength and weakening of the wrist and forearm muscles.

When you fit axillary crutches, the patient must be wearing shoes. Have the patient stand straight up. Fit the crutches so they are 1 to 1½ inches (about 2 finger widths) below the armpit. The crutch should be about 4 to 6 inches to the side and front of each foot. Handgrips must be near the wrist and even with the top of the hip line. When the hands are on the handgrip, the elbow should be bent 15 to 30 degrees.

Limitations with crutches

Providers will indicate the type of crutch, along with any limitations. Common limitations with crutches include the following:

  • Weight bearing as tolerated: Patients can place more than half of their body weight on their “bad,” or affected, extremity if it is not painful.
  • Partial weight bearing: The provider will indicate how much weight can be placed on the affected extremity.
  • Toe-touch weight bearing: Patients can touch the ground with their toes on the affected side. The toe-touch helps with balance. No weight bearing is allowed on the affected extremity.
  • Non–weight bearing: Patients cannot put weight on their affected extremity. This type of limitation would require the three-point crutch gait.

Crutch gaits

There are several crutch gaits that a medical assistant should know. The provider may also specify the gait the patient should use. The gait depends on whether the patient can put weight on the affected extremity. The following are common gaits:

  • Two-point crutch gait: Mimics normal walking. The patient must be able to put some weight on both legs. From the tripod position (starting position) use this sequence: Move the right crutch with left foot forward and then move the left crutch with the right foot forward. There are two individual movements with this gait. Repeat this pattern.
  • Four-point crutch gait: Must be able to put some weight on both legs. This gait is slower, but safer for those with generalized weakness. From the tripod position, use this sequence: Move the right crutch forward, then move the left foot forward, next move the left crutch forward, and lastly bring the right foot forward. There are four individual movements with this gait. Repeat this pattern.
  • Three-point crutch gait: Used when partial weight bearing or non–weight bearing is indicated. From the tripod position, use this sequence: Move both crutches and the affected leg forward, then move the “good,” or unaffected, leg forward. Repeat this pattern.
  • Swing to crutch gait: Must be able to put some weight on both legs. From the tripod position, use this sequence: Move both crutches forward, then swing the body so the feet are even with the line of the crutches. Repeat this pattern.
  • Swing-through crutch gait: Must be able to put some weight on both legs. From the tripod position, use this sequence: Move both crutches forward, then swing the body so the feet land in front of the line of the crutches. Repeat this pattern.

Walkers

Some patients use walkers after surgery. Many older adults use walkers for help with balance and support. Walkers provide more support than canes. A walker’s wide base helps stabilize the gait of the patient and can support up to 50% of the body weight. Walkers have a metal frame and can easily be adjusted to fit an individual. They are lightweight, and several types can fold flat for storage and travel. Several types of walkers are available:

  • Hemi-walker: Also called a one-hand walker. These walkers are used by patients who can only grasp the walker with one hand due to a stroke or arm/hand amputation.
  • Standard walker: A very common walker; it has four nonskid, rubber-tipped legs. A person needs to pick up the walker with every completed step. Sometimes tennis balls are inserted over the feet to help to move the walker easily across the floor.
  • Two-wheel walker: Resembles the standard walker, but the front two legs have wheels. This type of walker is for those who need some help but not constant weight-bearing help.
  • Three-wheel walker and four-wheel walker: Also called a Rollator. Each leg has a wheel, and many Rollators have brakes by the handles. Some models have a seat and a basket. These walkers are for people who do not need to lean on a walker for balance.
  • Knee walker: A foot-propelled scooter that has a platform to rest the knee and lower leg. This is commonly used instead of axillary crutches for leg or foot conditions.

When you fit a walker, the patient must be wearing shoes. Have the patient step into the walker and relax the arms at the sides of the body. The top of the walker grip should be near the crease in the wrist and even with the top of the hip line. With the shoulders relaxed and the hands on the grips, the elbows should be bent 15 degrees.

When you measure a cane, the patient must be wearing shoes and have the arms relaxed at the sides of the body. The top of the cane should be near the crease in the wrist. With the shoulders relaxed and the hand on the cane, the elbow should be bent 15 degrees. Tingling, numbness, or pain in the hand and fingers may indicate the handle is not appropriate for the person.

Canes

A cane can provide extra assistance for a person who has a minor balance or stability problem. There are two basic types of canes but several different grips or handles. Here are the basic types of canes:

  • Single-tipped cane: Provides minimal assistance with walking.
  • Four-tipped cane: Also called a quad cane. It provides greater stability for patients than the single-tipped cane.

When you measure a cane, the patient must be wearing shoes and have the arms relaxed at the sides of the body. The top of the cane should be near the crease in the wrist. With the shoulders relaxed and the hand on the cane, the elbow should be bent 15 degrees. Tingling, numbness, or pain in the hand and fingers may indicate the handle is not appropriate for the person.

Wheelchairs

Wheelchairs provide mobility for patients who cannot walk or who are able to walk only short distances. With a regular wheelchair, the patient uses arm muscles for mobility. Motorized wheelchairs are also available. The patient is referred to a medical equipment store, where the appropriate wheelchair is fitted to the individual. It is important to encourage the patient to always lock the wheels before transferring into and out of a wheelchair.

Key points

Assisting with assistive devices

  • Assistive devices: crutches, walkers, canes, wheelchairs
  • Proper fitting and coaching essential to prevent falls/injuries
  • Medical assistants adjust devices and instruct on safe use

Crutches

  • Types: axillary, forearm (Lofstrand), extension (Canadian), platform, hands-free, M+D crutches
  • Selection depends on patient’s strength, injury, and needs

Fitting axillary crutches

  • Crutch top: 1–1½ inches below armpit (2 finger widths)
  • Crutch placement: 4–6 inches to side/front of each foot
  • Handgrip: at wrist/hip level; elbow bent 15–30 degrees

Limitations with crutches

  • Weight bearing as tolerated: more than half weight if not painful
  • Partial weight bearing: provider specifies allowed weight
  • Toe-touch: toes touch for balance, no weight
  • Non–weight bearing: no weight on affected extremity; requires three-point gait

Crutch gaits

  • Two-point: right crutch/left foot, left crutch/right foot (some weight on both legs)
  • Four-point: right crutch, left foot, left crutch, right foot (safer, slower)
  • Three-point: both crutches + affected leg, then unaffected leg (partial/non-weight bearing)
  • Swing to: both crutches forward, swing feet to crutches
  • Swing-through: both crutches forward, swing feet past crutches

Walkers

  • Types: hemi-walker, standard, two-wheel, three/four-wheel (Rollator), knee walker
  • Fitting: walker grip at wrist crease/top of hip; elbows bent 15 degrees
  • Provides up to 50% body weight support; more stable than canes

Canes

  • Types: single-tipped (minimal assistance), four-tipped/quad cane (greater stability)
  • Fitting: cane top at wrist crease; elbow bent 15 degrees
  • Improper handle can cause tingling, numbness, pain

Wheelchairs

  • For patients unable to walk or only short distances
  • Manual and motorized options; fitted individually
  • Always lock wheels before transfers

Complementary therapies

  • Used with conventional medicine (not instead)
  • Examples: massage, chiropractic care, acupressure, acupuncture

Massage therapy

  • Deep: for muscle injury, slow/forceful
  • Swedish: relaxation, long strokes/circular movements
  • Sports: for athletes, injury prevention/treatment
  • Trigger point: targets tight muscles from injury/overuse

Chiropractic care

  • Focus: spine alignment, pain relief, improved function
  • Spinal manipulation for back/neck pain, headaches, joint conditions
  • Requires 4+ years training, licensing, continuing education

Acupressure and acupuncture

  • Acupressure: firm pressure on body points
  • Acupuncture: fine needles in specific points
  • Used for pain, nausea, neuropathy, anxiety, depression, sleep issues

Patient coaching

  • Wear rubber/nonskid shoes
  • Remove tripping hazards (rugs, cords, clutter, pets)
  • Ensure clean, dry floors
  • Safe sitting/standing techniques (back up to chair, use armrests)
  • Consider handrails in bathroom

Legal and ethical issues

  • Procedures may require additional training and state-specific authorization
  • Medical assistants must perform procedures correctly and legally

Patient-centered care

  • Provide safety info for home (nonskid shoes, remove hazards)
  • Suggest adaptive tools for bathing/grooming
  • Home care tips improve safety and independence

Professional behaviors

  • Remain calm, composed, and respectful with patients
  • Listen to concerns; understand pain/limited mobility may affect mood

More from The role of the medical assistant in physical therapy examination and assessment

  • Immobilization and treatment techniques
  • Assisting in physical therapy & rehabilitation
  • Assisting with cold and heat therapies