


Achievable logoAchievable logo
CCMA
Sign in
Sign up
Purchase
Textbook
Practice exams
Support
How it works
Exam catalog
Mountain with a flag at the peak
Textbook
1. Medical assistant
2. Electronic records
3. Medical terminology and anatomy
4. The fundamentals of infection control
5. Introduction to vital signs
6. The patient interview and history
7. The physical examination
8. Appointment scheduling
9. Insurance billing
10. Diagnostic coding and the ICD-10-CM System
11. Procedural coding
12. Medical billing and reimbursement essentials
13. Assisting with medical specialties
14. Assisting with the musculoskeletal system
15. Assisting with the cardiovascular system
16. Assisting with the respiratory system
17. Assisting with the nervous system
18. Anatomy and physiology of the urinary system
19. Assisting in obstetrics and gynecology
20. Assisting in endocrinology
21. Assisting in ophthalmology & otolaryngology
22. Assisting in gastroenterology
23. Assisting in the immune & lymphatic systems
24. Assisting in pediatrics: the developmental stages and care
25. The medical assistant’s role in caring for the older patient
26. The role of the medical assistant in physical therapy examination and assessment
27. Preparing for minor surgery: room, solutions, and supplies
28. Introduction to the clinical laboratory
29. Urinalysis
30. Blood collection
30.1 Phlebotomy procedures
30.2 Evacuated collection tubes and order of draw
30.3 Needle safety and post exposure follow-up
30.4 Routine venipuncture
30.5 Potential problems associated with venipuncture
30.6 Capillary puncture: indications, equipment, and procedure
30.7 Capillary puncture: processing, legal, and professional issues
31. Analysis of blood
32. Electrocardiography and heart structure
33. The principles of pharmacology
34. Essential calculations and measurement systems
35. Solid, liquid, & solutions medication doses
36. Administering medications
37. Metabolism and core nutrient roles
38. Medical emergencies in the healthcare setting
Achievable logoAchievable logo
30.4 Routine venipuncture
Achievable CCMA
30. Blood collection
Our CCMA course is currently in development and is a work-in-progress.

Routine venipuncture

10 min read
Font
Discuss
Share
Feedback

Venipuncture involves a series of steps that are vital to collecting a good sample. In addition to learning good techniques, we also want to be able to make our patients as comfortable as possible. As you read through the information, you will start to become familiar with the venipuncture procedure and the details of the process.

The first step of the procedure is to select the proper method for venipuncture (evacuated tube, syringe, or butterfly assembly). Next, prepare your patient for the procedure. Then you are ready to collect the sample and process the specimen appropriately.

Patient preparation

All blood collections begin with a requisition, a form from the patient’s provider requesting a test. Requisitions may be computer-generated or handwritten, and at a minimum, they must include the following information:

  • Patient’s name
  • Patient’s date of birth
  • Patient’s identification number
  • Name of the provider submitting the order
  • Type of test requested
  • Test status (timed, fasting, STAT, and so forth)

Begin the venipuncture procedure by greeting the patient and verifying his or her identity. According to CLSI, proper identification includes asking outpatients to (1) state and spell their first and last name and (2) state their birth date. All of the information must be compared and verified with the patient requisition. If communication with the patient is not effective due to any circumstances, a family member, guardian, or medical translator must provide the needed information. The name of the person assisting should be documented in the patient’s medical record. Always follow your institution’s procedures for assisted communication before completing the venipuncture procedure.

Briefly explain the venipuncture procedure to your patient, and make sure to ask him or her the following questions:

  • Do you have any questions or concerns?
  • Do you have an arm, vein, or site preference?
  • Were you given any special instructions prior to the venipuncture (e.g., does the person need to be fasting)?
  • Have you ever experienced any problems or complications with a routine venipuncture in the past?
  • Do you take aspirin or blood thinners?

Answer questions and concerns, and take steps to prevent any past problems from recurring. If you cannot answer all the patient’s questions, ask if the patient would like to talk to the provider for clarification. Obtain verbal consent to perform the venipuncture simply by asking whether you have permission to draw blood from the patient.

Your self-confidence in performing the procedure will help put your patient at ease. Act and speak professionally. Treat your patient with kindness and respect. Being pleasant and friendly is important. It makes your patients feel comfortable and shows that you take your role in their care seriously.

Preparing for the venipuncture

Seat the patient in a phlebotomy area. Ask the patient to extend an arm and position his or her other hand under the elbow to help straighten the elbow, if necessary. Inspect both arms and ask whether the patient has an arm or site preference. Veins in the antecubital area are most commonly used for venipuncture. According to CLSI standards, the veins in the center of the antecubital area should be located as a first choice before alternative veins within the antecubital area are considered. The puncture site should be carefully selected after both arms have been inspected. Alternative sites may be chosen if the area is scarred, bruised, burned, or swollen. You may use the veins on the back of the hand if the patient gives permission. Consult the provider for any other alternative site, and do not proceed without supervision.

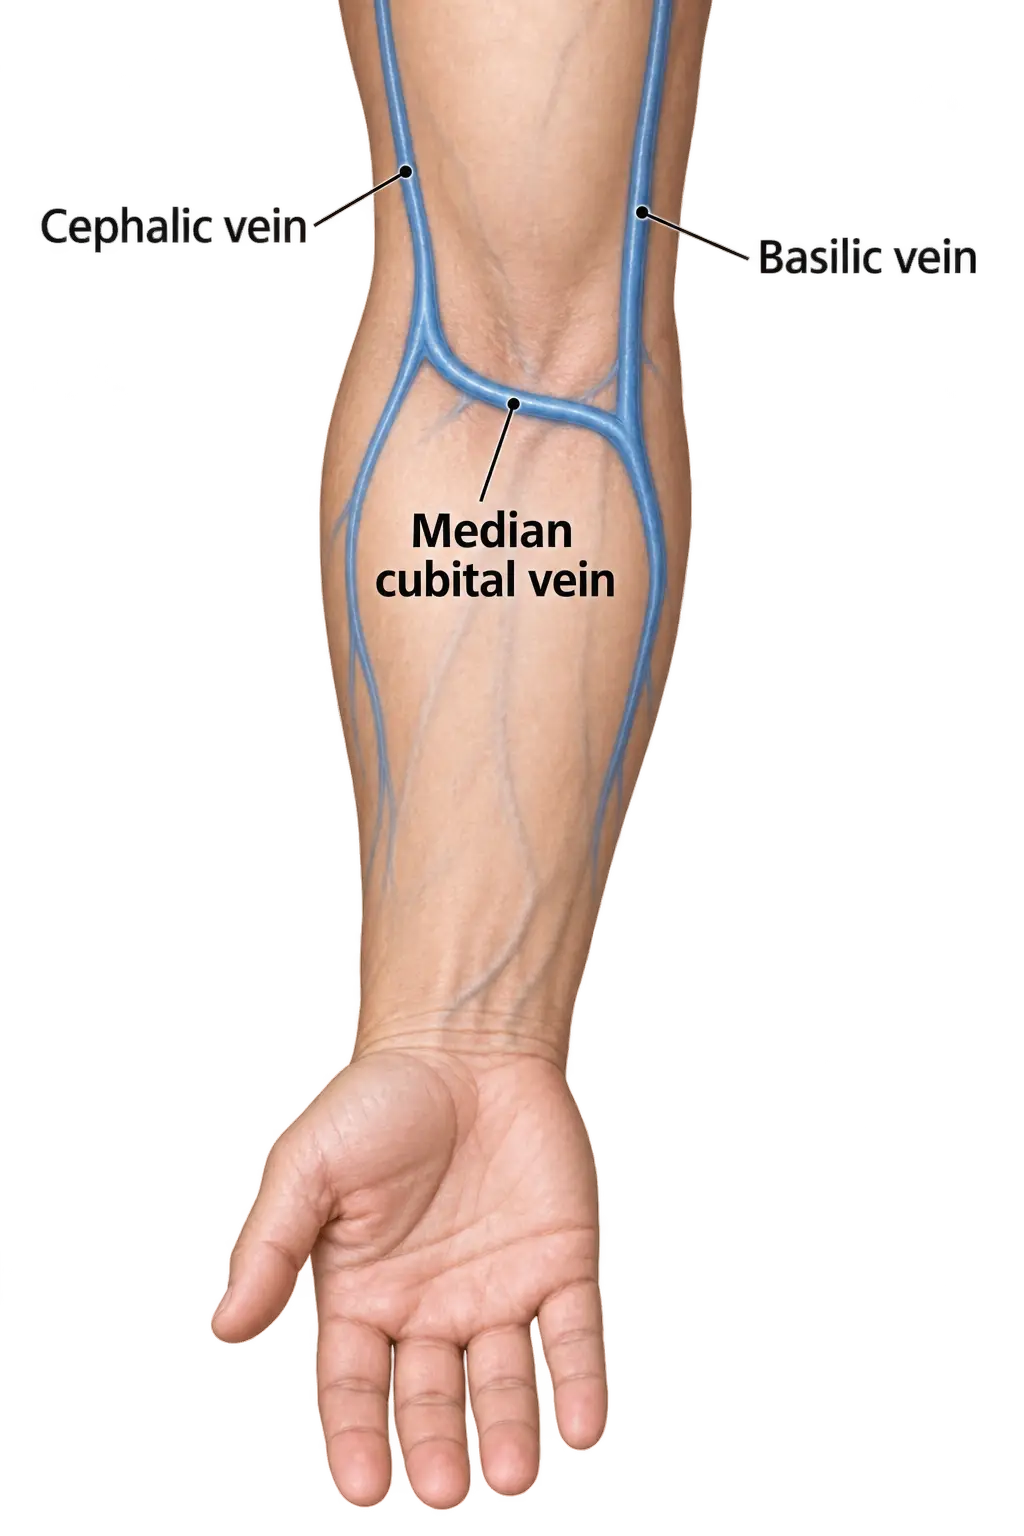
Veins commonly used for phlebotomy labeled
Phlebotomy veins
Wikimedia Commons
/
CC BY-SA 3.0
When choosing the best available vein, palpate the area. Feel for a vein that has “bounce” when lightly palpated. Consider the three Ds of vein selection:

  • Depth below the surface
  • Diameter of the vein
  • Direction through the antecubital region.

Correctly choosing a vein is one of the most important aspects of a venipuncture.

The medial veins generally run at a slight angle to the fold in the antecubital area. The cephalic veins are on the thumb side of the antecubital area. These are the veins of choice. The basilic vein, which lies on the inside of the antecubital area (the little finger side), is very close to the brachial artery and median nerves and should not be used! If the medial or cephalic veins are not accessible, consult the provider. Only the most experienced phlebotomists should ever attempt a basilic venipuncture. The chance of injury to the patient is too great.

The tourniquet should be placed about 3 to 4 inches above the patient’s elbow. Make sure it is not twisted because that will cause discomfort to your patient. Grasp the tourniquet ends, one in each hand, close to the patient’s skin. Pull the ends apart to gently stretch the tourniquet, then cross one end over the other while maintaining the tension. Tuck the top portion of the tourniquet underneath the bottom portion, creating a loop with the upper flap free. The free end will be tugged on to release the tourniquet later in the draw. The tourniquet should be tight without being uncomfortable or pinching the patient’s skin. Both ends of the tourniquet should be pointing upward on the arm. This way, the end of the tourniquet does not contaminate the venipuncture site.

When the tourniquet is in place, ask the patient to place his or her other hand or fist under the elbow of the arm that will be drawn if this aids in palpating the vein. Ask the person to just relax the arm. Palpate for an acceptable vein using your gloved index finger. It is more efficient to put on gloves at the beginning of the procedure and continue. Also, if you learn to palpate veins with gloves on, you will train your finger to recognize the veins through the gloves from the beginning.

According to the CLSI, you can palpate veins without wearing gloves as long as the venipuncture site has not yet been cleaned. After locating the vein, clean the area with a 70% isopropyl alcohol wipe. While the site is drying, resanitize your hands, put on gloves, and continue with the rest of the procedure.

Performing the venipuncture

When you have located a vein, remove the tourniquet. A tourniquet can remain in place for 1 minute. After its removal, wait 2 minutes before reapplying it. During this time, sanitize your hands and put on gloves (if they are not already on). Then cleanse the antecubital area with a 70% alcohol wipe. Clean the area by using a back-and-forth motion. CLSI guidelines recommend cleansing the site with friction and not in a circular motion. Do not touch this area after cleaning with alcohol. Assemble the equipment and place it within easy reach of the patient’s arm.

Reapply the tourniquet. Do not have the patient clench or pump the fist. If the fist is relaxed, the venipuncture will feel less painful. Visually relocate the vein, and do not retouch the cleaned area. Anchor the vein by gently stretching the skin downward, about 2 to 3 inches below the collection site, with the thumb of the nondominant hand. Smoothly and quickly insert the needle into the vein at about a 15-degree angle, depending on the depth and position of the vein. The bevel should be facing up. Push the evacuated tube onto the double-pointed needle or pull back on the syringe plunger with your nondominant hand.

Angle of needle entry

Why is the angle of the needle so important? If the needle is inserted at an angle greater than 15 degrees, it penetrates the vein quickly and may pass through the back side of the vein and enter other structures. Formation of a hematoma is more likely then.

If the angle is less than 15 degrees, the needle may skim on the top of the vein and not create a clean puncture. If the vein is just skimmed or scratched, there is a greater chance of creating a hematoma on the front of the vein.

The depth and position of the vein may require angle adjustment, but a 15-degree angle is a good place to start. The angle of entry is very important to a successful venipuncture.

Completing the venipuncture

Continue to draw the specimens, checking periodically on the patient’s condition. As you remove each tube from the needle holder, gently invert it several times before placing it in a collection rack. Tubes with sodium citrate should be inverted three to four times. Tubes with clot activator should be inverted five times. Tubes with anticoagulant should be inverted eight times. If the tubes are not inverted immediately after collection, small clots can form in the specimen. When the last tube has started to fill, carefully release the tourniquet. Gently tug on the short portion of the tourniquet, and it should just fall open. Remove the final vacuum tube. Cover the venipuncture area with gauze, then smoothly and quickly remove the needle. Once the needle is out of the arm, apply pressure to the site. At the same time, activate the safety device to cover the needle. Dispose of the entire venipuncture assembly into a sharps container. Ask the patient to apply direct pressure to the gauze. Do not bend the arm.

While the patient applies pressure to the site, label the tubes with computer-generated labels or by writing the information in permanent marker. Make sure the label contains the following minimum information:

  • Patient’s last name, then first name
  • Patient’s date of birth
  • Patient’s ID number or medical insurance number
  • Date and time of the draw and the phlebotomist’s initials
  • Provider’s name; also indicate if the patient was fasting (optional)

Before putting on a bandage, perform a two-point check to make sure the site is not leaking. Observe the site for 5 to 10 seconds after releasing pressure and removing the gauze. If visible bleeding occurs or if the tissue around the puncture site rises, continue applying pressure until the bleeding has stopped. Special precautions must be taken for patients taking anticoagulants because the phlebotomy site will bleed longer than normal. Put on a pressure bandage by placing a folded gauze (not a cotton ball) over the site and applying a hypoallergenic self-stick wrap, stretchy gauze, or a bandage. Never leave the room or release an outpatient until all the tubes have been labeled. Make sure the patient is doing well, then escort them to the exit or reception area.

Some patients may have small veins, and using a syringe or butterfly for venipuncture may work better than the standard evacuated assembly. Young children, chemotherapy patients, older adult patients, and people with veins that are difficult to draw may require syringe or butterfly equipment. Alternative equipment is always used to draw blood from hand veins.

Patient preparation

  • Verify patient identity using name and date of birth; compare with requisition
  • Explain procedure, address concerns, obtain verbal consent
  • Ask about site preference, fasting status, blood thinners, prior complications

Preparing for the venipuncture

  • Seat patient, position arm, inspect both arms for best site
  • First choice: medial and cephalic veins in antecubital area
    • Avoid basilic vein unless absolutely necessary
  • Apply tourniquet 3–4 inches above elbow; ensure proper tension and placement
  • Palpate for vein using the three Ds: Depth, Diameter, Direction
  • Clean site with 70% isopropyl alcohol; allow to dry before proceeding

Performing the venipuncture

  • Remove tourniquet before cleaning site; reapply after cleaning
  • Do not have patient clench or pump fist
  • Anchor vein, insert needle bevel up at ~15-degree angle
  • Use appropriate collection method (evacuated tube, syringe, butterfly)

Angle of needle entry

  • Ideal angle: 15 degrees
    • 15°: risk of penetrating through vein, causing hematoma

    • <15°: risk of skimming vein, causing hematoma

Completing the venipuncture

  • Invert tubes immediately after collection (number of inversions depends on additive)
  • Release tourniquet as last tube fills; remove needle, apply pressure with gauze
  • Activate needle safety device; dispose in sharps container
  • Label tubes with patient info, date/time, phlebotomist initials before leaving patient
  • Check site for bleeding; apply pressure bandage if needed
  • Use syringe or butterfly for small or difficult veins (e.g., children, elderly, hand veins)

Sign up for free to take 22 quiz questions on this topic

Previous
Next  | 30.5 Potential problems associated with venipuncture
All rights reserved ©2016 - 2026 Achievable, Inc.

Routine venipuncture

Venipuncture involves a series of steps that are vital to collecting a good sample. In addition to learning good techniques, we also want to be able to make our patients as comfortable as possible. As you read through the information, you will start to become familiar with the venipuncture procedure and the details of the process.

The first step of the procedure is to select the proper method for venipuncture (evacuated tube, syringe, or butterfly assembly). Next, prepare your patient for the procedure. Then you are ready to collect the sample and process the specimen appropriately.

Patient preparation

All blood collections begin with a requisition, a form from the patient’s provider requesting a test. Requisitions may be computer-generated or handwritten, and at a minimum, they must include the following information:

  • Patient’s name
  • Patient’s date of birth
  • Patient’s identification number
  • Name of the provider submitting the order
  • Type of test requested
  • Test status (timed, fasting, STAT, and so forth)

Begin the venipuncture procedure by greeting the patient and verifying his or her identity. According to CLSI, proper identification includes asking outpatients to (1) state and spell their first and last name and (2) state their birth date. All of the information must be compared and verified with the patient requisition. If communication with the patient is not effective due to any circumstances, a family member, guardian, or medical translator must provide the needed information. The name of the person assisting should be documented in the patient’s medical record. Always follow your institution’s procedures for assisted communication before completing the venipuncture procedure.

Briefly explain the venipuncture procedure to your patient, and make sure to ask him or her the following questions:

  • Do you have any questions or concerns?
  • Do you have an arm, vein, or site preference?
  • Were you given any special instructions prior to the venipuncture (e.g., does the person need to be fasting)?
  • Have you ever experienced any problems or complications with a routine venipuncture in the past?
  • Do you take aspirin or blood thinners?

Answer questions and concerns, and take steps to prevent any past problems from recurring. If you cannot answer all the patient’s questions, ask if the patient would like to talk to the provider for clarification. Obtain verbal consent to perform the venipuncture simply by asking whether you have permission to draw blood from the patient.

Your self-confidence in performing the procedure will help put your patient at ease. Act and speak professionally. Treat your patient with kindness and respect. Being pleasant and friendly is important. It makes your patients feel comfortable and shows that you take your role in their care seriously.

Preparing for the venipuncture

Seat the patient in a phlebotomy area. Ask the patient to extend an arm and position his or her other hand under the elbow to help straighten the elbow, if necessary. Inspect both arms and ask whether the patient has an arm or site preference. Veins in the antecubital area are most commonly used for venipuncture. According to CLSI standards, the veins in the center of the antecubital area should be located as a first choice before alternative veins within the antecubital area are considered. The puncture site should be carefully selected after both arms have been inspected. Alternative sites may be chosen if the area is scarred, bruised, burned, or swollen. You may use the veins on the back of the hand if the patient gives permission. Consult the provider for any other alternative site, and do not proceed without supervision.

When choosing the best available vein, palpate the area. Feel for a vein that has “bounce” when lightly palpated. Consider the three Ds of vein selection:

  • Depth below the surface
  • Diameter of the vein
  • Direction through the antecubital region.

Correctly choosing a vein is one of the most important aspects of a venipuncture.

The medial veins generally run at a slight angle to the fold in the antecubital area. The cephalic veins are on the thumb side of the antecubital area. These are the veins of choice. The basilic vein, which lies on the inside of the antecubital area (the little finger side), is very close to the brachial artery and median nerves and should not be used! If the medial or cephalic veins are not accessible, consult the provider. Only the most experienced phlebotomists should ever attempt a basilic venipuncture. The chance of injury to the patient is too great.

The tourniquet should be placed about 3 to 4 inches above the patient’s elbow. Make sure it is not twisted because that will cause discomfort to your patient. Grasp the tourniquet ends, one in each hand, close to the patient’s skin. Pull the ends apart to gently stretch the tourniquet, then cross one end over the other while maintaining the tension. Tuck the top portion of the tourniquet underneath the bottom portion, creating a loop with the upper flap free. The free end will be tugged on to release the tourniquet later in the draw. The tourniquet should be tight without being uncomfortable or pinching the patient’s skin. Both ends of the tourniquet should be pointing upward on the arm. This way, the end of the tourniquet does not contaminate the venipuncture site.

When the tourniquet is in place, ask the patient to place his or her other hand or fist under the elbow of the arm that will be drawn if this aids in palpating the vein. Ask the person to just relax the arm. Palpate for an acceptable vein using your gloved index finger. It is more efficient to put on gloves at the beginning of the procedure and continue. Also, if you learn to palpate veins with gloves on, you will train your finger to recognize the veins through the gloves from the beginning.

According to the CLSI, you can palpate veins without wearing gloves as long as the venipuncture site has not yet been cleaned. After locating the vein, clean the area with a 70% isopropyl alcohol wipe. While the site is drying, resanitize your hands, put on gloves, and continue with the rest of the procedure.

Performing the venipuncture

When you have located a vein, remove the tourniquet. A tourniquet can remain in place for 1 minute. After its removal, wait 2 minutes before reapplying it. During this time, sanitize your hands and put on gloves (if they are not already on). Then cleanse the antecubital area with a 70% alcohol wipe. Clean the area by using a back-and-forth motion. CLSI guidelines recommend cleansing the site with friction and not in a circular motion. Do not touch this area after cleaning with alcohol. Assemble the equipment and place it within easy reach of the patient’s arm.

Reapply the tourniquet. Do not have the patient clench or pump the fist. If the fist is relaxed, the venipuncture will feel less painful. Visually relocate the vein, and do not retouch the cleaned area. Anchor the vein by gently stretching the skin downward, about 2 to 3 inches below the collection site, with the thumb of the nondominant hand. Smoothly and quickly insert the needle into the vein at about a 15-degree angle, depending on the depth and position of the vein. The bevel should be facing up. Push the evacuated tube onto the double-pointed needle or pull back on the syringe plunger with your nondominant hand.

Angle of needle entry

Why is the angle of the needle so important? If the needle is inserted at an angle greater than 15 degrees, it penetrates the vein quickly and may pass through the back side of the vein and enter other structures. Formation of a hematoma is more likely then.

If the angle is less than 15 degrees, the needle may skim on the top of the vein and not create a clean puncture. If the vein is just skimmed or scratched, there is a greater chance of creating a hematoma on the front of the vein.

The depth and position of the vein may require angle adjustment, but a 15-degree angle is a good place to start. The angle of entry is very important to a successful venipuncture.

Completing the venipuncture

Continue to draw the specimens, checking periodically on the patient’s condition. As you remove each tube from the needle holder, gently invert it several times before placing it in a collection rack. Tubes with sodium citrate should be inverted three to four times. Tubes with clot activator should be inverted five times. Tubes with anticoagulant should be inverted eight times. If the tubes are not inverted immediately after collection, small clots can form in the specimen. When the last tube has started to fill, carefully release the tourniquet. Gently tug on the short portion of the tourniquet, and it should just fall open. Remove the final vacuum tube. Cover the venipuncture area with gauze, then smoothly and quickly remove the needle. Once the needle is out of the arm, apply pressure to the site. At the same time, activate the safety device to cover the needle. Dispose of the entire venipuncture assembly into a sharps container. Ask the patient to apply direct pressure to the gauze. Do not bend the arm.

While the patient applies pressure to the site, label the tubes with computer-generated labels or by writing the information in permanent marker. Make sure the label contains the following minimum information:

  • Patient’s last name, then first name
  • Patient’s date of birth
  • Patient’s ID number or medical insurance number
  • Date and time of the draw and the phlebotomist’s initials
  • Provider’s name; also indicate if the patient was fasting (optional)

Before putting on a bandage, perform a two-point check to make sure the site is not leaking. Observe the site for 5 to 10 seconds after releasing pressure and removing the gauze. If visible bleeding occurs or if the tissue around the puncture site rises, continue applying pressure until the bleeding has stopped. Special precautions must be taken for patients taking anticoagulants because the phlebotomy site will bleed longer than normal. Put on a pressure bandage by placing a folded gauze (not a cotton ball) over the site and applying a hypoallergenic self-stick wrap, stretchy gauze, or a bandage. Never leave the room or release an outpatient until all the tubes have been labeled. Make sure the patient is doing well, then escort them to the exit or reception area.

Some patients may have small veins, and using a syringe or butterfly for venipuncture may work better than the standard evacuated assembly. Young children, chemotherapy patients, older adult patients, and people with veins that are difficult to draw may require syringe or butterfly equipment. Alternative equipment is always used to draw blood from hand veins.

Key points

Patient preparation

  • Verify patient identity using name and date of birth; compare with requisition
  • Explain procedure, address concerns, obtain verbal consent
  • Ask about site preference, fasting status, blood thinners, prior complications

Preparing for the venipuncture

  • Seat patient, position arm, inspect both arms for best site
  • First choice: medial and cephalic veins in antecubital area
    • Avoid basilic vein unless absolutely necessary
  • Apply tourniquet 3–4 inches above elbow; ensure proper tension and placement
  • Palpate for vein using the three Ds: Depth, Diameter, Direction
  • Clean site with 70% isopropyl alcohol; allow to dry before proceeding

Performing the venipuncture

  • Remove tourniquet before cleaning site; reapply after cleaning
  • Do not have patient clench or pump fist
  • Anchor vein, insert needle bevel up at ~15-degree angle
  • Use appropriate collection method (evacuated tube, syringe, butterfly)

Angle of needle entry

  • Ideal angle: 15 degrees
    • 15°: risk of penetrating through vein, causing hematoma

    • <15°: risk of skimming vein, causing hematoma

Completing the venipuncture

  • Invert tubes immediately after collection (number of inversions depends on additive)
  • Release tourniquet as last tube fills; remove needle, apply pressure with gauze
  • Activate needle safety device; dispose in sharps container
  • Label tubes with patient info, date/time, phlebotomist initials before leaving patient
  • Check site for bleeding; apply pressure bandage if needed
  • Use syringe or butterfly for small or difficult veins (e.g., children, elderly, hand veins)

More from Blood collection

  • Phlebotomy procedures
  • Evacuated collection tubes and order of draw
  • Needle safety and post exposure follow-up
  • Potential problems associated with venipuncture
  • Capillary puncture: indications, equipment, and procedure