


Achievable logoAchievable logo
CCMA
Sign in
Sign up
Purchase
Textbook
Practice exams
Support
How it works
Exam catalog
Mountain with a flag at the peak
Textbook
1. Medical assistant
2. Electronic records
3. Medical terminology and anatomy
4. The fundamentals of infection control
5. Introduction to vital signs
5.1 Introduction to vital signs
5.2 Pulse sites and characteristics
5.3 Fever and temperature management
5.4 Respiration and oxygen saturation
5.5 Measuring blood pressure: equipment and techniques
5.5.1 Equipment, technique, and common errors
5.5.2 Orthostatic vital signs and anthropometric measurements
5.5.3 Understanding blood pressure and hypertension
6. The patient interview and history
7. The physical examination
8. Appointment scheduling
9. Insurance billing
10. Diagnostic coding and the ICD-10-CM System
11. Procedural coding
12. Medical billing and reimbursement essentials
13. Assisting with medical specialties
14. Assisting with the musculoskeletal system
15. Assisting with the cardiovascular system
16. Assisting with the respiratory system
17. Assisting with the nervous system
18. Anatomy and physiology of the urinary system
19. Assisting in obstetrics and gynecology
20. Assisting in endocrinology
21. Assisting in ophthalmology & otolaryngology
22. Assisting in gastroenterology
23. Assisting in the immune & lymphatic systems
24. Assisting in pediatrics: the developmental stages and care
25. The medical assistant’s role in caring for the older patient
26. The role of the medical assistant in physical therapy examination and assessment
27. Preparing for minor surgery: room, solutions, and supplies
28. Introduction to the clinical laboratory
29. Urinalysis
30. Blood collection
31. Analysis of blood
32. Electrocardiography and heart structure
33. The principles of pharmacology
34. Essential calculations and measurement systems
35. Solid, liquid, & solutions medication doses
36. Administering medications
37. Metabolism and core nutrient roles
38. Medical emergencies in the healthcare setting
Achievable logoAchievable logo
5.5.1 Equipment, technique, and common errors
Achievable CCMA
5. Introduction to vital signs
5.5. Measuring blood pressure: equipment and techniques
Our CCMA course is currently in development and is a work-in-progress.

Equipment, technique, and common errors

9 min read
Font
Discuss
Share
Feedback

Measuring blood pressure

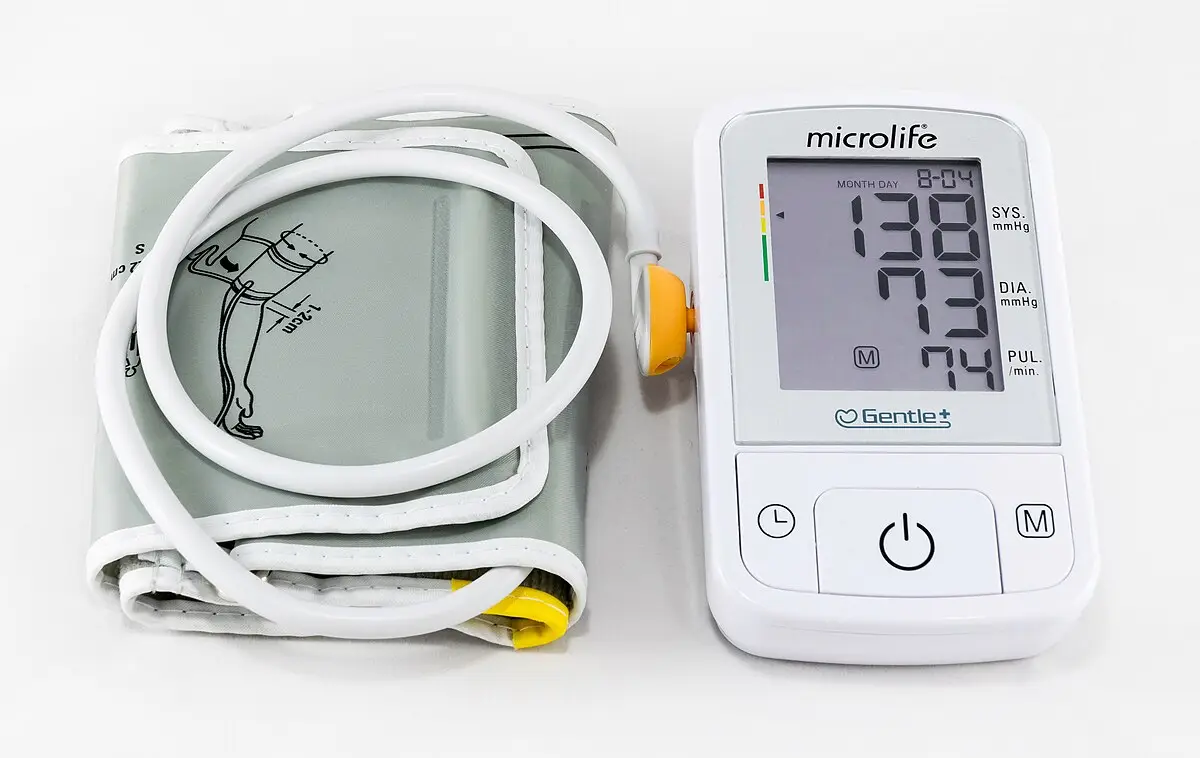
The instrument used to measure blood pressure is called a sphygmomanometer, or blood pressure cuff. It consists of an inflatable cuff, an inflation bulb with a control valve, and a pressure gauge. The blood pressure mechanism consists of an aneroid dial attached to an inflatable cuff; the device may be handheld, wall mounted, or a floor model. Some systems have a trigger-style air release valve; these can be pumped up, and then the air is slowly released simply by pushing the trigger. With the more traditional sphygmomanometers, the valve must be unscrewed.

Sphygmomanometers are delicately calibrated instruments that must be handled carefully. They should be recalibrated regularly and checked for accuracy by the medical assistant or a medical supply dealer. The needle on the aneroid dial sphygmomanometer should rest within the small square or circle at the bottom of the dial. If the sphygmomanometer is not correctly calibrated, the patient’s blood pressure reading will be inaccurate.

The sphygmomanometer must be used with a stethoscope. The goal of the procedure is to use the inflatable cuff to stop the circulation through an artery. The stethoscope is placed over the artery just below the cuff. As the cuff is slowly deflated to allow the blood to flow again, cardiac cycle sounds are heard through the stethoscope, and readings are taken when the first (systolic) and last (diastolic) sounds are heard (Procedure 5.9).

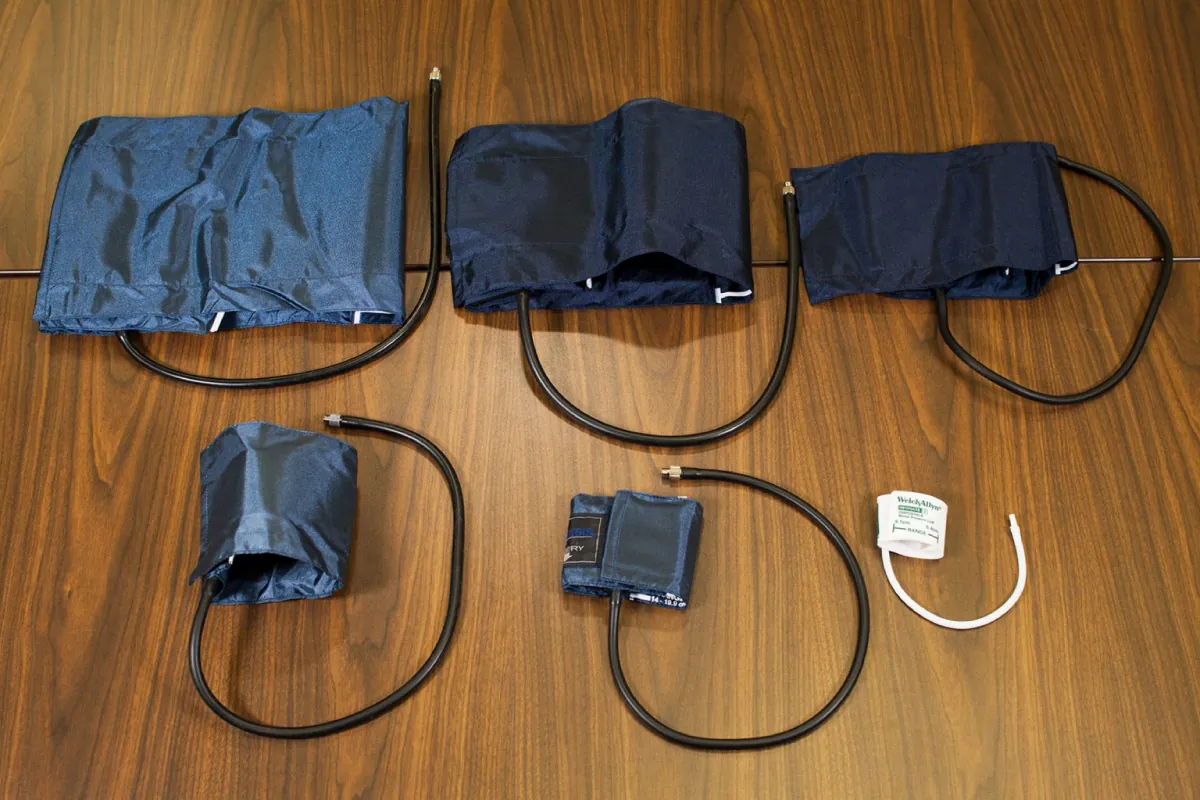
To obtain a correct blood pressure reading, the cuff used must be the proper size. The systolic and diastolic blood pressures can be lowered by as much as 5 mm Hg if the cuff is one size larger than appropriate; the blood pressure can be elevated by up to 6 mm Hg if the cuff is one size smaller. The inflatable part (the bladder) of a cuff of the correct size should cover about 80% of the circumference of the upper arm. To help with this, most blood pressure cuffs have predetermined markings on the internal side (the side placed on the patient’s arm); as long as the cuff is secured within these lines, it should be the accurate size.

Sphygmomanometer used to measure blood pressure
Sphygmomanometer
Wikimedia Commons
/
CC BY-SA 4.0
Different blood pressure cuff sizes for various patients displayed
Blood pressure cuff sizes
Achievable
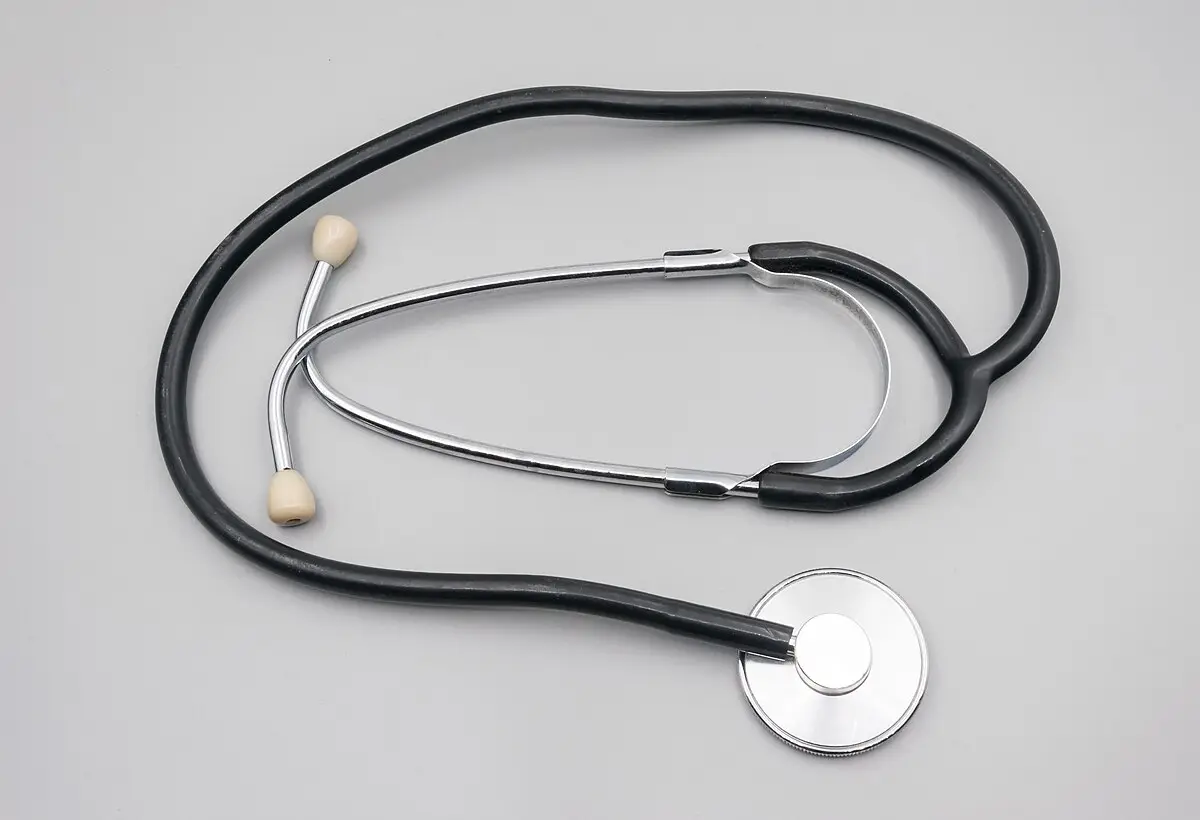
Stethoscope used for auscultation in clinical examinations
Stethoscope
Wikimedia Commons
/
CC BY-SA 4.0

The stethoscope is used to amplify body sounds, making them louder. It consists of earpieces, binaural tubes (one for each earpiece), rubber or plastic tubing, and a chestpiece. For best results, the earpieces should fit snugly and comfortably in your ears. When placing them in your ears, make sure the earpieces are facing forward, toward your face, for the best fit.

The chest piece consists of two parts: the diaphragm and the bell. The diaphragm is the larger, flat side of the chestpiece, which is covered by a thin, plastic disk. The diaphragm - best at amplifying high-pitched sounds, such as bowel and lung sounds-must be placed firmly against the skin for proper amplification of sound.

The bell is the cone-shaped side of the stethoscope chestpiece. It should be held lightly against the skin to amplify sound. The bell is best at amplifying low-pitched sounds, such as vascular and heart sounds.

When placed on the patient’s arm, the cuff should cover two-thirds of the distance from the elbow to the shoulder. The lower edge of the cuff should be 2 to 3 cm (about 2 finger widths, or 1 inch) above the elbow or antecubital space to allow plenty of room to place the stethoscope without touching the cuff. If the stethoscope touches the cuff during the blood pressure reading, the sound of the deflating cuff may interfere with your ability to hear the correct reading. The patient’s sleeve must be above the antecubital space; if the sleeve is tight, ask the patient to remove the arm from the sleeve. This is done for two reasons: tight clothing can restrict normal blood flow in the brachial artery, altering the blood pressure, and placing the stethoscope over clothing makes it difficult to hear blood pressure sounds. Provide a patient gown if needed to maintain the patient’s privacy.

Blood pressure cuffs and stethoscopes are available in drug and retail stores for patients to use to measure their own blood pressure at home. These units can be aneroid, electronic, or computerized sphygmomanometers. If you have patients who are monitoring their pressure at home, be sure they understand the mechanics of obtaining an accurate reading. It is best to have the patient bring the equipment to the office and demonstrate its use. While the patient is showing you the home equipment, you will have an ideal opportunity to check technique and calibration and answer any questions the patient may have about the use of the equipment. This is also a good opportunity to reinforce treatment plans, such as medication, diet, and exercise. It is helpful for a patient who is monitoring blood pressure readings at home to keep a log and review it with the provider during visits to help detect blood pressure variations during normal daily activities.

Some providers will want the BP taken on the leg when a patient has undergone a bilateral mastectomy with lymph node removal or has an arteriovenous shunt (used for dialysis). This is to reduce the risk of lymphedema. If a patient has had a mastectomy on one side, the opposite side can be used for BP. When using the leg, the BP can be taken at either the thigh or ankle. When using the thigh, a cuff designed for the thigh should be used, and the popliteal artery would be auscultated. For the ankle, a regular cuff could be used, and the posterior tibial artery would be auscultated. It can be difficult to hear Korotkoff sounds at the posterior tibial artery, and a Doppler may need to be used. For either location, the patient should be supine (lying down) so that the leg is at the same level as the heart. The cuff should encompass 80% of the circumference of either the thigh or the ankle.

Effects of body position on blood pressure measurement

Blood pressure is usually taken with the patient in either the sitting or the supine position. However, the diastolic pressure can be as much as 5 mm Hg higher when patients sit than when they are supine. In addition, if the patient’s back is not supported and there is some muscle tension in the body (as occurs when the patient is seated on an examination table rather than in a chair), the diastolic pressure may be increased by 6 mm Hg. If patients cross their legs during the reading, the systolic pressure may be raised by 2 to 8 mm Hg. The position of the patient’s arm can also have a major influence when the blood pressure is measured. If the upper arm is below the level of the right atrium (e.g., dangling at the patient’s side), the reading is artificially elevated; if the arm is above the heart level, the reading is lowered. Or if the patient holds up the arm, muscular tension will raise the pressure. The arm should be placed at the level of the heart on a table next to an exam room chair or resting on the arm of the chair to avoid these issues. Patients should also have their feet flat on the floor. Having the legs crossed at the knee can raise the blood pressure. If a patient has a full bladder, it can artificially raise the pressure up to 10 points. Ask patients if they need to use the restroom before taking vital signs.

Blood pressure cuff sizes:

Cuff Arm Circumference/Centimeters Inches
Small adult 22–26 9
Adult 27–34 Up to 13
Large adult 35–44 14–17
Adult thigh 45–52 18–20

Common causes of errors in blood pressure readings

  • The limb used for measurement is above the level of the heart.
  • The bladder in the cuff is not completely deflated before a reading is started or retaken.
  • The pressure in the cuff is released too rapidly.
  • The patient is nervous, uncomfortable, or anxious (may cause a reading to be higher than the patient’s actual blood pressure).
  • The patient consumed caffeine or smoked cigarettes within 30 minutes of the blood pressure measurement.
  • The cuff was applied improperly.
  • The cuff is too large, too small, too loose, or too tight.
  • The cuff was not placed around the arm smoothly.
  • The bladder is not centered over the artery, or the bladder bulges out from the cover.
  • There was a failure to wait 1 to 2 minutes between measurements.
  • Instruments are defective:
    • Air leaks in the valve
    • Air leaks in the bladder
    • Aneroid needle not calibrated to zero

Measuring blood pressure

  • Sphygmomanometer: inflatable cuff, inflation bulb/valve, pressure gauge
  • Must be calibrated regularly for accuracy
  • Used with stethoscope to detect systolic (first sound) and diastolic (last sound) pressures

Blood pressure cuff selection and placement

  • Proper cuff size essential for accurate readings
    • Bladder should cover ~80% of upper arm circumference
    • Incorrect size skews readings (too small = high, too large = low)
  • Cuff placement: covers 2/3 distance from elbow to shoulder, lower edge 2–3 cm above elbow
  • Arm should be bare; avoid tight clothing

Stethoscope use

  • Earpieces face forward, fit snugly
  • Diaphragm: flat side, high-pitched sounds (bowel, lung)
  • Bell: cone side, low-pitched sounds (heart, vascular)

Special situations for BP measurement

  • Leg BP: used after bilateral mastectomy or with arteriovenous shunt
    • Thigh: use thigh cuff, auscultate popliteal artery
    • Ankle: regular cuff, auscultate posterior tibial artery
    • Patient supine, cuff covers 80% of limb circumference

Effects of body position on BP measurement

  • Sitting vs. supine: diastolic higher when sitting
  • Unsupported back or muscle tension increases diastolic
  • Crossed legs raise systolic by 2–8 mm Hg
  • Arm position: below heart = higher reading, above heart = lower reading
  • Full bladder can raise BP up to 10 mm Hg
  • Feet should be flat on floor

Blood pressure cuff sizes

  • Small adult: 22–26 cm (9 in)
  • Adult: 27–34 cm (up to 13 in)
  • Large adult: 35–44 cm (14–17 in)
  • Adult thigh: 45–52 cm (18–20 in)

Common causes of errors in BP readings

  • Limb above heart level
  • Incomplete cuff deflation before reading
  • Rapid cuff deflation
  • Patient anxiety, discomfort, recent caffeine/smoking
  • Improper cuff application or size
  • Bladder not centered or bulging
  • Inadequate wait time between readings
  • Defective instruments (air leaks, uncalibrated needle)

Palpatory method

  • Systolic pressure determined by palpating radial pulse
  • Inflate cuff until pulse disappears, add 30 mm Hg, release slowly
  • First pulse felt = systolic (recorded as systolic/P)
  • Cannot determine diastolic or Korotkoff phases

Korotkoff sounds

  • Sounds heard during BP measurement, produced by arterial wall vibrations

Phase I

  • First sharp, tapping sound as cuff deflates
  • Marks systolic pressure

Phase II

  • Swishing sound as more blood flows
  • Possible auscultatory gap (temporary disappearance of sound)

Phase III

  • Return of sharp, rhythmic tapping sounds
  • Indicates increased blood flow

Phase IV

  • Sounds become muffled, softer
  • AHA: beginning of phase IV = diastolic in children
  • Some providers record as fading sound between systolic/diastolic

Phase V

  • All sounds disappear
  • Marks diastolic pressure

Sign up for free to take 12 quiz questions on this topic

Previous
Next  | 5.5.2 Orthostatic vital signs and anthropometric measurements
All rights reserved ©2016 - 2026 Achievable, Inc.

Equipment, technique, and common errors

Measuring blood pressure

The instrument used to measure blood pressure is called a sphygmomanometer, or blood pressure cuff. It consists of an inflatable cuff, an inflation bulb with a control valve, and a pressure gauge. The blood pressure mechanism consists of an aneroid dial attached to an inflatable cuff; the device may be handheld, wall mounted, or a floor model. Some systems have a trigger-style air release valve; these can be pumped up, and then the air is slowly released simply by pushing the trigger. With the more traditional sphygmomanometers, the valve must be unscrewed.

Sphygmomanometers are delicately calibrated instruments that must be handled carefully. They should be recalibrated regularly and checked for accuracy by the medical assistant or a medical supply dealer. The needle on the aneroid dial sphygmomanometer should rest within the small square or circle at the bottom of the dial. If the sphygmomanometer is not correctly calibrated, the patient’s blood pressure reading will be inaccurate.

The sphygmomanometer must be used with a stethoscope. The goal of the procedure is to use the inflatable cuff to stop the circulation through an artery. The stethoscope is placed over the artery just below the cuff. As the cuff is slowly deflated to allow the blood to flow again, cardiac cycle sounds are heard through the stethoscope, and readings are taken when the first (systolic) and last (diastolic) sounds are heard (Procedure 5.9).

To obtain a correct blood pressure reading, the cuff used must be the proper size. The systolic and diastolic blood pressures can be lowered by as much as 5 mm Hg if the cuff is one size larger than appropriate; the blood pressure can be elevated by up to 6 mm Hg if the cuff is one size smaller. The inflatable part (the bladder) of a cuff of the correct size should cover about 80% of the circumference of the upper arm. To help with this, most blood pressure cuffs have predetermined markings on the internal side (the side placed on the patient’s arm); as long as the cuff is secured within these lines, it should be the accurate size.

The stethoscope is used to amplify body sounds, making them louder. It consists of earpieces, binaural tubes (one for each earpiece), rubber or plastic tubing, and a chestpiece. For best results, the earpieces should fit snugly and comfortably in your ears. When placing them in your ears, make sure the earpieces are facing forward, toward your face, for the best fit.

The chest piece consists of two parts: the diaphragm and the bell. The diaphragm is the larger, flat side of the chestpiece, which is covered by a thin, plastic disk. The diaphragm - best at amplifying high-pitched sounds, such as bowel and lung sounds-must be placed firmly against the skin for proper amplification of sound.

The bell is the cone-shaped side of the stethoscope chestpiece. It should be held lightly against the skin to amplify sound. The bell is best at amplifying low-pitched sounds, such as vascular and heart sounds.

When placed on the patient’s arm, the cuff should cover two-thirds of the distance from the elbow to the shoulder. The lower edge of the cuff should be 2 to 3 cm (about 2 finger widths, or 1 inch) above the elbow or antecubital space to allow plenty of room to place the stethoscope without touching the cuff. If the stethoscope touches the cuff during the blood pressure reading, the sound of the deflating cuff may interfere with your ability to hear the correct reading. The patient’s sleeve must be above the antecubital space; if the sleeve is tight, ask the patient to remove the arm from the sleeve. This is done for two reasons: tight clothing can restrict normal blood flow in the brachial artery, altering the blood pressure, and placing the stethoscope over clothing makes it difficult to hear blood pressure sounds. Provide a patient gown if needed to maintain the patient’s privacy.

Blood pressure cuffs and stethoscopes are available in drug and retail stores for patients to use to measure their own blood pressure at home. These units can be aneroid, electronic, or computerized sphygmomanometers. If you have patients who are monitoring their pressure at home, be sure they understand the mechanics of obtaining an accurate reading. It is best to have the patient bring the equipment to the office and demonstrate its use. While the patient is showing you the home equipment, you will have an ideal opportunity to check technique and calibration and answer any questions the patient may have about the use of the equipment. This is also a good opportunity to reinforce treatment plans, such as medication, diet, and exercise. It is helpful for a patient who is monitoring blood pressure readings at home to keep a log and review it with the provider during visits to help detect blood pressure variations during normal daily activities.

Some providers will want the BP taken on the leg when a patient has undergone a bilateral mastectomy with lymph node removal or has an arteriovenous shunt (used for dialysis). This is to reduce the risk of lymphedema. If a patient has had a mastectomy on one side, the opposite side can be used for BP. When using the leg, the BP can be taken at either the thigh or ankle. When using the thigh, a cuff designed for the thigh should be used, and the popliteal artery would be auscultated. For the ankle, a regular cuff could be used, and the posterior tibial artery would be auscultated. It can be difficult to hear Korotkoff sounds at the posterior tibial artery, and a Doppler may need to be used. For either location, the patient should be supine (lying down) so that the leg is at the same level as the heart. The cuff should encompass 80% of the circumference of either the thigh or the ankle.

Effects of body position on blood pressure measurement

Blood pressure is usually taken with the patient in either the sitting or the supine position. However, the diastolic pressure can be as much as 5 mm Hg higher when patients sit than when they are supine. In addition, if the patient’s back is not supported and there is some muscle tension in the body (as occurs when the patient is seated on an examination table rather than in a chair), the diastolic pressure may be increased by 6 mm Hg. If patients cross their legs during the reading, the systolic pressure may be raised by 2 to 8 mm Hg. The position of the patient’s arm can also have a major influence when the blood pressure is measured. If the upper arm is below the level of the right atrium (e.g., dangling at the patient’s side), the reading is artificially elevated; if the arm is above the heart level, the reading is lowered. Or if the patient holds up the arm, muscular tension will raise the pressure. The arm should be placed at the level of the heart on a table next to an exam room chair or resting on the arm of the chair to avoid these issues. Patients should also have their feet flat on the floor. Having the legs crossed at the knee can raise the blood pressure. If a patient has a full bladder, it can artificially raise the pressure up to 10 points. Ask patients if they need to use the restroom before taking vital signs.

Blood pressure cuff sizes:

Cuff Arm Circumference/Centimeters Inches
Small adult 22–26 9
Adult 27–34 Up to 13
Large adult 35–44 14–17
Adult thigh 45–52 18–20

Common causes of errors in blood pressure readings

  • The limb used for measurement is above the level of the heart.
  • The bladder in the cuff is not completely deflated before a reading is started or retaken.
  • The pressure in the cuff is released too rapidly.
  • The patient is nervous, uncomfortable, or anxious (may cause a reading to be higher than the patient’s actual blood pressure).
  • The patient consumed caffeine or smoked cigarettes within 30 minutes of the blood pressure measurement.
  • The cuff was applied improperly.
  • The cuff is too large, too small, too loose, or too tight.
  • The cuff was not placed around the arm smoothly.
  • The bladder is not centered over the artery, or the bladder bulges out from the cover.
  • There was a failure to wait 1 to 2 minutes between measurements.
  • Instruments are defective:
    • Air leaks in the valve
    • Air leaks in the bladder
    • Aneroid needle not calibrated to zero
Key points

Measuring blood pressure

  • Sphygmomanometer: inflatable cuff, inflation bulb/valve, pressure gauge
  • Must be calibrated regularly for accuracy
  • Used with stethoscope to detect systolic (first sound) and diastolic (last sound) pressures

Blood pressure cuff selection and placement

  • Proper cuff size essential for accurate readings
    • Bladder should cover ~80% of upper arm circumference
    • Incorrect size skews readings (too small = high, too large = low)
  • Cuff placement: covers 2/3 distance from elbow to shoulder, lower edge 2–3 cm above elbow
  • Arm should be bare; avoid tight clothing

Stethoscope use

  • Earpieces face forward, fit snugly
  • Diaphragm: flat side, high-pitched sounds (bowel, lung)
  • Bell: cone side, low-pitched sounds (heart, vascular)

Special situations for BP measurement

  • Leg BP: used after bilateral mastectomy or with arteriovenous shunt
    • Thigh: use thigh cuff, auscultate popliteal artery
    • Ankle: regular cuff, auscultate posterior tibial artery
    • Patient supine, cuff covers 80% of limb circumference

Effects of body position on BP measurement

  • Sitting vs. supine: diastolic higher when sitting
  • Unsupported back or muscle tension increases diastolic
  • Crossed legs raise systolic by 2–8 mm Hg
  • Arm position: below heart = higher reading, above heart = lower reading
  • Full bladder can raise BP up to 10 mm Hg
  • Feet should be flat on floor

Blood pressure cuff sizes

  • Small adult: 22–26 cm (9 in)
  • Adult: 27–34 cm (up to 13 in)
  • Large adult: 35–44 cm (14–17 in)
  • Adult thigh: 45–52 cm (18–20 in)

Common causes of errors in BP readings

  • Limb above heart level
  • Incomplete cuff deflation before reading
  • Rapid cuff deflation
  • Patient anxiety, discomfort, recent caffeine/smoking
  • Improper cuff application or size
  • Bladder not centered or bulging
  • Inadequate wait time between readings
  • Defective instruments (air leaks, uncalibrated needle)

Palpatory method

  • Systolic pressure determined by palpating radial pulse
  • Inflate cuff until pulse disappears, add 30 mm Hg, release slowly
  • First pulse felt = systolic (recorded as systolic/P)
  • Cannot determine diastolic or Korotkoff phases

Korotkoff sounds

  • Sounds heard during BP measurement, produced by arterial wall vibrations

Phase I

  • First sharp, tapping sound as cuff deflates
  • Marks systolic pressure

Phase II

  • Swishing sound as more blood flows
  • Possible auscultatory gap (temporary disappearance of sound)

Phase III

  • Return of sharp, rhythmic tapping sounds
  • Indicates increased blood flow

Phase IV

  • Sounds become muffled, softer
  • AHA: beginning of phase IV = diastolic in children
  • Some providers record as fading sound between systolic/diastolic

Phase V

  • All sounds disappear
  • Marks diastolic pressure

More from Measuring blood pressure: equipment and techniques

  • Orthostatic vital signs and anthropometric measurements
  • Understanding blood pressure and hypertension