Plyometric mechanics and physiology
Plyometric exercises use powerful movements that start with a pre-stretch (countermovement), which activates the stretch-shortening cycle (SSC). The goal is to increase power output by taking advantage of:
- The elastic properties of muscles and tendons
- The stretch reflex
Plyometric training improves both force and speed, which are essential for athletic performance. Two models help explain why plyometrics work.
Mechanical model of plyometric exercise
This model focuses on how the body stores and reuses elastic energy in the series elastic component (SEC).
- A rapid eccentric stretch stores elastic energy in tendons.
- If a concentric contraction follows immediately, that stored energy is released and adds to the total force.
- If there’s a delay, the stored energy dissipates as heat and force is lost.
Key components:
- CC (Contractile component): Actin-myosin crossbridges that generate active force.
- SEC (Series elastic component): Stores and returns elastic energy, primarily through tendons.
- PEC (Parallel elastic component): Passive structures (such as connective tissue) that provide resistance when the muscle is stretched.
Neurophysiological model of plyometric exercise
This model explains plyometric power through the stretch reflex, which is triggered by:
- Muscle spindles, which sense the rate and magnitude of muscle stretch.
- A faster stretch produces more spindle activation, which leads to greater reflexive muscle activity.
Potentiation is the increase in force output caused by this reflex when the movement transitions quickly from stretch to contraction.
If the time between eccentric and concentric actions is too long, the reflex effect is lost.
Stretch-shortening cycle (SSC)
The SSC increases force production by combining:
- Stored elastic energy (from the series elastic component)
- Reflex activation (via the stretch reflex)
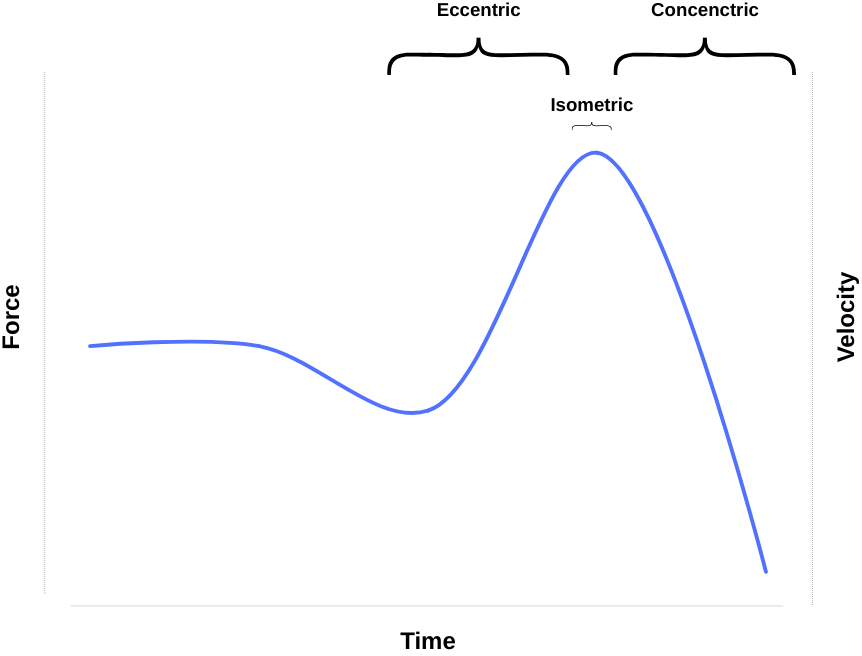
It consists of three phases:
| Phase | Action | Physiological event |
|---|---|---|
| I - Eccentric | Stretch of the agonist muscle | Elastic energy stored, muscle spindles activated |
| II - Amortization | Pause between eccentric and concentric | Afferent nerve synapse with motor neurons |
| III - Concentric | Shortening of agonist muscle fibers | Elastic energy released, alpha motor neurons trigger contraction |
A shorter amortization phase produces greater force output. If amortization is too long, stored energy dissipates and the reflex response is lost.
Plyometric program design
Plyometric training follows principles similar to resistance training. Key variables include:
- Mode (e.g., jumps in place, depth jumps, bounds)
- Intensity (affected by speed, height, body weight, contact type)
- Frequency (typically 1-3 sessions/week depending on experience and sport)
- Recovery (48-72 hours between sessions; 2-3 minutes between sets)
- Volume (measured in ground contacts)
- Program length (usually 6-10 weeks)
- Progression (start low, then build intensity and volume gradually)
Plyometric volumes
| Experience level | Volume (contacts per session) |
|---|---|
| Beginner | 80-100 |
| Intermediate | 100-120 |
| Advanced | 120-140 |
Warm-up and implementation
Your warm-up should include dynamic, low-intensity movements. For example:
- Marching, jogging, skipping, footwork, and lunging
Steps to implement plyometric training:
- Evaluate the athlete.
- Establish sport-specific goals.
- Assign program variables (intensity, volume, frequency).
- Teach technique.
- Progress the program safely.
Age considerations
- Adolescents can perform plyometrics if supervised and developmentally ready.
- Avoid depth and high-intensity jumps for young athletes with open growth plates.
- Emphasize landing mechanics to reduce injury risk (e.g., prevent valgus knee collapse).
Proper landing cues
- Knees aligned over toes.
- Shoulders over knees (center of gravity).
Masters athletes
When designing plyometric programs for masters athletes, consider:
- Lower volume and intensity
- Longer recovery between sessions (3-4 days)
- Avoiding depth jumps and single-leg drills if there’s a history of joint degeneration or surgery
- Prioritizing proper technique, feedback, and recovery
Integrating plyometrics with other training
Plyometric + resistance training:
- Combine lower body resistance with upper body plyos, and vice versa
- Avoid high-intensity resistance and plyos on the same day unless using complex training (e.g., squat then jump)
Plyometric + aerobic training:
- Perform plyometrics before aerobic training to preserve power output
Sample schedule:
| Day | Resistance training | Plyometrics |
|---|---|---|
| Monday | High-intensity upper body | Low-intensity lower body |
| Tuesday | Low-intensity lower body | High-intensity upper body |
| Thursday | Low-intensity upper body | High-intensity lower body |
| Friday | High-intensity lower body | Low-intensity upper body |
Safety considerations
To minimize injury risk:
- Use a structured warm-up and progression
- Monitor fatigue and soreness
- Teach proper jumping and landing technique (knees over toes, no valgus collapse)
Pre-training evaluation of the athlete
Key readiness factors include:
- Technique: Proper landing and jumping mechanics
- Strength: Lower body strength of 1.5x body weight recommended for depth jumps
- Balance: E.g., 30-sec single-leg hold or squat
- Body weight: >220 lbs should avoid depth jumps from >18 inches
Equipment and facility recommendations
- Landing surface: Grass, rubber mats, or suspended floors preferred
- Training area: Requires ~30m for bounding, 3-4m ceiling for depth jumps
- Boxes: Height 6-42", with nonslip top and solid construction
Depth jumping guidelines
- Recommended box height: 16-42" (40-107 cm)
- 220 lbs: Use 18" or less
- Avoid excessive box height, which lengthens amortization and reduces stretch reflex efficiency