


Achievable logoAchievable logo
CCMA
Sign in
Sign up
Purchase
Textbook
Practice exams
Support
How it works
Exam catalog
Mountain with a flag at the peak
Textbook
1. Medical assistant
2. Electronic records
3. Medical terminology and anatomy
4. The fundamentals of infection control
5. Introduction to vital signs
6. The patient interview and history
7. The physical examination
8. Appointment scheduling
9. Insurance billing
10. Diagnostic coding and the ICD-10-CM System
11. Procedural coding
12. Medical billing and reimbursement essentials
13. Assisting with medical specialties
14. Assisting with the musculoskeletal system
15. Assisting with the cardiovascular system
16. Assisting with the respiratory system
17. Assisting with the nervous system
18. Anatomy and physiology of the urinary system
19. Assisting in obstetrics and gynecology
20. Assisting in endocrinology
21. Assisting in ophthalmology & otolaryngology
22. Assisting in gastroenterology
23. Assisting in the immune & lymphatic systems
24. Assisting in pediatrics: the developmental stages and care
25. The medical assistant’s role in caring for the older patient
26. The role of the medical assistant in physical therapy examination and assessment
27. Preparing for minor surgery: room, solutions, and supplies
28. Introduction to the clinical laboratory
29. Urinalysis
30. Blood collection
31. Analysis of blood
32. Electrocardiography and heart structure
33. The principles of pharmacology
34. Essential calculations and measurement systems
35. Solid, liquid, & solutions medication doses
36. Administering medications
36.1 Administering medications
36.2 Administering vaccines
36.3 Routes of medication
36.4 Intradermal injections and tuberculin testing
36.5 Needles and syringes
36.6 Reconstitution, mixing, and general injection guidelines
36.7 Subcutaneous and intramuscular injections
37. Metabolism and core nutrient roles
38. Medical emergencies in the healthcare setting
Achievable logoAchievable logo
36.5 Needles and syringes
Achievable CCMA
36. Administering medications
Our CCMA course is currently in development and is a work-in-progress.

Needles and syringes

8 min read
Font
Discuss
Share
Feedback

When administering injectable medication, the medical assistant must use the correct needle and syringe. Using the correct technique to uncap, recap, and switch needles is important for infection control. The following sections discuss needles, syringes, and the correct techniques to use when working with them.

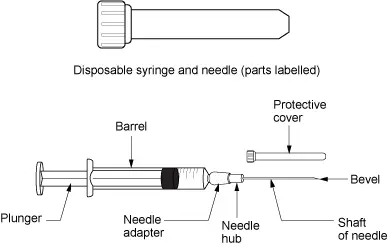
Parts of a syringe and hypodermic needle labeled
Parts of a syringe and hypodermic needle
Wikimedia Commons
/
CC BY 4.0

Hypodermic needles

A hypodermic needle attaches to a hypodermic syringe. Hypodermic needles come with syringes or are packaged separately. The entire needle needs to remain sterile for the injection. It is important for the medical assistant to know the parts of the needle. The parts of a hypodermic needle include the following:

  • Hub: Attaches or screws onto the syringe
  • Hilt: Where the needle attaches
  • Bevel: Slanted end of the shaft
  • Lumen: Hollow space inside the needle; the size is indicated by the gauge number

Gauge and length

Each needle has two measurements: the gauge (G) and the length. The lumen size is indicated by the gauge and is given a numeric value. The higher the gauge number, the smaller the lumen. The thickness of the needle wall increases along with the lumen size. This means that an 18 G needle makes a larger hole than a 25 G needle. The 18 G needle has a thicker wall than the 25 G needle. As the gauge number increases, the needles bend more easily. Thicker-walled needles (smaller gauge numbers) are used for deeper injections. Thinner-walled needles (larger gauge numbers) are used for more superficial injections.

The medication’s viscosity is also an important factor when selecting the gauge of the needle. A medication with a syrupy thickness (high viscosity) would be harder to push out of a needle compared with a medication as thin as water. Using a wider lumen needle (smaller gauge number) would be better for thicker medications. Using a finer lumen needle (a larger gauge number) would be more appropriate for watery medications.

The needle length refers to the length of the shaft. The needle length used is dependent on the type of injection given and the size of the patient. The length of the needle for an intradermal injection is smaller than that used for an intramuscular injection. The length of an intramuscular injection needle for a 300-pound person would be longer than that for a 100-pound person. Knowing the length and gauge required for an injection are important information for the medical assistant.

Safety needles

Due to the Needlestick Safety and Prevention Act, safety needles are common in the ambulatory care setting. Safety needles are designed to reduce the risk of needlesticks after an injection. A passive safety needle is designed so that the needle is automatically covered after the injection. Passive safety needles are currently used with insulin pens (e.g., the BD AutoShield Duo pen needle). An active safety needle requires the healthcare professional to activate the safety device. These are most common for injections. Current active safety needles fall into two groups:

  • Protective sheaths and hinged needle shields: The safety device is a sleeve over the syringe barrel or a hinged needle shield. These devices are moved over the needle after the injection. Once they are in place, the needle cannot be uncovered. The risk of needlesticks decreases if the safety device is activated with the hand holding the syringe.
  • Retractable needles: After the injection, the healthcare professional activates a device that retracts the needle either into the syringe or into another chamber.

Hypodermic syringes

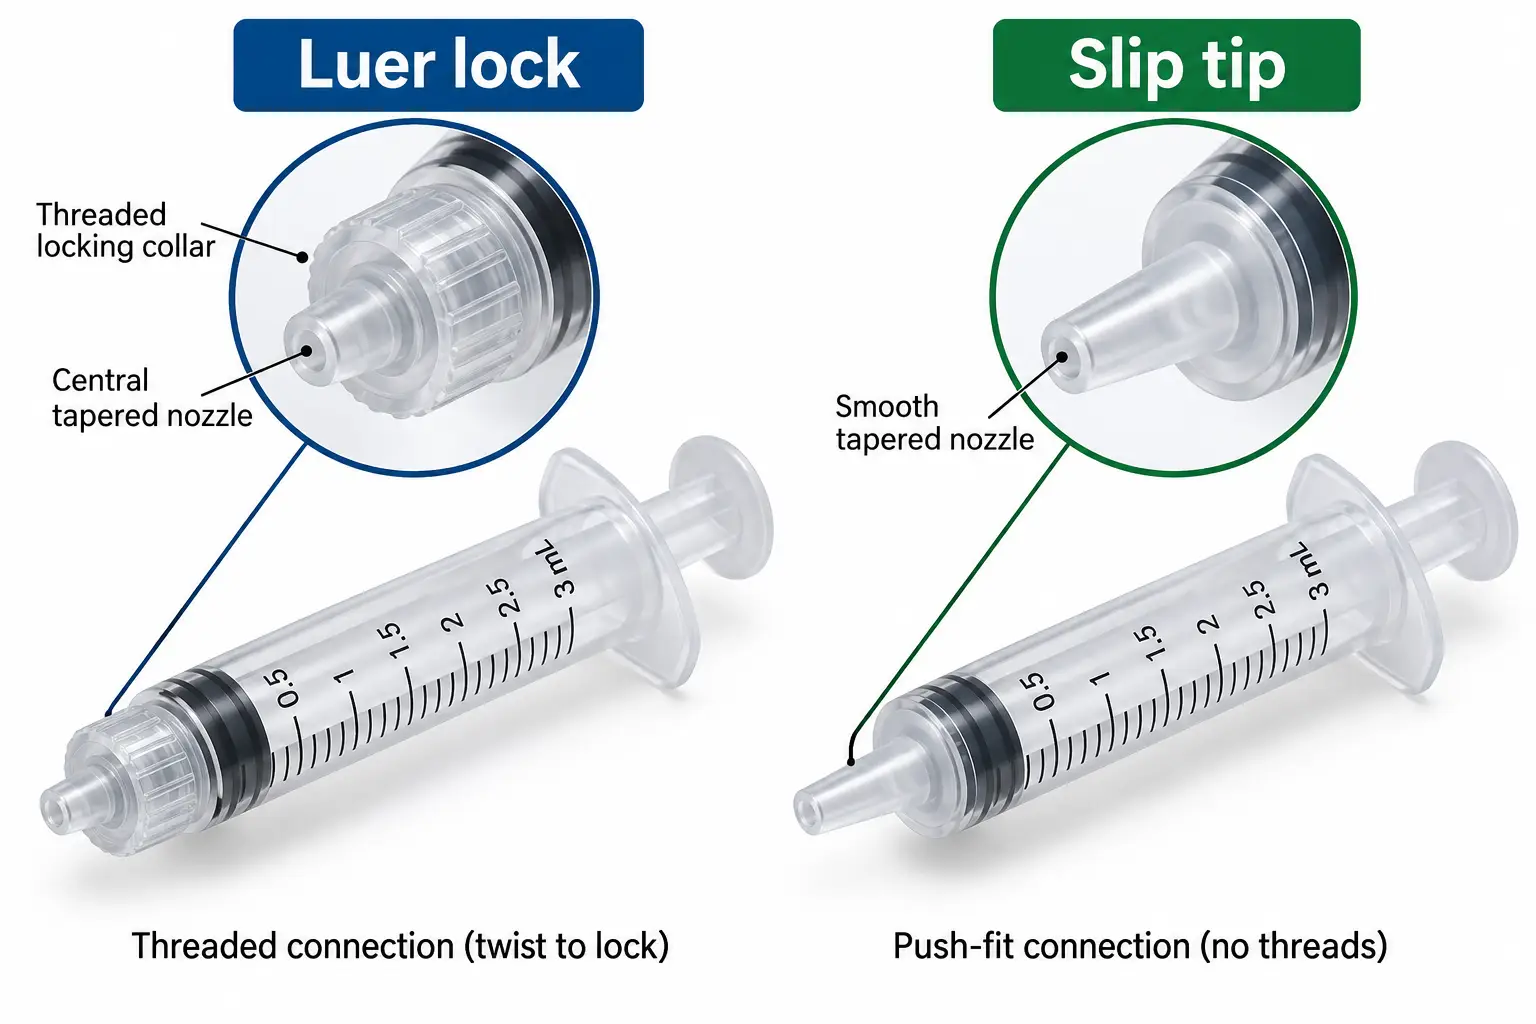
Hypodermic syringes attach to needles and hold the medication for the injection. They come in many sizes (e.g., 1, 3, 5, 6, 10, and 12 mL), but usually, the facility only stocks three or four sizes. The two parts of a syringe are considered to be the barrel and the plunger. Syringes can have either a Luer-Lok tip or a slip tip. Calibration marks are on the barrel of the syringe. It is important for the medical assistant to be able to read medication amounts in syringes.

Luer-lock and slip-tip syringes compared
Leur lock and slip tip syringe
Wikimedia Commons
/
Public Domain

Working with the needle and syringe

Syringes come packaged in different ways:

  • A syringe can be packaged without a needle. A needle must be added to the syringe when giving an injection.
  • A syringe may be packaged with a needle that is not attached. The unit must be assembled.
  • A syringe and needle unit may come preassembled. Always tighten the needle on the syringe before using the unit.

The needle and syringe can be assembled with clean, ungloved hands.

When a syringe is packaged by itself, first open the syringe. When removing the syringe from the packaging, it is important not to touch the syringe tip to anything. The tip needs to remain sterile because it attaches to the needle. The syringe should be held until the needle is attached. As you are holding the syringe between your middle and ring fingers, use your thumbs and index fingers to open the needle package. It is important to hold down the packaging flaps to prevent contamination of the needle. Attach the syringe to the needle and lift the needle out of the package. The needle and syringe unit can be placed on the counter. The needle cover should remain on to protect the sterility of the needle.

When the needle and syringe are packaged together but not assembled, carefully open the packaging. Hold down the packaging flaps. Angle the contents so the syringe can be grasped without going over or touching the needle. Remove the syringe, then attach it to the needle. Remove the needle from the packaging. Once the syringe and needle are assembled, the unit can be placed on the counter.

When working with the plunger, only touch the section that remains outside of the syringe when the plunger is completely pushed in. Touching the plunger that goes inside the barrel could potentially contaminate the medication.

Uncapping and recapping needles

Never recap a needle that has been used on a patient. Needles can be recapped until they are used on a patient. As you prepare medication, you will need to uncap and recap the needle. It is important to maintain the sterility of the needle. If there is any doubt, consider the needle contaminated and replace it with a new one.

  • To uncap: Hold the cover between the fingers and thumb of your nondominant hand. Hold the syringe with the fingers and thumb of your dominant hand. Pull your hands apart horizontally (side to side) in a smooth continuous motion.
  • To recap: Use the one-handed scoop technique. Place the cover on a firm, flat surface. If the cover rolls, place a finger of your nondominant hand at the far end of the cover. This will keep the cover in place. Carefully insert the needle into the cover. If the needle touches the outside surface of the cover or any other surface, it is contaminated and must be replaced. Scoop up the cover and secure the cover onto the needle.

Switching needles

When switching needles, it is important not to give yourself a needlestick and to protect the sterility of the new needle. Several methods are used to switch needles. One method includes opening the new needle package. Hold the packaging flaps down with the index finger and thumb of your nondominant hand. With your dominant hand, place the syringe with the covered needle between the middle and ring fingers of your nondominant hand. Firmly grasp the covered needle in your palm. The syringe should be above the top of your hand. With your dominant hand, remove the syringe from the old needle and attach it to the new needle. Your nondominant hand should be holding both needles the entire time. Discard the old needle into the biohazardous sharps container.

Hypodermic needles

  • Parts: hub (attaches to syringe), hilt (attachment point), bevel (slanted end), lumen (hollow space, gauge size)
  • Entire needle must remain sterile

Gauge and length

  • Gauge: higher number = smaller lumen; lower number = larger, thicker needle
    • Thicker (lower gauge) for viscous meds/deeper injections
    • Thinner (higher gauge) for watery meds/superficial injections
  • Length: depends on injection type and patient size

Safety needles

  • Designed to prevent needlesticks
  • Types:
    • Passive: auto-cover after injection (e.g., insulin pens)
    • Active: requires user activation (protective sheaths/hinged shields, retractable needles)

Hypodermic syringes

  • Parts: barrel (holds medication), plunger (draws/pushes medication)
  • Tips: Luer-Lok (twist-lock), slip tip (push-on)
  • Sizes: commonly 1, 3, 5, 6, 10, 12 mL
  • Calibration marks for accurate dosing

Working with the needle and syringe

  • Packaging: may be separate, unassembled, or preassembled
  • Maintain sterility of syringe tip and needle
  • Only touch plunger section outside barrel

Uncapping and recapping needles

  • Never recap after patient use
  • Uncap: pull apart horizontally with both hands
  • Recap (before use): one-handed scoop technique, avoid contamination

Switching needles

  • Use safe technique to avoid needlesticks
  • Hold both needles during switch, discard old needle in sharps container

Preparing parenteral medication

  • Work in well-lit, distraction-free area
  • Discard medication if abnormal in color, clarity, expired, or non-sterile
  • Mix if normal precipitate; discard if abnormal precipitate

Using an ampule

  • Single-dose, all-glass container
  • Snap off neck with ampule opener
  • Use filter needle to withdraw medication (removal before injection)

Using a prefilled sterile cartridge

  • Single-dose, may contain excess medication
  • May require assembly with reusable holder (e.g., Carpuject, Tubex)
  • Attach safety needle if needed

Specialty syringe units

  • Designed for self-administration (e.g., insulin pens, EpiPen)
  • Dose set by dial (insulin pens); change needle for each use
  • EpiPen: automatic injector for anaphylaxis

Using a vial

  • Plastic/glass with rubber stopper, single or multidose
  • Single-dose: one patient, one procedure; no preservatives
  • Multidose: contains antimicrobial preservative, good for 28 days after opening (unless otherwise stated)
    • Label with new expiration date
    • Disinfect stopper, use sterile needle/syringe each entry
    • Inject air equal to amount withdrawn
    • Do not return unused medication to vial after needle removal

Sign up for free to take 12 quiz questions on this topic

Previous
Next  | 36.6 Reconstitution, mixing, and general injection guidelines
All rights reserved ©2016 - 2026 Achievable, Inc.

Needles and syringes

When administering injectable medication, the medical assistant must use the correct needle and syringe. Using the correct technique to uncap, recap, and switch needles is important for infection control. The following sections discuss needles, syringes, and the correct techniques to use when working with them.

Hypodermic needles

A hypodermic needle attaches to a hypodermic syringe. Hypodermic needles come with syringes or are packaged separately. The entire needle needs to remain sterile for the injection. It is important for the medical assistant to know the parts of the needle. The parts of a hypodermic needle include the following:

  • Hub: Attaches or screws onto the syringe
  • Hilt: Where the needle attaches
  • Bevel: Slanted end of the shaft
  • Lumen: Hollow space inside the needle; the size is indicated by the gauge number

Gauge and length

Each needle has two measurements: the gauge (G) and the length. The lumen size is indicated by the gauge and is given a numeric value. The higher the gauge number, the smaller the lumen. The thickness of the needle wall increases along with the lumen size. This means that an 18 G needle makes a larger hole than a 25 G needle. The 18 G needle has a thicker wall than the 25 G needle. As the gauge number increases, the needles bend more easily. Thicker-walled needles (smaller gauge numbers) are used for deeper injections. Thinner-walled needles (larger gauge numbers) are used for more superficial injections.

The medication’s viscosity is also an important factor when selecting the gauge of the needle. A medication with a syrupy thickness (high viscosity) would be harder to push out of a needle compared with a medication as thin as water. Using a wider lumen needle (smaller gauge number) would be better for thicker medications. Using a finer lumen needle (a larger gauge number) would be more appropriate for watery medications.

The needle length refers to the length of the shaft. The needle length used is dependent on the type of injection given and the size of the patient. The length of the needle for an intradermal injection is smaller than that used for an intramuscular injection. The length of an intramuscular injection needle for a 300-pound person would be longer than that for a 100-pound person. Knowing the length and gauge required for an injection are important information for the medical assistant.

Safety needles

Due to the Needlestick Safety and Prevention Act, safety needles are common in the ambulatory care setting. Safety needles are designed to reduce the risk of needlesticks after an injection. A passive safety needle is designed so that the needle is automatically covered after the injection. Passive safety needles are currently used with insulin pens (e.g., the BD AutoShield Duo pen needle). An active safety needle requires the healthcare professional to activate the safety device. These are most common for injections. Current active safety needles fall into two groups:

  • Protective sheaths and hinged needle shields: The safety device is a sleeve over the syringe barrel or a hinged needle shield. These devices are moved over the needle after the injection. Once they are in place, the needle cannot be uncovered. The risk of needlesticks decreases if the safety device is activated with the hand holding the syringe.
  • Retractable needles: After the injection, the healthcare professional activates a device that retracts the needle either into the syringe or into another chamber.

Hypodermic syringes

Hypodermic syringes attach to needles and hold the medication for the injection. They come in many sizes (e.g., 1, 3, 5, 6, 10, and 12 mL), but usually, the facility only stocks three or four sizes. The two parts of a syringe are considered to be the barrel and the plunger. Syringes can have either a Luer-Lok tip or a slip tip. Calibration marks are on the barrel of the syringe. It is important for the medical assistant to be able to read medication amounts in syringes.

Working with the needle and syringe

Syringes come packaged in different ways:

  • A syringe can be packaged without a needle. A needle must be added to the syringe when giving an injection.
  • A syringe may be packaged with a needle that is not attached. The unit must be assembled.
  • A syringe and needle unit may come preassembled. Always tighten the needle on the syringe before using the unit.

The needle and syringe can be assembled with clean, ungloved hands.

When a syringe is packaged by itself, first open the syringe. When removing the syringe from the packaging, it is important not to touch the syringe tip to anything. The tip needs to remain sterile because it attaches to the needle. The syringe should be held until the needle is attached. As you are holding the syringe between your middle and ring fingers, use your thumbs and index fingers to open the needle package. It is important to hold down the packaging flaps to prevent contamination of the needle. Attach the syringe to the needle and lift the needle out of the package. The needle and syringe unit can be placed on the counter. The needle cover should remain on to protect the sterility of the needle.

When the needle and syringe are packaged together but not assembled, carefully open the packaging. Hold down the packaging flaps. Angle the contents so the syringe can be grasped without going over or touching the needle. Remove the syringe, then attach it to the needle. Remove the needle from the packaging. Once the syringe and needle are assembled, the unit can be placed on the counter.

When working with the plunger, only touch the section that remains outside of the syringe when the plunger is completely pushed in. Touching the plunger that goes inside the barrel could potentially contaminate the medication.

Uncapping and recapping needles

Never recap a needle that has been used on a patient. Needles can be recapped until they are used on a patient. As you prepare medication, you will need to uncap and recap the needle. It is important to maintain the sterility of the needle. If there is any doubt, consider the needle contaminated and replace it with a new one.

  • To uncap: Hold the cover between the fingers and thumb of your nondominant hand. Hold the syringe with the fingers and thumb of your dominant hand. Pull your hands apart horizontally (side to side) in a smooth continuous motion.
  • To recap: Use the one-handed scoop technique. Place the cover on a firm, flat surface. If the cover rolls, place a finger of your nondominant hand at the far end of the cover. This will keep the cover in place. Carefully insert the needle into the cover. If the needle touches the outside surface of the cover or any other surface, it is contaminated and must be replaced. Scoop up the cover and secure the cover onto the needle.

Switching needles

When switching needles, it is important not to give yourself a needlestick and to protect the sterility of the new needle. Several methods are used to switch needles. One method includes opening the new needle package. Hold the packaging flaps down with the index finger and thumb of your nondominant hand. With your dominant hand, place the syringe with the covered needle between the middle and ring fingers of your nondominant hand. Firmly grasp the covered needle in your palm. The syringe should be above the top of your hand. With your dominant hand, remove the syringe from the old needle and attach it to the new needle. Your nondominant hand should be holding both needles the entire time. Discard the old needle into the biohazardous sharps container.

Key points

Hypodermic needles

  • Parts: hub (attaches to syringe), hilt (attachment point), bevel (slanted end), lumen (hollow space, gauge size)
  • Entire needle must remain sterile

Gauge and length

  • Gauge: higher number = smaller lumen; lower number = larger, thicker needle
    • Thicker (lower gauge) for viscous meds/deeper injections
    • Thinner (higher gauge) for watery meds/superficial injections
  • Length: depends on injection type and patient size

Safety needles

  • Designed to prevent needlesticks
  • Types:
    • Passive: auto-cover after injection (e.g., insulin pens)
    • Active: requires user activation (protective sheaths/hinged shields, retractable needles)

Hypodermic syringes

  • Parts: barrel (holds medication), plunger (draws/pushes medication)
  • Tips: Luer-Lok (twist-lock), slip tip (push-on)
  • Sizes: commonly 1, 3, 5, 6, 10, 12 mL
  • Calibration marks for accurate dosing

Working with the needle and syringe

  • Packaging: may be separate, unassembled, or preassembled
  • Maintain sterility of syringe tip and needle
  • Only touch plunger section outside barrel

Uncapping and recapping needles

  • Never recap after patient use
  • Uncap: pull apart horizontally with both hands
  • Recap (before use): one-handed scoop technique, avoid contamination

Switching needles

  • Use safe technique to avoid needlesticks
  • Hold both needles during switch, discard old needle in sharps container

Preparing parenteral medication

  • Work in well-lit, distraction-free area
  • Discard medication if abnormal in color, clarity, expired, or non-sterile
  • Mix if normal precipitate; discard if abnormal precipitate

Using an ampule

  • Single-dose, all-glass container
  • Snap off neck with ampule opener
  • Use filter needle to withdraw medication (removal before injection)

Using a prefilled sterile cartridge

  • Single-dose, may contain excess medication
  • May require assembly with reusable holder (e.g., Carpuject, Tubex)
  • Attach safety needle if needed

Specialty syringe units

  • Designed for self-administration (e.g., insulin pens, EpiPen)
  • Dose set by dial (insulin pens); change needle for each use
  • EpiPen: automatic injector for anaphylaxis

Using a vial

  • Plastic/glass with rubber stopper, single or multidose
  • Single-dose: one patient, one procedure; no preservatives
  • Multidose: contains antimicrobial preservative, good for 28 days after opening (unless otherwise stated)
    • Label with new expiration date
    • Disinfect stopper, use sterile needle/syringe each entry
    • Inject air equal to amount withdrawn
    • Do not return unused medication to vial after needle removal

More from Administering medications

  • Administering medications
  • Administering vaccines
  • Routes of medication
  • Intradermal injections and tuberculin testing
  • Reconstitution, mixing, and general injection guidelines