


Achievable logoAchievable logo
CCMA
Sign in
Sign up
Purchase
Textbook
Practice exams
Support
How it works
Resources
Exam catalog
Mountain with a flag at the peak
Textbook
Introduction
1. Medical assistant
2. Electronic records
3. Medical terminology and anatomy
4. The fundamentals of infection control
5. Introduction to vital signs
6. The patient interview and history
7. The physical examination
8. Appointment scheduling
9. Insurance billing
10. Diagnostic coding and the ICD-10-CM System
11. Procedural coding
12. Medical billing and reimbursement essentials
13. Assisting with medical specialties
14. Assisting with the musculoskeletal system
15. Assisting with the cardiovascular system
16. Assisting with the respiratory system
17. Assisting with the nervous system
18. Anatomy and physiology of the urinary system
19. Assisting in obstetrics and gynecology
20. Assisting in endocrinology
21. Assisting in ophthalmology & otolaryngology
22. Assisting in gastroenterology
23. Assisting in the immune & lymphatic systems
24. Assisting in pediatrics: the developmental stages and care
25. The medical assistant’s role in caring for the older patient
26. The role of the medical assistant in physical therapy examination and assessment
27. Preparing for minor surgery: room, solutions, and supplies
28. Introduction to the clinical laboratory
28.1 Introduction to the clinical laboratory
28.2 Government legislation and CLIA
28.3 Quality assurance & quality control
28.4 Safety in the laboratory
28.4.1 Chemical hazards
28.4.2 Biological and physical laboratory safety
28.4.3 Biohazards and physical hazards
28.4.4 Specimen collection, processing, and storage
28.4.5 Laboratory mathematics and measurement
28.4.6 Laboratory equipment: microscope and centrifuge
28.4.7 Laboratory equipment: incubator, coaching, and professional issues
29. Urinalysis
30. Blood collection
31. Analysis of blood
32. Electrocardiography and heart structure
33. The principles of pharmacology
34. Essential calculations and measurement systems
35. Solid, liquid, & solutions medication doses
36. Administering medications
37. Metabolism and core nutrient roles
38. Medical emergencies in the healthcare setting
Achievable logoAchievable logo
28.4.6 Laboratory equipment: microscope and centrifuge
Achievable CCMA
28. Introduction to the clinical laboratory
28.4. Safety in the laboratory

Laboratory equipment: microscope and centrifuge

10 min read
Font
Discuss
Share
Feedback

Laboratory equipment

The three most common pieces of equipment found in a clinical laboratory are a microscope, a centrifuge, and an incubator. It is important for medical assistants working in a clinical laboratory setting to have a basic understanding of these pieces of equipment. This chapter covers the microscope and the centrifuge; the incubator is covered in a later chapter, Laboratory equipment: incubator, coaching, and professional issues.

Common units of measure seen in healthcare

Volume Length Weight
Liter (L) Meter (m) Gram (g)
Milliliter (mL or ml) Centimeter (cm) Kilogram (kg)
Cubic centimeter (cc) Millimeter (mm) Milligram (mg)
cc = mL Microgram (mcg)

Microscope

Nearly every medical laboratory is equipped with a microscope. This indispensable instrument is used to view objects too small to be seen with the naked eye. The microscope is used to evaluate stained blood smears, urine sediment, vaginal secretions, and smears made from body fluids and microorganisms.

Microscopic procedures are not considered CLIA-waived tests because they require judgment and additional training. In addition, an error in reading microscopic tests may have a detrimental effect on the patient’s care. Providers petitioned the CMS to create a new laboratory category that would allow them to perform a set of simple microscopic tests that could be performed in the ambulatory setting. The CMS approved the list and created an additional CLIA category called provider-performed microscopy procedures (PPMP). Laboratories with a PPM certificate must meet quality requirements like those for moderate-complexity testing. CLIA does not require them to enroll in proficiency testing for PPM procedures, but they must verify the accuracy of each PPM procedure at least twice a year. The medical assistant is taught how to prepare the microscope slide and bring it into focus. The final analysis of a microscope slide must be made by one of the following personnel:

  • Physician (medical doctor, doctor of osteopathy, or doctor of podiatric medicine)
  • Mid level practitioner (nurse midwife, nurse practitioner, or physician’s assistant)
  • Dentist (doctor of dental surgery or doctor of dental medicine) trained as a laboratory professional with CLIA moderate- or high-complexity training
  • A CLS or CLT trained in moderate and highly complex testing

Scope of practice: the medical assistant prepares the microscope slide and brings it into focus, but the final microscopic interpretation must be rendered by an authorized provider (per CLIA/PPMP) — a physician, a mid-level practitioner, a suitably trained dentist, or a CLS/CLT trained at the test’s complexity level.

Microscopes have three components:

  • The magnification system, which forms and enlarges the image (the ocular and objective lenses, plus the fine and coarse focus knobs)
  • The illumination system, which provides and directs the light that passes through the specimen (the light source, condenser, and iris diaphragm)
  • The framework, which includes all components responsible for positioning the slide

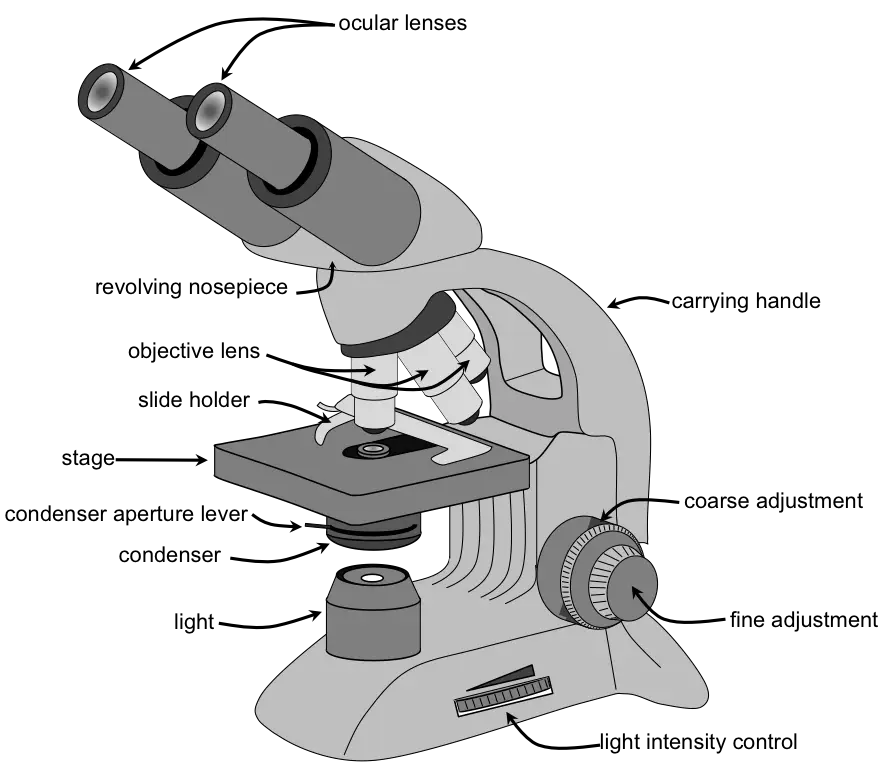
The magnification system includes the ocular and objective lenses, plus the fine and coarse knobs used to adjust the clarity. Microscopes may be monocular or binocular. A monocular microscope has one eyepiece for viewing, and a binocular microscope has two. The eyepiece, or ocular, is located at the top of the microscope and contains a lens to magnify what is being viewed.

The usual ocular magnification is 10 times (10×). In addition to the ocular, compound microscopes have objective lenses that increase the magnification of the specimen. The objectives are attached to the revolving nosepiece. Most microscopes have four objectives, each with a different magnifying power:

  • The shortest objective has the lowest power (4×) and is called the scanning lens. This lens is used to scan the field of interest and then focus on a particular object.
  • Greater detail is observed with the next longest objective, which is low power (10×).
  • The high or high dry objective usually has a magnification of 40× or 45×.
  • The longest objective, oil immersion (100×), allows the finest focusing of the object and requires the use of a special oil that is placed directly on the slide. This special oil, called immersion oil, prevents refraction of the light and improves the resolution (clarity) of the magnified image. Oil immersion is used to view cells and extremely small materials (e.g., bacteria and platelets) and to examine stained specimens.

The total magnification of the specimen is determined by multiplying the magnification of the objective lens by 10 (the magnification of the ocular lens). Therefore, if you have the 10× objective in place when observing blood cells, you are magnifying the image 100 times. Just above the base are the focusing knobs. The coarse adjustment is used only with scanning and low-power lenses, and the fine adjustment is used with high-power and oil immersion lenses.

The arm of the microscope connects the objectives and the oculars to the base, which supports the microscope and contains its light source. The stage of the microscope holds the slide to be viewed. Under the stage is the light source, the condenser, and the iris diaphragm, which make up the illumination system. The condenser directs light up through the slide, and the iris diaphragm regulates the amount of light passing through the specimen.

Microscopes are very precise and expensive instruments that require careful handling. The amount of routine maintenance required depends on the amount of daily use. Dirt is the enemy of the microscope, which must be kept very clean at all times. Oil, makeup, dust, and eye secretions can all obstruct vision through the lens and may transmit infective organisms. The microscope should always be stored in a plastic dust cover when not in use. Lenses should be cleaned before and after each use with lens paper and lens cleaner. Any other type of tissue scratches the lenses or leaves lint residue behind. Routine use of solvent cleaners, such as xylene, is not recommended because these cleaners may loosen a lens. The body of the microscope should be dusted with a soft cloth.

Parts of a compound light microscope labeled
Microscope parts
Wikimedia Commons
/
Public Domain

The microscope should be placed in a permanent location in the laboratory, on a sturdy table, in an area where it cannot be bumped. If a microscope must be moved, it should be carried securely, with one hand supporting the base and the other holding the arm. When the microscope is stored, it should be left covered with the low-power objective in the highest position. The stage should be centered.

Using a microscope involves focusing and illumination. The image is focused by moving the objectives closer to the specimen using the fine and coarse knobs. Proper focusing begins with the objective at the lowest power. The coarse adjustment moves the objective quickly. This knob is used first to bring the specimen into approximate focus. The fine adjustment focus knob then brings the specimen into precise focus. The fine focus moves the objective more slowly to allow the viewer to zero in on the specimen with greater accuracy. Illumination is accomplished by raising or lowering the condenser and by opening and closing the diaphragm on the condenser.

If the microscope is a binocular model, the eyepieces may need to be adjusted to accommodate the distance between the pupils and the individual’s point of greatest visual acuity. A gentle push inward or pull outward adjusts the distance between the eyepieces.

Centrifuge

A centrifuge is an instrument that is used to separate solids from liquids. A centrifuge works by rapidly spinning the specimen, which increases the gravitational force. The increased force pushes the heavier solids to the bottom of the specimen and lets lighter liquids remain at the top of the specimen. Centrifugation is used to separate blood cells from serum or plasma. It is also used to separate solid materials in urine specimens, such as cells and crystals.

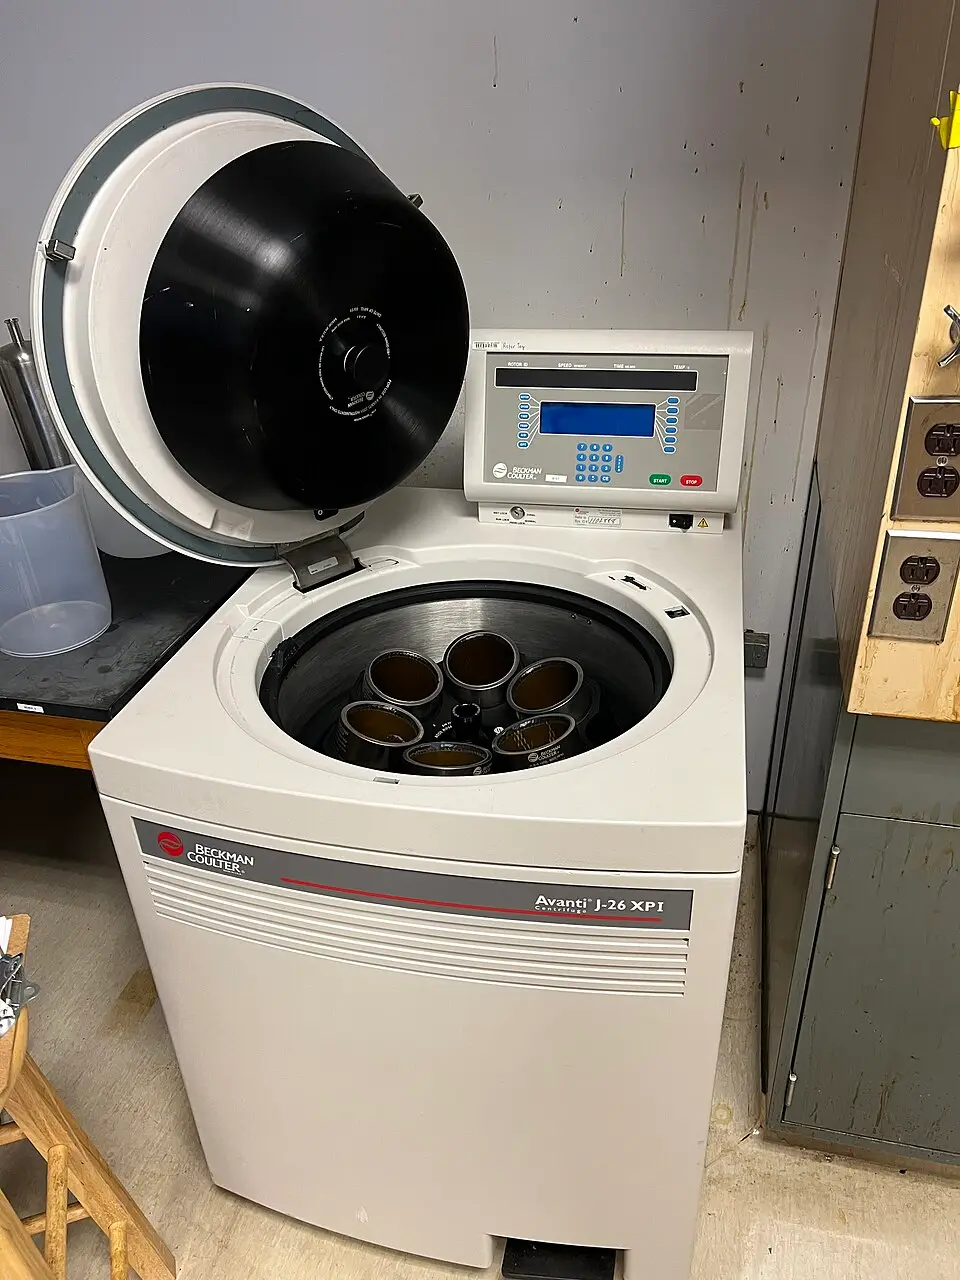
Centrifuges are designed for specific uses. They may be bench-top or floor models; some may be refrigerated. Some may have rotating parts or members known as rotors or heads that are interchangeable to accommodate different-sized sample tubes. Centrifuge configurations vary with the laboratory task that needs to be done. Here are the three common configurations used in the clinical laboratory:

  • A centrifuge that has a fixed-angle rotor, where specimen cups are held in a rigid position at a fixed angle
  • A centrifuge that has a horizontal head with buckets that swing out horizontally during centrifugation
  • A centrifuge used for centrifuging capillary tubes for microhematocrit testing

Directions for using a centrifuge usually are given in terms of revolutions per minute (rpm). Spinning generates centrifugal force, causing the heaviest particles in a liquid to migrate to the bottom of the tube. Centrifuges can be dangerous if not used correctly. The most important rule is to ensure that the centrifuge is balanced so that tubes of equal size and equal volume are directly across from one another in the rotor holders or buckets. Therefore, there must always be an even number of tubes in the centrifuge. An exception to this rule is if there is one empty space between each tube, then there can be an odd number of tubes. If a second specimen of the same volume in the same-sized tube is not available for balance, a tube of water may be used to balance the load. Tubes being centrifuged should be capped to prevent samples from creating aerosols during spinning. Rubber cups should be placed at the bottom of the carrier cups to prevent breakage of the glass tubes.

Laboratory centrifuge used to separate blood components
Centrifuge
Wikimedia Commons
/
CC0 (Creative Commons Zero)

Centrifuges should never be opened while they are in operation, nor should you attempt to slow a centrifuge with your hands. Most centrifuges are equipped with a brake, which should be used only in an emergency, the most common of which is a broken glass tube. In this case, wait until the centrifuge comes to a complete stop and follow the manufacturer’s instructions for disinfecting the unit; also, follow Standard Precautions to prevent injury and disease transmission.

Centrifuges should be regularly checked, cleaned, and lubricated to ensure proper operation. A certified technician must ensure the centrifuge’s speed to comply with quality assurance guidelines set forth by the College of American Pathologists (CAP).

Laboratory equipment

  • Three main types: microscope, centrifuge, incubator
  • Essential for specimen analysis and processing

Common units of measure seen in healthcare

  • Volume: Liter (L), milliliter (mL), cubic centimeter (cc = mL)
  • Length: Meter (m), centimeter (cm), millimeter (mm)
  • Weight: Gram (g), kilogram (kg), milligram (mg), microgram (mcg)

Microscope

  • Used for viewing microscopic specimens (e.g., blood, urine, microorganisms)
  • Three main components:
    • Magnification system (ocular and objective lenses, fine/coarse focus)
    • Illumination system (light source, condenser, iris diaphragm)
    • Framework (arm, base, stage)
  • Objective lenses: scanning (4×), low power (10×), high dry (40×/45×), oil immersion (100×)
    • Total magnification = ocular × objective (e.g., 10× × 40× = 400×)
  • Maintenance: clean lenses with lens paper, store covered, handle carefully

Centrifuge

  • Separates solids from liquids by spinning specimens
  • Types: fixed-angle rotor, horizontal head (swinging bucket), microhematocrit
  • Key operation rules:
    • Balance tubes (equal size/volume, even number or spaced evenly)
    • Cap tubes to prevent aerosols
    • Never open while spinning; use brake only in emergencies
  • Regular maintenance and speed checks required

Incubator

  • Maintains constant temperature (usually 35°–37°C) for microbiology cultures
  • Features: temperature alarms, daily monitoring, regular cleaning
  • Documentation of maintenance procedures required

Patient coaching

  • Provide clear verbal and written instructions for testing (e.g., fasting requirements)
  • Review provider’s orders before instructing patient
  • Include contact information for patient questions

Legal and ethical issues

  • Follow safety guidelines and document all actions
  • Report potential safety problems to supervisors
  • Commitment to safety protects patients, self, and coworkers

Patient-centered care

  • Provider must review and sign test results before informing patient
  • Follow HIPAA guidelines for privacy and confidentiality
  • Only authorized personnel may communicate results

Professional behaviors

  • Develop skills in patient education, specimen collection, and documentation
  • Adhere to CLIA-waived test protocols and professionalism standards

Sign up for free to take 17 quiz questions on this topic

Previous
Next  | 28.4.7 Laboratory equipment: incubator, coaching, and professional issues
All rights reserved ©2016 - 2026 Achievable, Inc.

Laboratory equipment: microscope and centrifuge

Laboratory equipment

The three most common pieces of equipment found in a clinical laboratory are a microscope, a centrifuge, and an incubator. It is important for medical assistants working in a clinical laboratory setting to have a basic understanding of these pieces of equipment. This chapter covers the microscope and the centrifuge; the incubator is covered in a later chapter, Laboratory equipment: incubator, coaching, and professional issues.

Common units of measure seen in healthcare

Volume Length Weight
Liter (L) Meter (m) Gram (g)
Milliliter (mL or ml) Centimeter (cm) Kilogram (kg)
Cubic centimeter (cc) Millimeter (mm) Milligram (mg)
cc = mL Microgram (mcg)

Microscope

Nearly every medical laboratory is equipped with a microscope. This indispensable instrument is used to view objects too small to be seen with the naked eye. The microscope is used to evaluate stained blood smears, urine sediment, vaginal secretions, and smears made from body fluids and microorganisms.

Microscopic procedures are not considered CLIA-waived tests because they require judgment and additional training. In addition, an error in reading microscopic tests may have a detrimental effect on the patient’s care. Providers petitioned the CMS to create a new laboratory category that would allow them to perform a set of simple microscopic tests that could be performed in the ambulatory setting. The CMS approved the list and created an additional CLIA category called provider-performed microscopy procedures (PPMP). Laboratories with a PPM certificate must meet quality requirements like those for moderate-complexity testing. CLIA does not require them to enroll in proficiency testing for PPM procedures, but they must verify the accuracy of each PPM procedure at least twice a year. The medical assistant is taught how to prepare the microscope slide and bring it into focus. The final analysis of a microscope slide must be made by one of the following personnel:

  • Physician (medical doctor, doctor of osteopathy, or doctor of podiatric medicine)
  • Mid level practitioner (nurse midwife, nurse practitioner, or physician’s assistant)
  • Dentist (doctor of dental surgery or doctor of dental medicine) trained as a laboratory professional with CLIA moderate- or high-complexity training
  • A CLS or CLT trained in moderate and highly complex testing

Scope of practice: the medical assistant prepares the microscope slide and brings it into focus, but the final microscopic interpretation must be rendered by an authorized provider (per CLIA/PPMP) — a physician, a mid-level practitioner, a suitably trained dentist, or a CLS/CLT trained at the test’s complexity level.

Microscopes have three components:

  • The magnification system, which forms and enlarges the image (the ocular and objective lenses, plus the fine and coarse focus knobs)
  • The illumination system, which provides and directs the light that passes through the specimen (the light source, condenser, and iris diaphragm)
  • The framework, which includes all components responsible for positioning the slide

The magnification system includes the ocular and objective lenses, plus the fine and coarse knobs used to adjust the clarity. Microscopes may be monocular or binocular. A monocular microscope has one eyepiece for viewing, and a binocular microscope has two. The eyepiece, or ocular, is located at the top of the microscope and contains a lens to magnify what is being viewed.

The usual ocular magnification is 10 times (10×). In addition to the ocular, compound microscopes have objective lenses that increase the magnification of the specimen. The objectives are attached to the revolving nosepiece. Most microscopes have four objectives, each with a different magnifying power:

  • The shortest objective has the lowest power (4×) and is called the scanning lens. This lens is used to scan the field of interest and then focus on a particular object.
  • Greater detail is observed with the next longest objective, which is low power (10×).
  • The high or high dry objective usually has a magnification of 40× or 45×.
  • The longest objective, oil immersion (100×), allows the finest focusing of the object and requires the use of a special oil that is placed directly on the slide. This special oil, called immersion oil, prevents refraction of the light and improves the resolution (clarity) of the magnified image. Oil immersion is used to view cells and extremely small materials (e.g., bacteria and platelets) and to examine stained specimens.

The total magnification of the specimen is determined by multiplying the magnification of the objective lens by 10 (the magnification of the ocular lens). Therefore, if you have the 10× objective in place when observing blood cells, you are magnifying the image 100 times. Just above the base are the focusing knobs. The coarse adjustment is used only with scanning and low-power lenses, and the fine adjustment is used with high-power and oil immersion lenses.

The arm of the microscope connects the objectives and the oculars to the base, which supports the microscope and contains its light source. The stage of the microscope holds the slide to be viewed. Under the stage is the light source, the condenser, and the iris diaphragm, which make up the illumination system. The condenser directs light up through the slide, and the iris diaphragm regulates the amount of light passing through the specimen.

Microscopes are very precise and expensive instruments that require careful handling. The amount of routine maintenance required depends on the amount of daily use. Dirt is the enemy of the microscope, which must be kept very clean at all times. Oil, makeup, dust, and eye secretions can all obstruct vision through the lens and may transmit infective organisms. The microscope should always be stored in a plastic dust cover when not in use. Lenses should be cleaned before and after each use with lens paper and lens cleaner. Any other type of tissue scratches the lenses or leaves lint residue behind. Routine use of solvent cleaners, such as xylene, is not recommended because these cleaners may loosen a lens. The body of the microscope should be dusted with a soft cloth.

The microscope should be placed in a permanent location in the laboratory, on a sturdy table, in an area where it cannot be bumped. If a microscope must be moved, it should be carried securely, with one hand supporting the base and the other holding the arm. When the microscope is stored, it should be left covered with the low-power objective in the highest position. The stage should be centered.

Using a microscope involves focusing and illumination. The image is focused by moving the objectives closer to the specimen using the fine and coarse knobs. Proper focusing begins with the objective at the lowest power. The coarse adjustment moves the objective quickly. This knob is used first to bring the specimen into approximate focus. The fine adjustment focus knob then brings the specimen into precise focus. The fine focus moves the objective more slowly to allow the viewer to zero in on the specimen with greater accuracy. Illumination is accomplished by raising or lowering the condenser and by opening and closing the diaphragm on the condenser.

If the microscope is a binocular model, the eyepieces may need to be adjusted to accommodate the distance between the pupils and the individual’s point of greatest visual acuity. A gentle push inward or pull outward adjusts the distance between the eyepieces.

Centrifuge

A centrifuge is an instrument that is used to separate solids from liquids. A centrifuge works by rapidly spinning the specimen, which increases the gravitational force. The increased force pushes the heavier solids to the bottom of the specimen and lets lighter liquids remain at the top of the specimen. Centrifugation is used to separate blood cells from serum or plasma. It is also used to separate solid materials in urine specimens, such as cells and crystals.

Centrifuges are designed for specific uses. They may be bench-top or floor models; some may be refrigerated. Some may have rotating parts or members known as rotors or heads that are interchangeable to accommodate different-sized sample tubes. Centrifuge configurations vary with the laboratory task that needs to be done. Here are the three common configurations used in the clinical laboratory:

  • A centrifuge that has a fixed-angle rotor, where specimen cups are held in a rigid position at a fixed angle
  • A centrifuge that has a horizontal head with buckets that swing out horizontally during centrifugation
  • A centrifuge used for centrifuging capillary tubes for microhematocrit testing

Directions for using a centrifuge usually are given in terms of revolutions per minute (rpm). Spinning generates centrifugal force, causing the heaviest particles in a liquid to migrate to the bottom of the tube. Centrifuges can be dangerous if not used correctly. The most important rule is to ensure that the centrifuge is balanced so that tubes of equal size and equal volume are directly across from one another in the rotor holders or buckets. Therefore, there must always be an even number of tubes in the centrifuge. An exception to this rule is if there is one empty space between each tube, then there can be an odd number of tubes. If a second specimen of the same volume in the same-sized tube is not available for balance, a tube of water may be used to balance the load. Tubes being centrifuged should be capped to prevent samples from creating aerosols during spinning. Rubber cups should be placed at the bottom of the carrier cups to prevent breakage of the glass tubes.

Centrifuges should never be opened while they are in operation, nor should you attempt to slow a centrifuge with your hands. Most centrifuges are equipped with a brake, which should be used only in an emergency, the most common of which is a broken glass tube. In this case, wait until the centrifuge comes to a complete stop and follow the manufacturer’s instructions for disinfecting the unit; also, follow Standard Precautions to prevent injury and disease transmission.

Centrifuges should be regularly checked, cleaned, and lubricated to ensure proper operation. A certified technician must ensure the centrifuge’s speed to comply with quality assurance guidelines set forth by the College of American Pathologists (CAP).

Key points

Laboratory equipment

  • Three main types: microscope, centrifuge, incubator
  • Essential for specimen analysis and processing

Common units of measure seen in healthcare

  • Volume: Liter (L), milliliter (mL), cubic centimeter (cc = mL)
  • Length: Meter (m), centimeter (cm), millimeter (mm)
  • Weight: Gram (g), kilogram (kg), milligram (mg), microgram (mcg)

Microscope

  • Used for viewing microscopic specimens (e.g., blood, urine, microorganisms)
  • Three main components:
    • Magnification system (ocular and objective lenses, fine/coarse focus)
    • Illumination system (light source, condenser, iris diaphragm)
    • Framework (arm, base, stage)
  • Objective lenses: scanning (4×), low power (10×), high dry (40×/45×), oil immersion (100×)
    • Total magnification = ocular × objective (e.g., 10× × 40× = 400×)
  • Maintenance: clean lenses with lens paper, store covered, handle carefully

Centrifuge

  • Separates solids from liquids by spinning specimens
  • Types: fixed-angle rotor, horizontal head (swinging bucket), microhematocrit
  • Key operation rules:
    • Balance tubes (equal size/volume, even number or spaced evenly)
    • Cap tubes to prevent aerosols
    • Never open while spinning; use brake only in emergencies
  • Regular maintenance and speed checks required

Incubator

  • Maintains constant temperature (usually 35°–37°C) for microbiology cultures
  • Features: temperature alarms, daily monitoring, regular cleaning
  • Documentation of maintenance procedures required

Patient coaching

  • Provide clear verbal and written instructions for testing (e.g., fasting requirements)
  • Review provider’s orders before instructing patient
  • Include contact information for patient questions

Legal and ethical issues

  • Follow safety guidelines and document all actions
  • Report potential safety problems to supervisors
  • Commitment to safety protects patients, self, and coworkers

Patient-centered care

  • Provider must review and sign test results before informing patient
  • Follow HIPAA guidelines for privacy and confidentiality
  • Only authorized personnel may communicate results

Professional behaviors

  • Develop skills in patient education, specimen collection, and documentation
  • Adhere to CLIA-waived test protocols and professionalism standards

More from Safety in the laboratory

  • Chemical hazards
  • Biological and physical laboratory safety
  • Biohazards and physical hazards
  • Specimen collection, processing, and storage
  • Laboratory mathematics and measurement